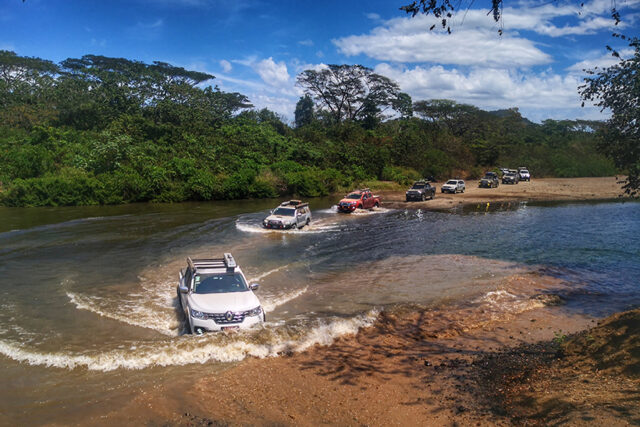
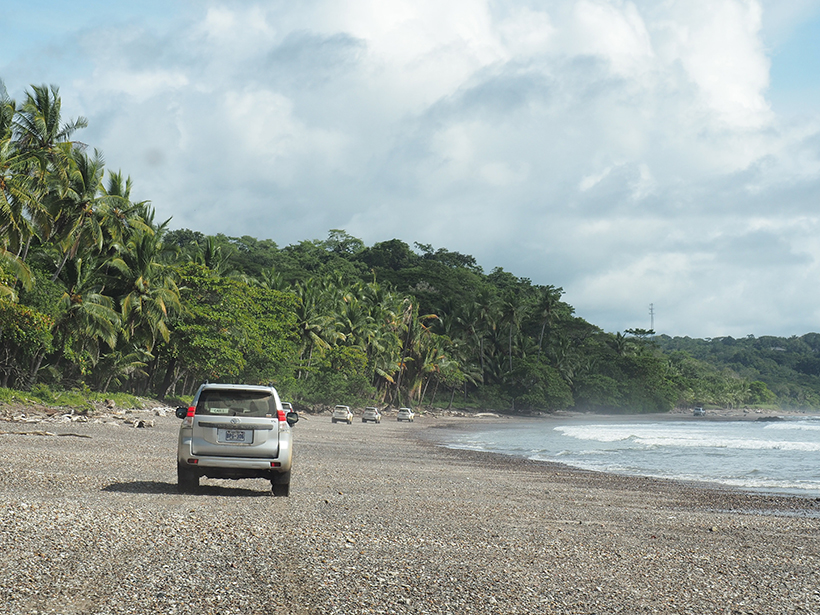
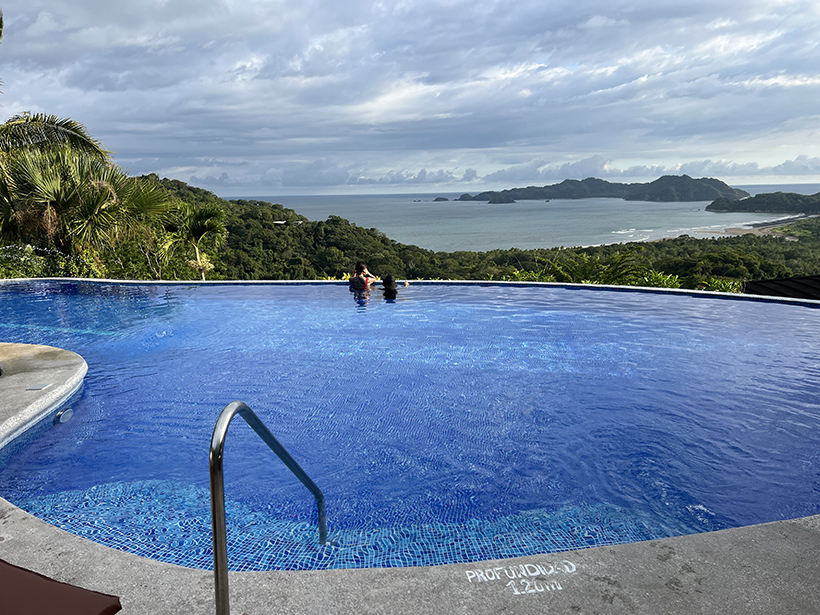
Four Points Adventures: While you may have been to Costa Rica, this is an opportunity to see parts of the country that tourists rarely venture into. You will have the opportunity to drive a new Land Cruiser (Prado 250) on back roads and trails and get to experience some of the more remote small villages while enjoying luxury accommodations each night. Some of the highlights of this itinerary include beaches, jungle trails, hanging bridges, and even a night in a treehouse.
While we have arranged some special boutique luxury accommodations from beach resorts to jungle campesinos for the evenings, the days will be filled with the adventurous overlanding experiences you have come to expect from Four Points. We will navigate mud, rivers, and remote mountain roads that will provide great Overland training opportunities and the chance to put that training to the test in real-time situations.
You may already be familiar with Costa Rica but the safe, politically stable, and friendly vibe coupled with some truly remote backcountry opportunities brought it to the top of our list for our international destination in 2025. It is a great way to combine an exotic warm weather vacation with some overland fun in an environment that is predictable and easily navigated culturally. We have lined up some great food and cultural stops along the way and I am excited to offer this to a special group as Four Points Adventures begins to venture beyond North America.
With most overland rigs being heavy beasts and notoriously sluggish, any aftermarket gadget that helps reduce throttle lag and potentially improve gas mileage is worth looking at. Enter the Ultimate9 evcX throttle controller.
Installation: This was a 15 minute install and the only difficulty was unplugging the factory wiring harness from the 4Runner pedal. However, once we had that taken care of, it’s as simple as plugging one end of the Ultimate9 harness into the pedal and the other end into the original factory wiring harness. After that, just run the USC-B cable from the pedal to the dash mounted controller and that’s it. After the install, download the app onto your phone and either key in the last 4 digits of the ID # provided on the wiring harness (or in app, scan the bar code and this will be done automatically).
Ultimate9 evcX Modes:
Ultimate9 Mode: For maximum throttle enhancement. Ultimate9 mode instantly sets the pedal response to our highest setting.
Ultimate Mode: Enhance your throttle response and choose from 9 levels of sensitivity to fine-tune your vehicle’s response.
Launch Mode: Improve those takeoffs with controlled, maximum throttle enhancement. Launch Mode’s initial response is modified compared to Ultimate9 mode to try and reduce wheel spin & increase traction.
Adapt Mode: Take the guesswork out. Let Adapt Mode choose the best Ultimate throttle response based on your pedal input.
Eco Mode: Subdue your initial throttle response for greater control on loose, uneven surfaces such as when off-road. With 9 levels to choose from, Eco Mode is great for off-road, heavy traffic and low-speed towing manoeuvres. Try your luck and see if you can gain more economy from your vehicle!
Anti-Slip Mode: Reduce your throttle response and limit your RPM to help increase traction. With 9 levels of sensitivity, gain more control when navigating slippery surfaces such as snow, ice and mud.
Valet Mode: Designed for parking, Valet mode reduces throttle response whilst limiting the available throttle to provide approximately 50% maximum RPM.
Factory Mode: Replicates factory throttle settings, ideal for sharing your vehicle with an unfamiliar driver
Lock Mode: Add an extra level of security to your vehicle. Block all throttle input from the accelerator pedal and immobilise your vehicle.
With the engine turned on, you can connect via Bluetooth into the app. Once in the app scroll around the mode dashboard with each mode change updating instantly to the Ultimate9 controller.
Our Take: Every driver and vehicle is unique, and that’s exactly why the flexibility and adjustability of the Ultimate9 EVCX stand out. On long highway drives, Econ Mode makes perfect sense—boosting fuel efficiency by at least 10%, making the device pay for itself in no time.
Need instant throttle response? Ultimate9 Mode drastically reduces lag, giving your vehicle a noticeable boost. For everyday driving, we’ve found Adapt Mode to be the sweet spot—it intelligently adjusts to your driving style for the best overall results. And for security, Lock Mode disables the throttle pedal entirely, adding an extra layer of protection for your rig.
Bottom line: The Ultimate9 EVCX delivers on its promises. It’s an affordable, worthwhile upgrade that enhances performance and can quickly pay for itself. Every driving condition from pavement to off-road or snow and ice, demands a different level of throttle response and the Ultimate9 provides the options required for an improved driver experience.
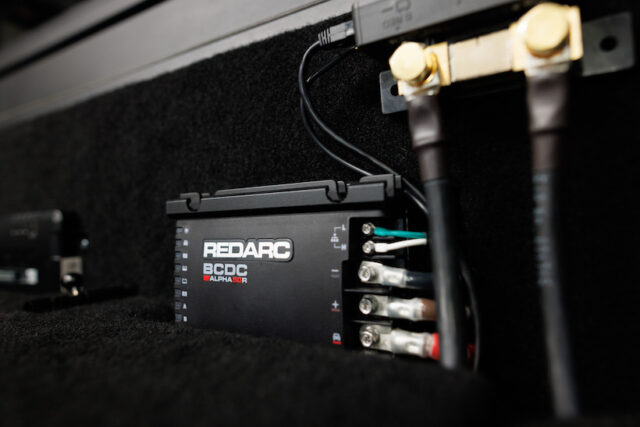
Now available in a 50A model, the BCDC Alpha Renhances the capabilities of REDARC’s BCDC range, offering unprecedented smart charging and monitoring features.
It’s more than a charger; it’s a mini vehicle power management system. The BCDC Alpha R is a cutting-edge DC-DC charger designed to keep your auxiliary battery charged using power from both your vehicle’s alternator and solar panels. This ensures you always have reliable energy for your essential off-grid needs, such as powering fridges, lights, laptops, and even household appliances. Whether you’re camping, overlanding, or working remotely, the BCDC Alpha R keeps your power system running smoothly and worry-free.
The BCDC Alpha R represents the pinnacle of charging technology in the BCDC lineup. This model builds on the key features of the original BCDC Alpha while introducing additional functionality. The BCDC Alpha R will give you:
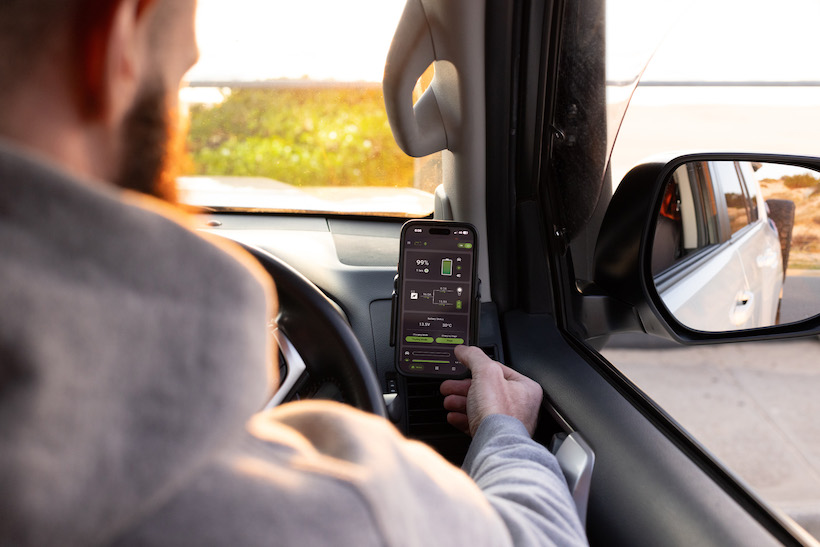
Instant Insight: Monitor your setup remotely via the RedVision app or display. Similar to the monitoring capabilities of the Manager Alpha, this system provides instant insight into battery percentage, remaining charge, and current flow per input/output, ensuring detailed oversight of your power needs. Avoid ‘power anxiety’ by always knowing how much power you are using and what you have left.
Total System Connectivity: Seamless integration with RedVision and TVMS products for a comprehensive power management system, and on-air updates ensure you always have the most updated technology. When used with the TVMS, users have the ability to switch on/off systems like lights and appliances directly through the RedVision app or display.
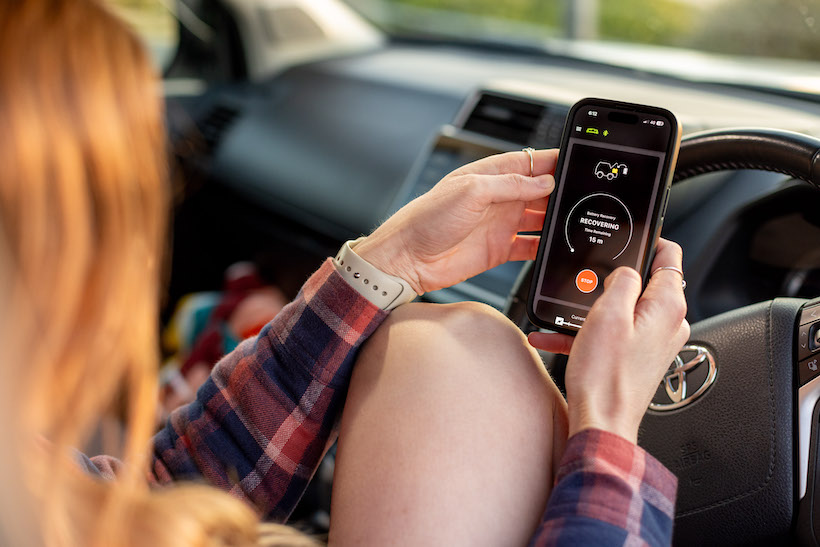
Never worry about a dead vehicle start battery: The REDARC BCDC Alpha range are the only DC-DC chargers that offers both start battery charging and recovery. Recover your flat start battery in just 15 minutes with the push of a button, getting you back on the road quickly and safely.
Optimized Charging: Automatically adjusts charge mode in real time to meet a battery’s needs, maximizing efficiency and extending battery life.
The BCDC Alpha R retains the renowned functionalities of the BCDC Alpha, including compatibility with hybrid and electric vehicles, start battery recovery and charging, plus the capability for over-the-air updates. Installation is simple with pushbutton interface and screw connections, with no need for soldering.
“The BCDC Alpha R is our most sophisticated BCDC yet, enhancing the original model by integrating advanced system connectivity and control,” said Peter Favilla, REDARC’s Global President. “With visibility to battery state of charge, start battery recovery, and vastly simplified installation, this offering enables the end user to power their adventures and remove power anxiety.”
The BCDC Alpha R, designed for in-cabin installation, comes packaged with REDARC’s Smart Battery Monitor (BSEN500) for advanced state of charge monitoring. For those looking to customize their setup further, optional TVMS systems and RedVision displays are available.
To Learn More of the BCDC Alpha Series and explore REDARC’s full range of innovative products CLICK HERE
I’ve lived in Moab for almost twenty years. A Southern Utah OG adventure town, Moab attracts over three million annual visitors from every corner of the world and though I adore my hometown, occasionally I need to escape the buzzing energy that is our tourist season. Recently, I did just that with a two-day photography trip through the other two thirds of southern Utah in my newly acquired Toyota Land Cruiser.
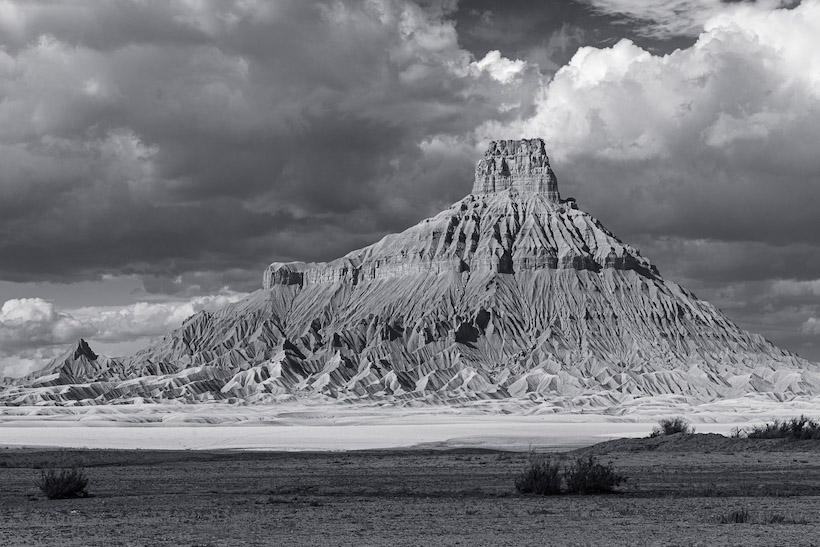
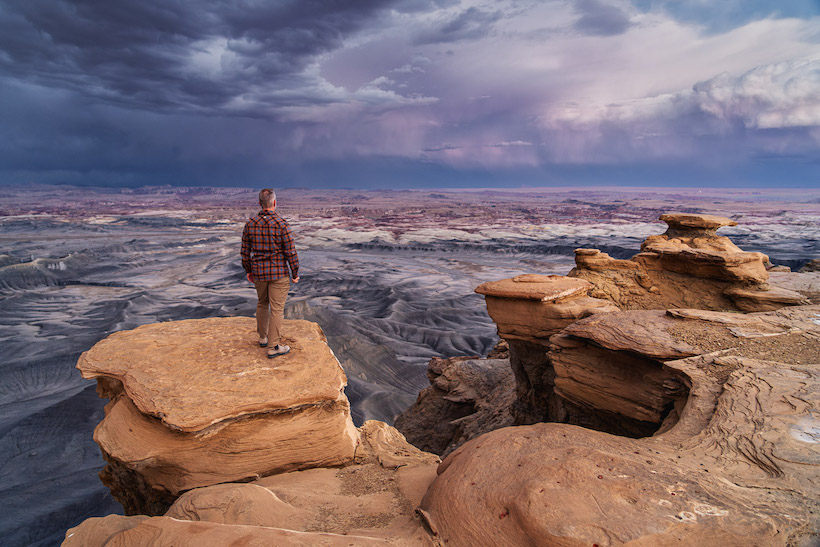
I left Moab for Hanksville late Thursday morning under moody and somewhat ominous skies. Arriving at a turnoff that would take me to two spires surrounded by colorful badlands, I drove through great clouds of dust whipped up by powerful winds. This would usually be an easy and pleasant hike but in the wind, it became a test of my mental fortitude. I arrived at the first spire, where I made several images under rapidly changing conditions. Suddenly, a tidal wave of wind and dust blew past me. I glanced over my shoulder to the south and saw dark clouds marching toward me. Clay badlands are a terrible place to be in the rain, so I beat feet back to my truck. I hit pavement just as the first drops of rain fell on my windshield.
Storm Clouds Boil Above Factory Butte near Hanksville, Utah
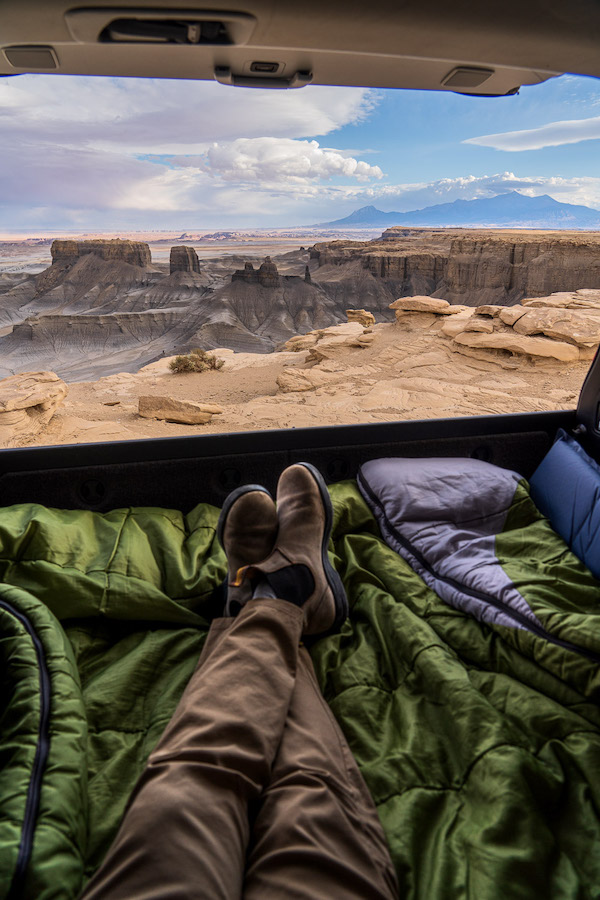
I pressed on to my next southern Utah destination, an overlook popular with the Instagram crowd where I planned to spend the night. Several miles of driving on a number of dirt roads deposited me at the tip of a peninsula with breathtaking views in every direction.
Moonscape Overlook, Utah
I spent several hours exploring the canyon rim, enjoying and photographing the ever-changing perspectives. Following a dramatic sunset, I crawled into a makeshift bed in the back of my truck, where I watched the canyon below disappear into darkness through the dusty rear window. A brilliant flash of light, immediately followed by the distinctive crack of thunder, woke me from a deep sleep. An intense thunderstorm had settled directly overhead, and rain was falling in waves. I somehow fell asleep with the storm raging outside and when I awoke at sunrise, I was disappointed to discover that the entire eastern horizon was hidden behind a curtain of clouds. There would be no blazing sunrise light today. On the drive out, I encountered a few short sections of clay that were all bookended by sandstone slabs. Each time, just as my vehicle started sliding in the clay, the front tires would grab onto sandstone and pull me away from catastrophe. By the time I made it back to the highway my nerves were shot, I was hungry and desperate for caffeine.
Enjoying the View of Moonscape Overlook from Back of Toyota Land Cruiser, Utah
I cruised quickly through Capitol Reef as the cottonwood trees had yet to recognize that it was autumn. I stopped in the small southern Utah town of Torrey for food and fuel, grabbing a delicious breakfast burrito and chai latte at the Wild Rabbit Café, then pointed my truck south on Highway 12.
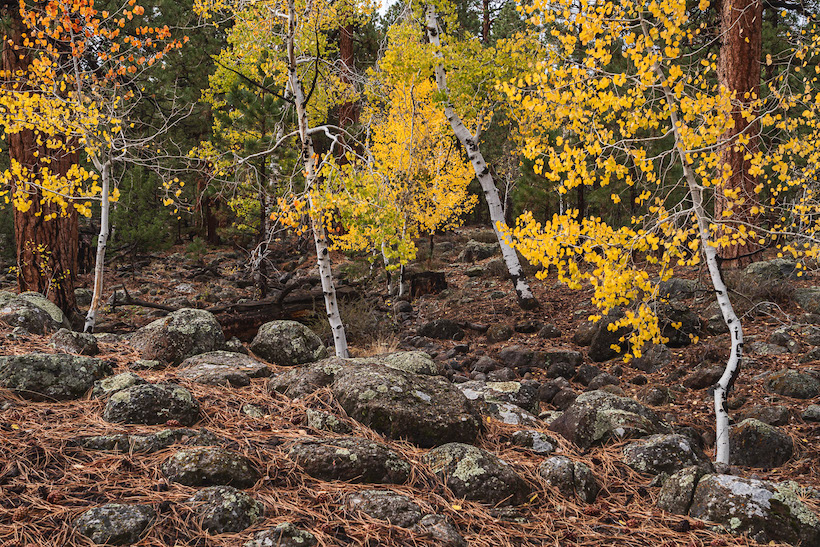
Snow had fallen at higher elevations. It was already mid-October, and though Boulder Mountain is home to some of the largest aspen groves in the West, I didn’t expect to find any yellow leaves. I rounded a corner and was shocked to see several small aspens ablaze in color! Much to my delight, I found abundant yellow, orange and red leaves clinging to stubborn aspens for the entire length of the drive over the mountain.
Autumn Aspen Trees Along Rock Creek on Boulder Mountain, Utah
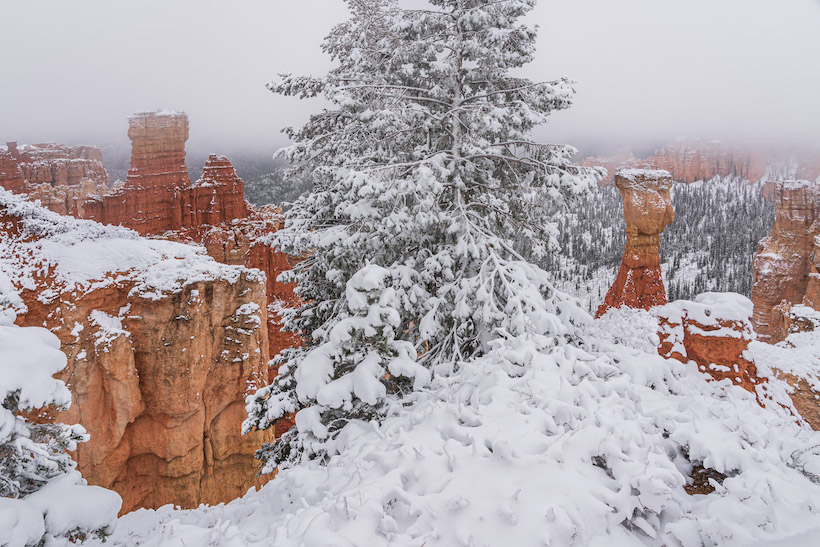
The weather worsened as I approached Bryce National Park. Nature photographers are fond of saying “bad weather makes good photos”, and I headed into the park. I stopped at several viewpoints, and at each one I found absolutely epic winter conditions. At one, I watched in amusement as a pair of ravens preened on a fencepost, their black feathers shimmering when ruffled by the wind. The entire landscape was muted by fog and clouds. Several inches of fresh snow had accumulated on trees and was layered like icing on the tops of red velvet hoodoos. If ever there was a perfect winter moment at Bryce, surely this was it.
Flocked Evergreens and Hoodoos at Ponderosa Canyon in Bryce Canyon National Park, Utah
Nearing Zion, I pulled off on a dirt road and drove a short distance to a flat spot surrounded by small trees. This would be tonight’s campsite. I was again awakened by a midnight thunderstorm. This time it didn’t linger, quickly moving east where the rain would become snow as the landscape climbed in elevation.
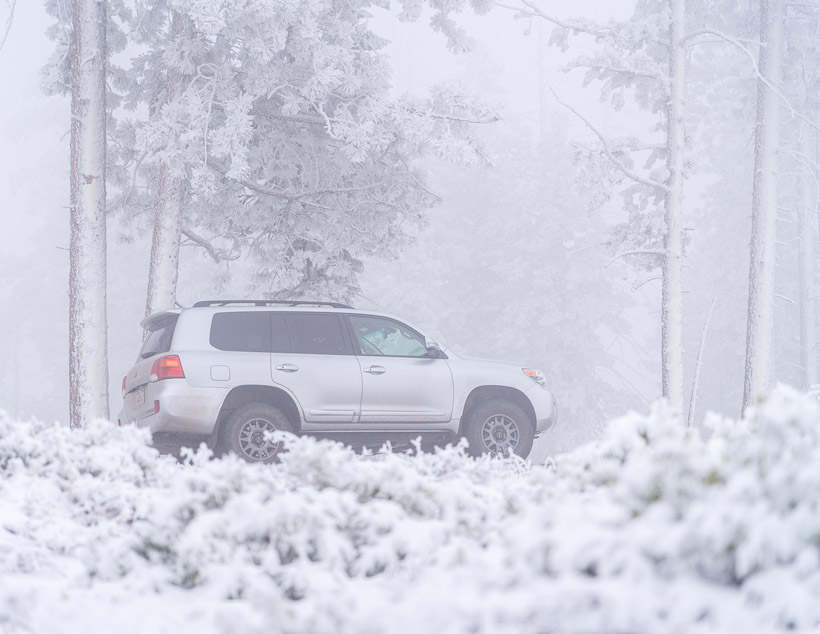
My Toyota Land Cruiser 200 in Snow and Fog at Bryce Canyon National Park, Utah
I awoke early on Saturday and within a few minutes, I was in Zion, where I planned to hike one of my favorite canyons that I hoped would be filled with colorful foliage. Much to my dismay, I discovered that Mother Nature had other plans. Virtually all of the foliage was still green, with only subtle hints of fall sprinkled throughout the park. Though I was disappointed, I was also eager to get home where I would download my bounty off the SD cards and begin the process of culling through over 500 images. My trip around southern Utah had come to an end, but as I drove home to Moab, I was already planning my next escape into southern Utah’s natural wonderland.
In-field contributor: Bret Edge – 2021 F250 and Four Wheel Campers Hawk UTE
Bret is a professional adventure and nature photographer in Moab, Utah. He, his wife Melissa, son Jackson, and adventure pug travel frequently throughout the West in search of the best trails to mountain bike and hike, and the most epic campsites for their 2021 F250 and Four Wheel Campers Hawk UTE or Land Cruiser 200. Some of his favorite places include the Sonoran Desert, Oregon Coast, Northern Rockies and the Cascades.
Looking for a solid travel tripod to help capture all your Overland adventures? Then check out this in-field review of the Peak Design Travel Tripod, by Moab based professional adventure photographer, Bret Edge.
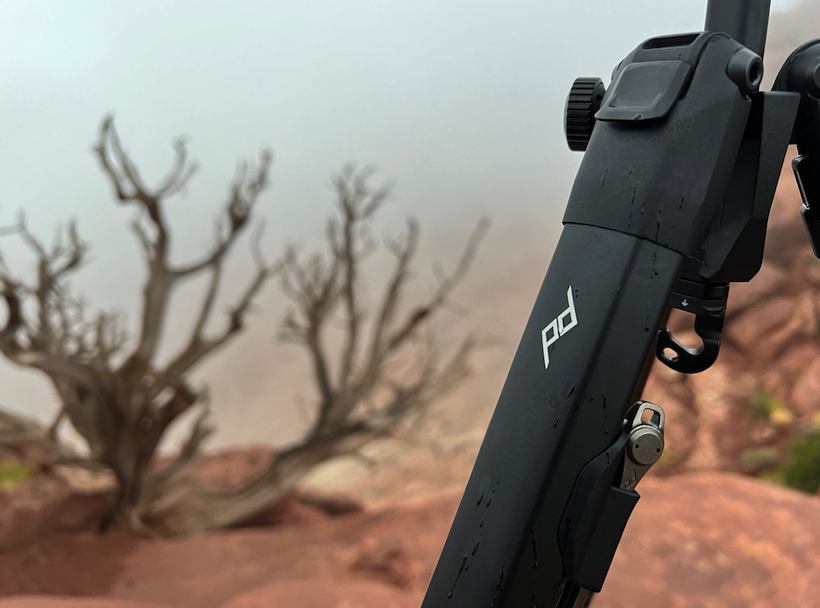
I’ve never owned a “travel tripod”. Typically characterized by compact dimensions and light weight, they’re easier to lug around while on the go. So, when Peak Design asked me to review their aluminum Travel Tripod, I eagerly accepted. When collapsed it’s less than 15 ½” long, just over 3” in diameter, and the whole thing weighs less than 3.4 pounds. With the center column fully extended, maximum height is a respectable 60”. Peak Design rates it to hold 20 pounds, which is kind of mind boggling if you consider how small and light this tripod is. But, specs don’t tell the whole story. Real world performance does.
In an effort to put the Peak Design Travel Tripod through as many different use scenarios as possible, I traded my bigger, heavier carbon fiber tripods for the Peak Design. Over several months, I carried it on hikes, tossed it in the back of my truck, and packed it in my suitcase when traveling by air. The little tripod that could has been all over Oregon, beaten around in the deserts of Utah and even made it as far as the Arctic Ocean at Barrow, Alaska. Through it all, it delivered impressive performance and durability, with very few compromises.
The integrated ballhead utilizes a unique design that holds the camera firmly in place while allowing you to quickly and easily flip between landscape and portrait orientations. Unlike most ballheads, there’s only one control – a ring directly below the QR clamp. The ring has small ridges that make it easy to grip, and twisting one direction loosens it while twisting the other direction locks it in place. The action is smooth and requires little effort to loosen or tighten, but it’s also rock solid when locked in place. This single control allows you to rotate the camera side to side, or place it in landscape or portrait orientation. A spring loaded latch secures the QR plate on the bottom of your camera to the ballhead, and a secondary rotating lock prevents the latch from accidentally opening, which would send your expensive camera tumbling to the ground. I found the operation of the ballhead and QR mechanism to be intuitive, secure and easy to operate. While we’re on the topic of the QR plate, it’s compatible with all Arca-Swiss style plates – bonus!
Holding the tripod in one hand, you can use the other one to simultaneously flip open all four leg cams, extend the legs, and lock them in place one leg at a time. The deployment process is quick and easy, but I still prefer the twist locks on my other tripods. That’s not a knock on the leg cams. I’ve been using twist locks for so long that they’re just second nature. The first time I used the Peak Design Travel Tripod, a loose cam caused one of the legs to suddenly collapse and the tripod tipped over with my camera on top. Luckily, I caught it before tragedy struck. I discovered that several of the leg cams were loose from the factory. I used the included tool to tighten them, which resolved the issue, and over the next few months the cams never came loose again. The tool included with the tripod mounts to one of the legs and while I appreciate the idea, the execution isn’t great. The tool slips into a small plastic sleeve on one of the legs and it fell out more times than I can count. Luckily, every time it fell out I was able to find it but I doubt that will always be the case.
With the center column fully extended the tripod became unsteady in windy conditions with my Sony A7IV mounted to the ballhead. Drop the center column a few inches and it becomes much more solid, but at the expense of overall height. I don’t use any long, heavy lenses but I suspect at full center column extension, a longer lens would simply be too much for this tripod. There is a small hook at the bottom of the center column from which you could hang a backpack to provide additional stability. The legs are easily adjusted to multiple angles, allowing for high or low vantage points, and this makes it easy to level the tripod on uneven terrain. An included phone mount stows in the center column, which I used a few times when filming short videos and time-lapses.
The Peak Design Travel Tripod includes a lightly padded carrying case with a zipper that provides quick access. The case is much nicer than many others I’ve seen. It’s well constructed and the heathered gray fabric looks and feels high-end. I used the carrying case when traveling by air, but left the tripod naked when hiking or shooting from my truck. The tripod displays a few battle scars from being banged up against the Moab sandstone while navigating narrow canyons but they’re purely cosmetic. Here in the desert, when the wind gets to blowing the air is filled with sand that finds its way into every nook, cranny and crevice of your gear. Even so, the legs still extend and retract smoothly and the ballhead moves around as easily as it did on day one. The salty ocean water on the Oregon Coast didn’t cause any issues, either. I always tried to leave the legs extended when wet and when I remembered, I’d wipe them down when I got back to my truck. It’s proven to be quite a durable piece of equipment.
I’ve enjoyed using the Peak Design Travel Tripod. Its small size, light weight, innovative design and useful features make it a great option when used as intended; for traveling. Will I continue to use it as a daily driver? No. I’ve gone back to my bigger, heavier carbon fiber tripods for regular use but when traveling and space is limited, I will absolutely reach for the Peak Design Travel Tripod.
Peak Design also makes the Travel tripod in carbon fiber, which shaves off over half a pound of weight while retaining all the same functionality as the aluminum version.
In-field contributor: Bret Edge – 2021 F250 and Four Wheel Campers Hawk UTE
Bret is a professional adventure and nature photographer in Moab, Utah. He, his wife Melissa, son Jackson, and adventure pug travel frequently throughout the West in search of the best trails to mountain bike and hike, and the most epic campsites for their 2021 F250 and Four Wheel Campers Hawk UTE. Some of his favorite places include the Sonoran Desert, Oregon Coast, Northern Rockies and the Cascades.
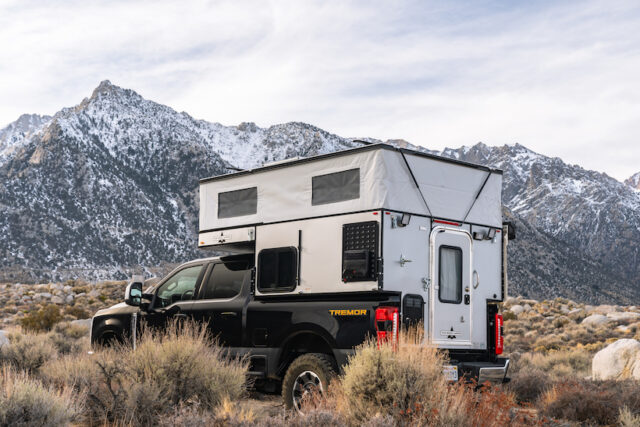
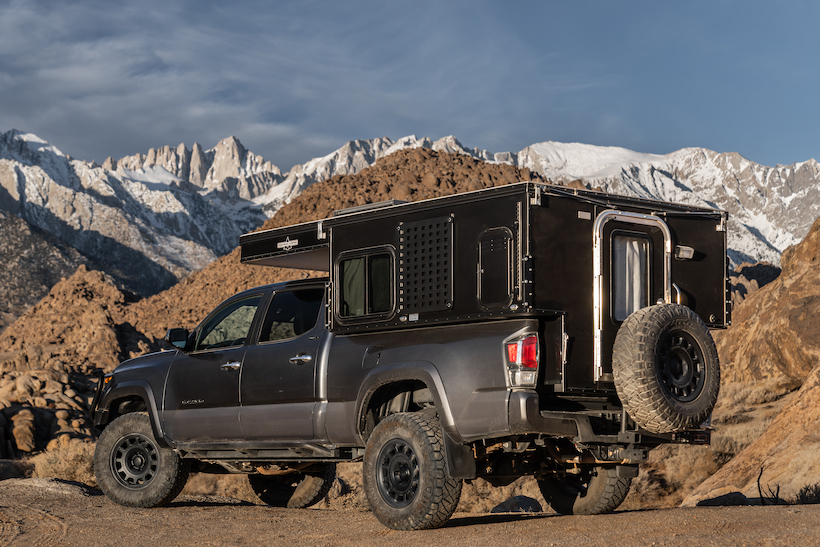
Every now and then something really exciting hits the Overlanding world and TAP is truly stoked to introduce CampOutfrom Four Wheel Campers, a modular pop-up truck camper series designed to adapt to any adventure. Below we give you a comprehensive first look at the all new truck camper series.
CampOut’s thoughtfully designed modular system lets users add or remove modules anytime, at purchase or down the road. Built for versatility, these durable yet lightweight modules offer easy DIY or dealer-assisted installation, making it easy to tailor CampOut to any outdoor lifestyle.
Designed with the understanding that travel needs change, CampOut adapts for different activities, destinations, and seasons of life. This innovative new series delivers flexibility for adventurers who demand more from their gear. “With the CampOut series, we’re giving outdoor enthusiasts the freedom to create a camper that grows with them, combining modular innovation with adaptability for any journey,” said Larry Baab, CEO and board member of Four Wheel Campers.
“Build Your Way” Modular System
CampOut introduces the “Build Your Way” philosophy, empowering camping enthusiasts to take control over their camper’s layout and features. Whether you prefer a fully equipped camper with all available modules or an open floorplan, CampOut is designed to meet every exploration style.
Customize CampOut with Versatile Modules:
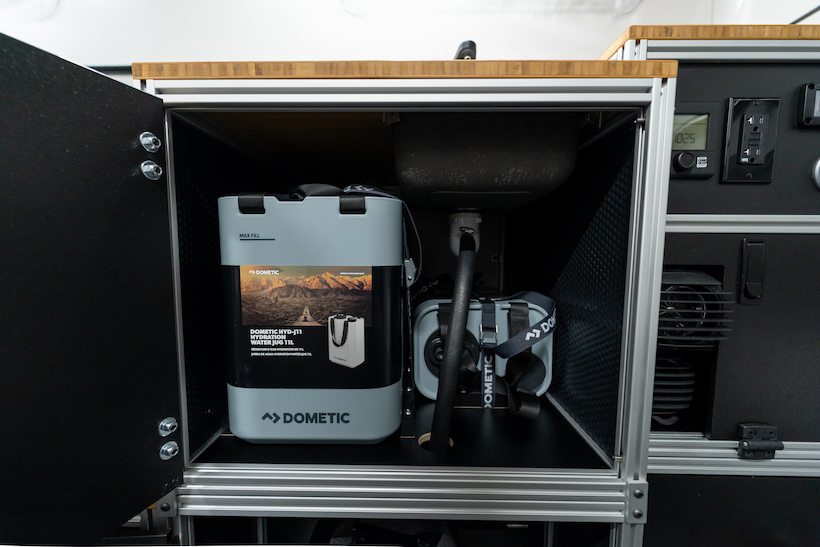
Power Module (Standard): Located in the rear passenger cabinet, it features a lithium battery with smart monitor, power ports (USB/12v/120v), DC to DC charging with solar controller, and shore power. Optional upgrades include a second lithium battery, a 2000W inverter, and up to 500W of roof-mounted solar panels.
Utility Module (Standard): Features a rear driver-side cabinet with interior storage and lockable exterior storage. Optional upgrades include a propane system with a Truma furnace, a propane stove with quick-connect options, or an induction stove (requires inverter).
Water Module (Optional): Includes a built-in sink, 12V pump with faucet, three 11L freshwater jugs, and one 11L gray water jug. Alternative options include a tall storage module or a lower platform with an optional seat cushion.
Fridge Module (Optional): Comes with a removable Dometic CFX chest refrigerator and lockable platform storage. Non-fridge options include the lockable platform with or without a seat cushion.
Seating Module (Optional): Designed based on truck bed length. 5 ft. beds feature bench-style seating, while 6 ft. and 8 ft. beds include a front dinette layout. All seating modules come with lower storage, seat cushions, and a Lagun swivel table.
Each module is built with modern bamboo countertops, slotted aluminum extrusions, polypropylene honeycomb panels, and HDPE doors with compression latches. With its adaptable design, CampOut evolves with you, making it the perfect companion for both seasoned travelers and first-time campers alike.
Four Wheel Campers offers three convenient ways to order and install modular components:
At the initial purchase: Opt for a complete setup from the start.
Flat-packed for DIY installation: Order modules later, shipped directly to your door for easy self-assembly.
Through local dealers: Work with your nearest Four Wheel Campers dealer for ordering and professional installation assistance.
Versatile Exterior Features and Truck Compatibility
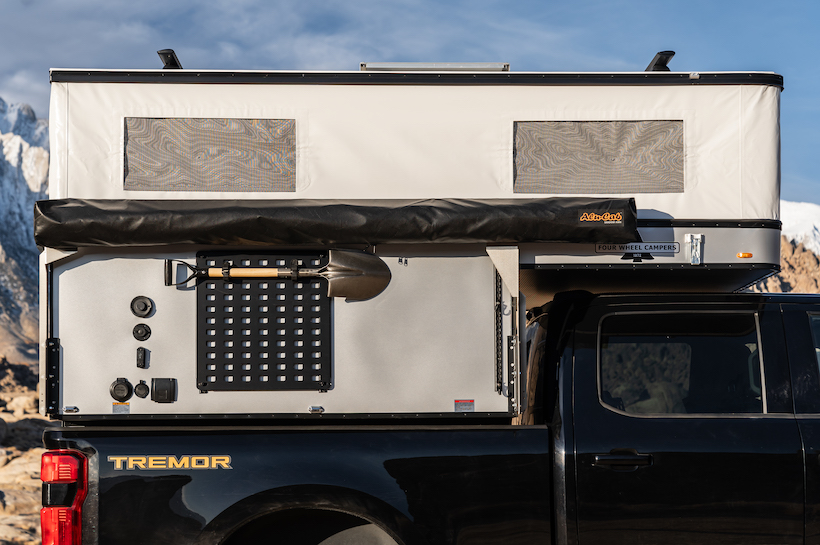
CampOut doesn’t stop at a sleek interior; it takes the Four Wheel Campers slide-in platform to new heights with exterior features that bring function and convenience to the forefront. The following standard features make the CampOut’s exterior just as functional as its interior:
Six vertical rows of L-track and two molle panels: Offer endless possibilities, letting users creatively secure gear, organize essentials, and customize their exterior setup.
DC port for Starlink Mini: Allows energy efficient off-grid connectivity.
Exterior power panel: With 120V, USB, and USB-C outlets.
Exterior downlights: for improved nighttime visibility.
Designed to fit nearly every truck on the market, CampOut is compatible with mid-size trucks with 5 ft. and 6 ft. beds as well as full-size trucks with 5 ft., 6ft., and 8ft. beds. With starting weights ranging from 860 lbs for mid-size 5ft. models to 1,030 lbs for full-size 8ft. models, CampOut delivers lightweight performance without compromising durability or functionality.
Explore, Experience, and Build Your Own CampOut
Ready to customize your own CampOut? Use the online builder tool to design and price your perfect setup today. Pricing starts at $25,995 for 5 ft. and 6 ft. truck models and $26,995 for 8 ft. truck models.
CampOut is now available to view and order at any Four Wheel Campers dealer across North America. Explore the dealer map to find a location near you and connect with a local expert.
Mark your calendars for April 5th, when Four Wheel Campers will host an International Open House at Headquarters and dealer locations. This special event invites outdoor enthusiasts to see the CampOut up close, meet their local camper experts, and connect with the Four Wheel Campers community. Be sure to visit the FWC events calendar for a full list of expos, open houses, and gatherings where you can see a CampOut model in person throughout 2025.