


“Begin with the end in mind” and “Plan your work, work your plan”. Both often heard phrases in boardrooms around the globe. But not so commonly used in the overlanding space. Sure, no one wants corporate America peeing in our adventure Wheaties, but perhaps these cliche proverbs can be of use. When you are building an overland trailer, especially one designed to keep you alive many miles from civilization, you should indeed have an equally sophisticated plan.
Few years back I was living the overland life in an F250 on 37s, RTT perched on a self-built rack and usually a bike or two in the bed. All good, right up until I needed to exit camp and do some exploring. Nothing is less fun than a total camp teardown. Especially just to set it all back up again a few hours later. Making matters worse was dragging the expensive tent across low hanging branches (rig was pretty tall). The Solution? Well, a trailer of course and this is where “beginning with the end in mind” comes into play. After setting up the aforementioned camp for the third time in as many days, I spent a long evening sketching out a new plan for overlanding nirvana.
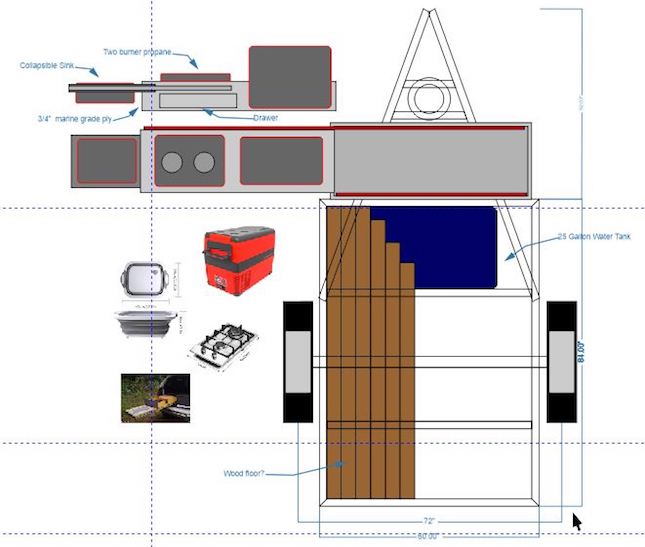
Fundamentally, I knew I’d want to run the same tires on the trailer as my rig (eliminating need for two spares). It would also need to haul small motorcycles. Groms are the ultimate overland tender and maybe a mountain bike or two. I was coveting a slide-out kitchen I had seen at a recent Overland Expo. I wanted to incorporate that into the trailer as well. The rig would need to live autonomously for days at a time. So a healthy battery and solar would also be mandatory.
Additionally, I had just adopted a Lab puppy. So the tent would need to live at a reasonable height in order to heft her rapidly growing floof into our intended sleeping quarters! Within 60 days I was well into the “planning my work” stage. Pencil sketches had evolved into detailed technical drawings with one significant takeaway. In an unanticipated departure in my original strategy, I would not be able to base the build on an existing trailer platform.
Here’s the deal, military or utility are pretty much the two basic options when it comes to trailer platforms for this size and application. Surplus trailers are likely going to be durable enough. But the WW2 stuff (M100 generation) are tiny. And the newer units are extremely tall and shockingly heavy (a M1101 comes in just under 1500 lbs empty).
So maybe a cheap utility trailer? I took a hard look at this option, even wheeling one into the garage to start the project with. The chassis construction was a few clicks above angle iron, spindly axle was unlikely to survive off road and would certainly not tolerate a 35” tire and many of these things utilize slipper springs (eyelet on one end, slider on the other). I promptly returned this unit to the side yard. Where it would spend the remainder of its life transporting lawn mowers and yard debris. There was no chance it would live up to the end I had in mind.
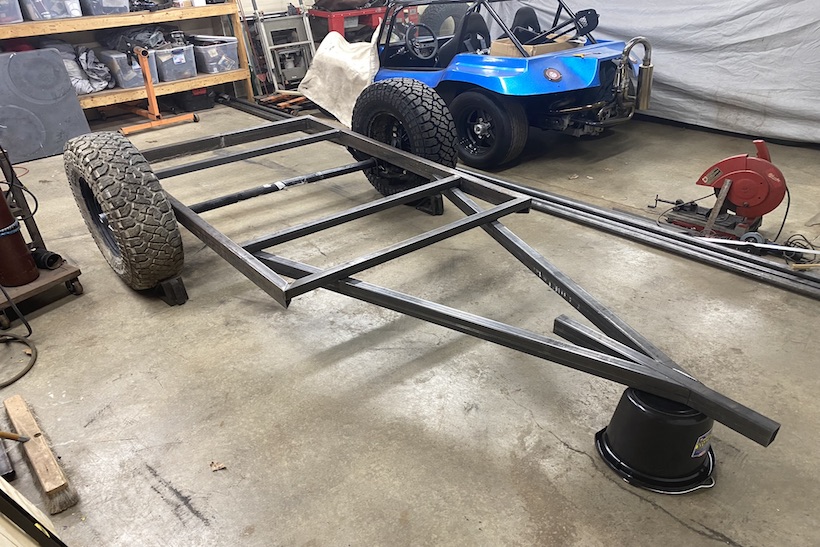
It was soon obvious a scratch build was going to be the best option. I’m not a professional fabricator, so this was a daunting outcome. Around the same time, rising fuel costs prompted a switch from the F250 to a Gladiator. This made trailer weight an even more significant factor in the build plan. I like the stance and usability of 35” tires and decided both rig and trailer would sport the narrow Kenda Klever R/Ts. I also didn’t want a trailer with a high platform (you may recall the dog and Grom loading challenges). So this created a logistical problem. The answer turned out to be a 3500 lb, 4” drop axle with a 5×5 bolt pattern to match the Jeep.
After a bit of research, the axle procurement ended up being an easy and relatively inexpensive purchase through Ebay. Bolt up a set of wheels (allotting for substantial negative offset of factory Jeep rim). Whatever fits comfortably in the middle would now be the width of the platform. A couple of other things were factored in. I wanted a bunch of water. So a 25-gallon RV water tank would reside just in front of the axle but below the deck to keep the center of gravity low. The platform itself would need to be 7 feet long to accommodate small and medium-sized motorcycles as well as gear bins.
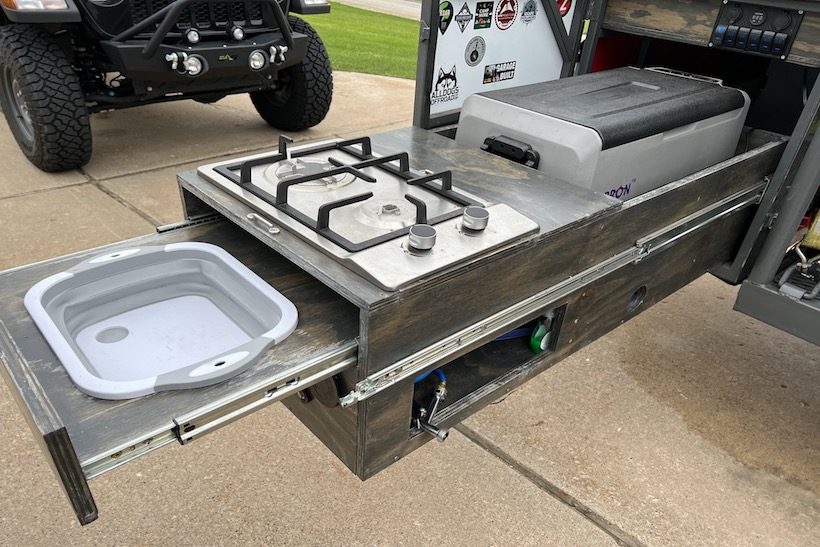
Next challenge was the kitchen layout. All the cool kids seemed to be building a box of some sort and the dimensions of the fridge would define a lot of the dimensions of said box. Total width would naturally match the platform and the box would be roughly 24” deep. After a little research I framed it in 1” square steel tube and skinned the box with adhesive mounted aluminum (similar to an enclosed trailer).
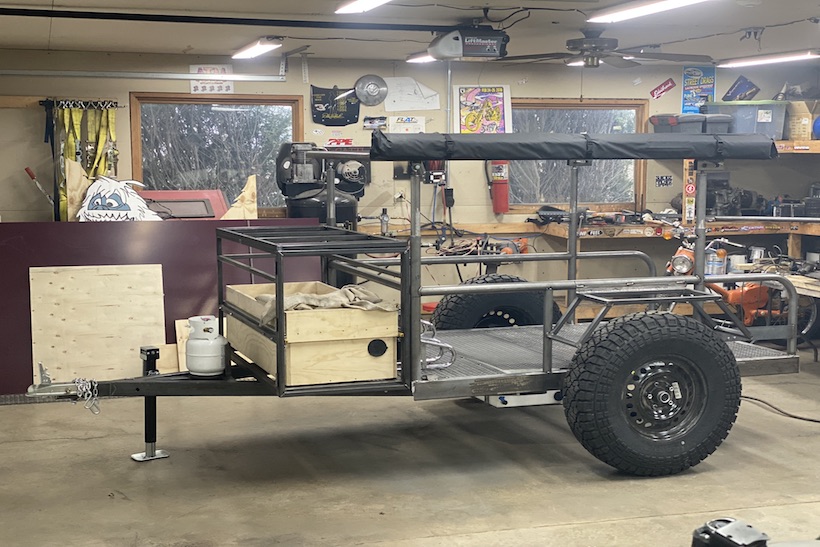
End result is a durable and relatively light structure. Heavy duty hinges adorn the side door as well as top access point. The box would also house all the electronics, including fuse array, inverter, kill switch, solar controller and USB ports with a 100 watt solar panel perched on top of it. A 100 amp hour gel battery would power all of this (I love lithium, but the cost is painful). A simple two burner propane stove top and a pop out sink rounds out the kitchen with water pressure delivered via a 3.5 GPM 45 PSI pump living next to the water tank.
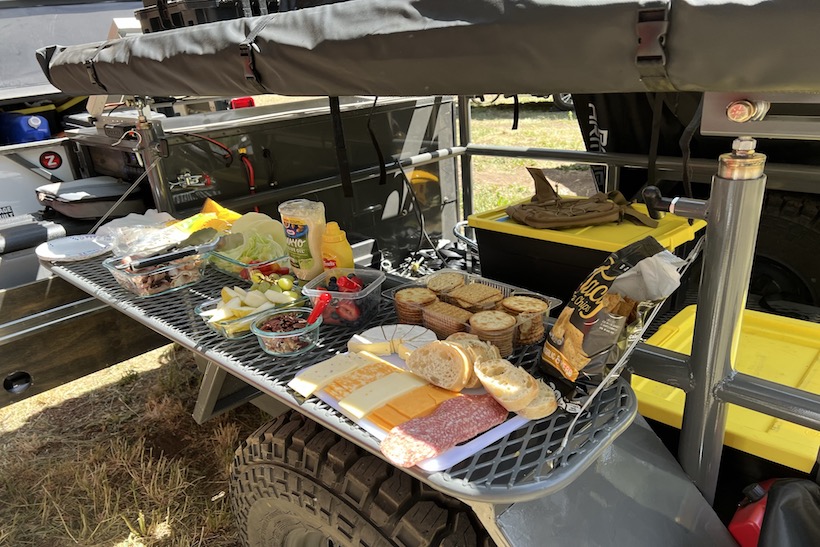
Kitchens require counter space. So a simple fold down table constructed out of the same expanded steel as the trailer floor, does the job. Next up would be hot water via a Camplux 1.32 GPM water heater housed in a Harbor Freight Apache 4800 weatherproof case. What about cold weather? Well, the Pelican case at the front of the upper rack not only stores the Trasharoo and other tools, but also houses a 5KW Vevor diesel heater. When needed, we plumb the duct and thermostat into the adjacent tent.
We probably overthought (overplanned?) a couple of things, including the upper rack with 12” of height adjustment. We achieved this using giant rod ends and stainless sliders surrounded by brass bushings. I did say it was overthought, right?. Since the dog didn’t end up particularly big, we rarely utilize this feature. Twenty five gallons of water is also probably overkill (208 lbs!), but has proven to be quite a blessing on some of the more remote trips. The 1000 watt inverter seemed like a must have, but so far usage has been a one time hair curling demand from the Mrs.
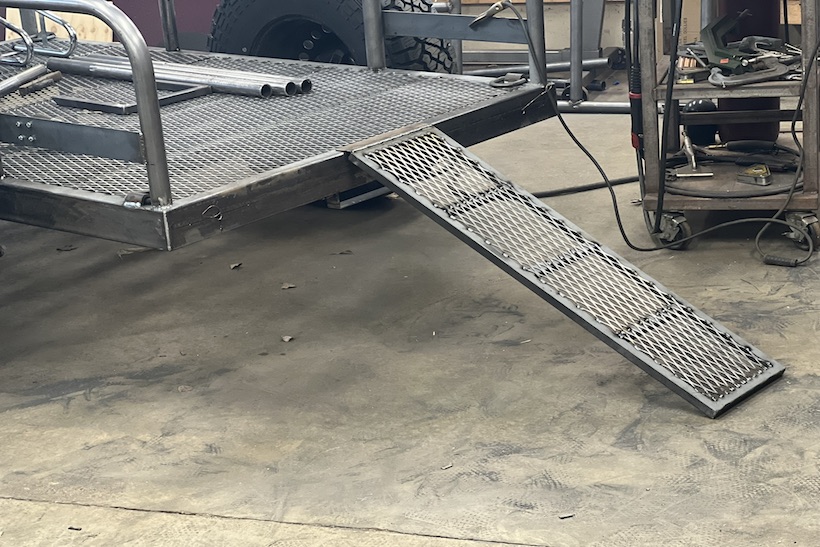
Other features have been amazing. A pair of repurposed motorcycle shocks keep the trailer running stable even under the harshest roads. This is a must have for any off-road trailer build. The solar panel, although a medium sized unit, has never let me down and kept the battery well above twelve volts during multiple days of off-grid usage running lights, pump and fridge. Built in ramp, once again utilizing the expanded steel is very handy and the Hebron 47 qt, dual zone fridge has performed flawlessly across the last two years. Bonus points for a slick app that lets me check temps without opening up the kitchen box.
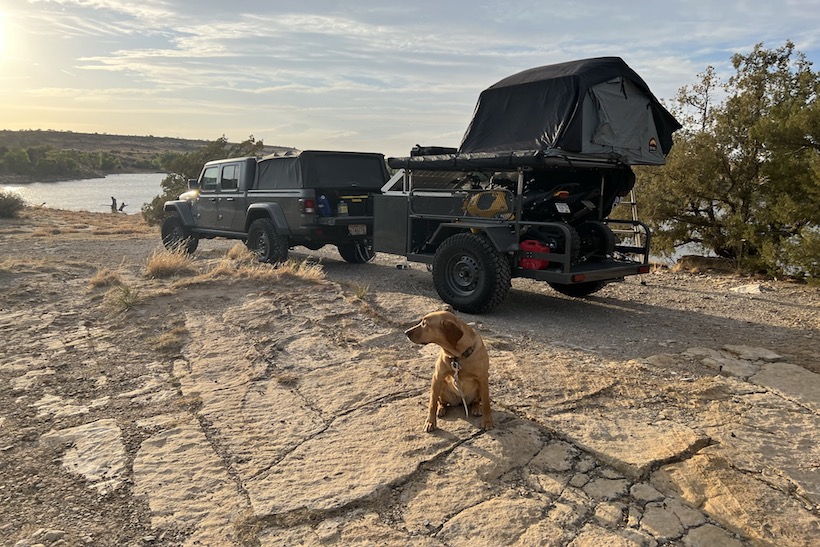
We color matched the entire cacophony of steel to the Jeep in Chrysler Sting Gray. With several of the forward-facing surfaces coated in Raptor liner tinted in the same shade. The trailer is now at the tail end of its second season and has traveled through 14 states and Canada. It’s performed exactly as planned with only minor tweaks along the way. I credit much of that to having a solid usage plan.
If you’re bold enough to build your own rig (and I know many of you are!), sketch that idea out. List the features you want and measure everything. You can even get technical and use SketchUp or a similar design app (oddly enough, I did this in CorelDraw). Most importantly, have a plan. Even basic pencil drawings will get you there. It took six months of weekends to build this trailer, but that was preceded by four months of design work. End in mind, indeed and my end in this scenario is the flexibility to leave basecamp behind, bug out at the drop of a hat (all the camping gear lives in bins in the trailer) and have a good time off-grid. Mission accomplished.
_____________________________________________________________________

Contributor David Zemla: Dave is a native of California, now living in the wilds of Wisconsin. He has been writing about his two and four wheeled antics for the last few decades. He travels with his yellow Lab, Ranger and on occasion his wife Apryl. As of late he can be found dreaming about building a Mitsubishi Fuso Overland rig.


