


A while back, TAP published an article on Coyote Adventure Safari run by John Marshall, a Certified Off-Road Driving Instructor (I4WDTA), an Advanced level Emergency Medical Technician, and a Certified U.S. Marshal’s Desert Tracker who’s been off-roading and leading off-road expeditions for many years. While discussing the article, he mentioned that he had built his own off-road trailer. We were intrigued and asked him to tell us about it. Read on for John’s account of his trailer build.
I have been involved in the off-road world for over thirty years. In this time I have seen the technology that supports this passion continue to evolve. These advances allow those involved to not only go further into the wild, but to do it with a higher level of comfort. On the market today, I’ve seen a wide range of trailers emerge onto the off-road scene. Trailers packed with every imaginable comfort item needed for extended stays in the backcountry; cooking appliances, water heaters, showers, ice chests and refrigerators, solar panels, dry goods storage and a comfortable place to sleep. However, all of these wonderful amenities come with a price. I won’t talk too much about price, because that is what the buyer’s guides are for. However, it is safe to say that most of these trailers are priced between $10-$25 thousand dollars (U.S.).
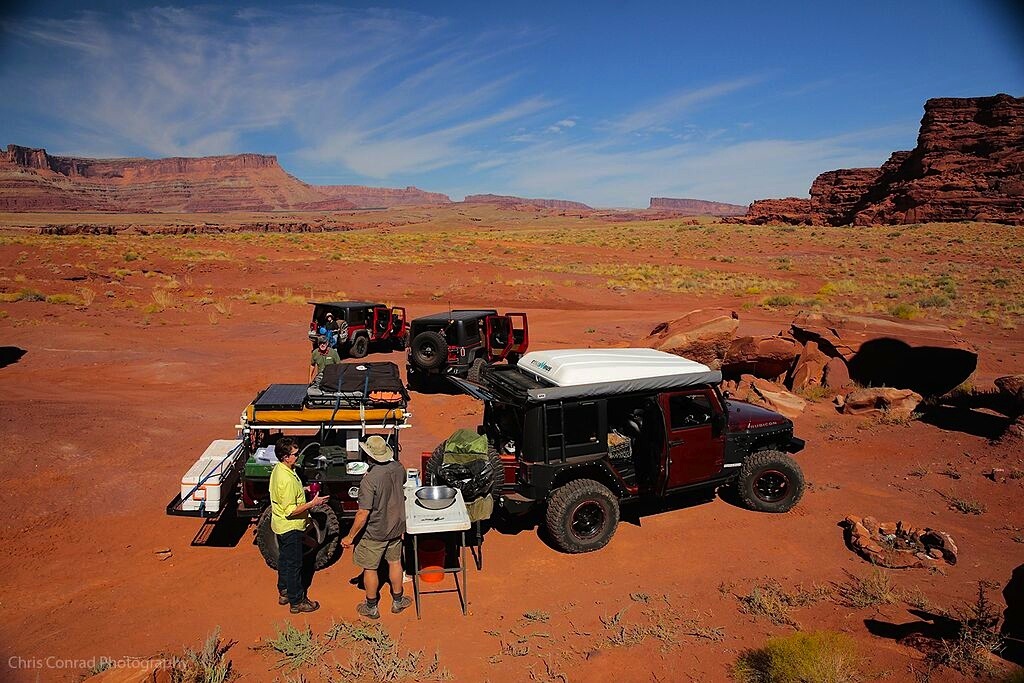
I recently found the need to supply myself with the ability to feed and support 15 people on a multi-day expedition through the deserts of southern Utah. The biggest problem I faced was time. I only had a week to prep for this trip and found myself without the needed room in my 4 door Jeep JK. I needed an off-road trailer and I needed it fast. After a dozen phone calls, I quickly realized that ordering one of these manufactured beauties was not going to meet my tight schedule. With the departure date so close I had only one real option. Build my own Off-Road Trailer.
I considered many options and scoured the internet for ideas. I discovered that I didn’t need to look any farther than my own backyard for the needed inspiration. There staring at me was an old 1988 Suzuki Samurai. It had been given to me by a friend as a parts donor. I felt that this could be the answer to my schedule needs. I drug it from its resting place and stood back and gazed upon the Samurai’s body lines.

I then grabbed a tape measure and a Sharpie and began to apply cutting lines. With a Sawzall and a cut-off wheel, the rear section was free to live again in an archaic process that took less than 15 minutes.
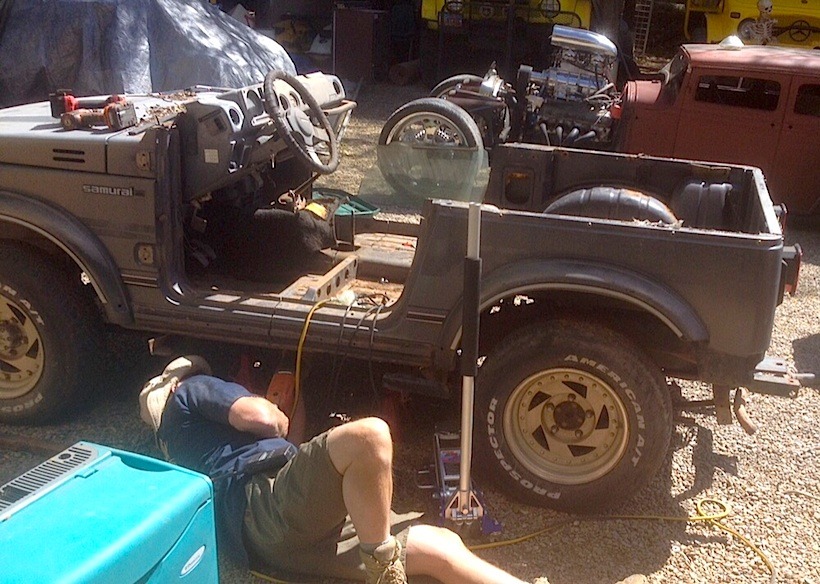
I cut the Samurai just about through the middle of the shifter hole in the floor. This allowed me to gain a few extra feet ahead of the bed area.
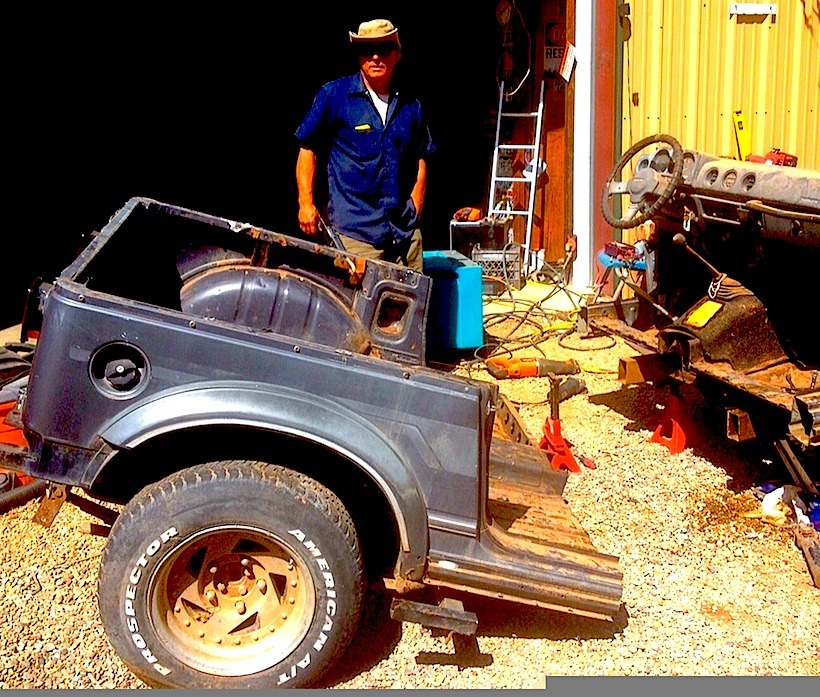
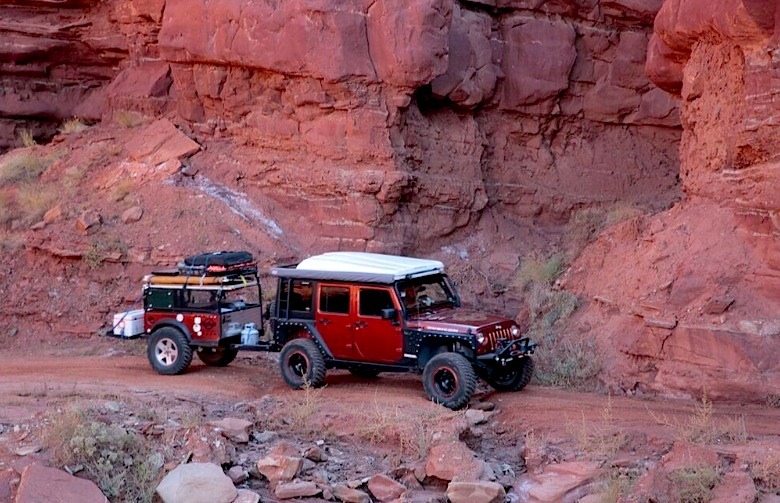
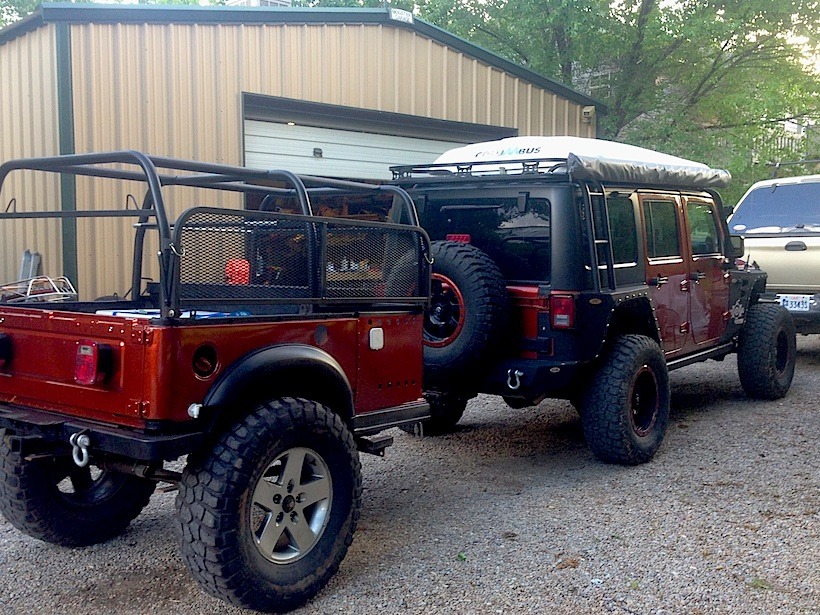
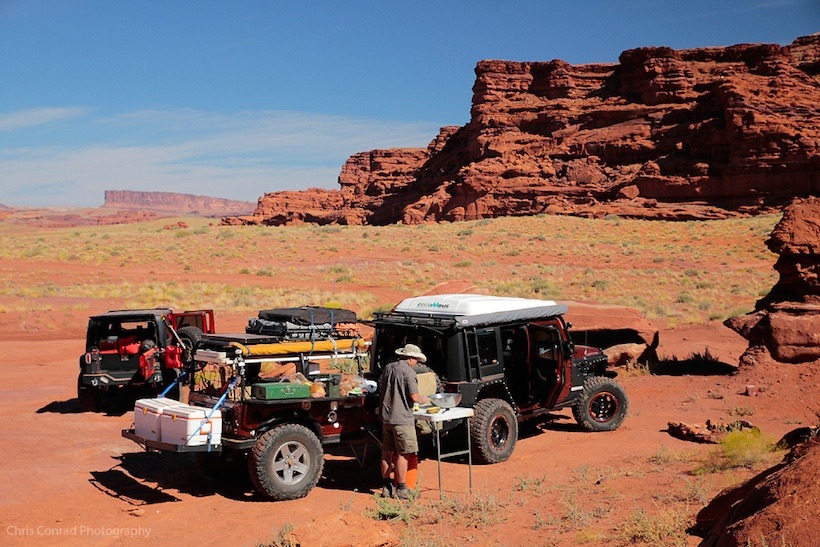
Next I purchased a pair of 3500 lb. axle spindles and hubs with the lug pattern matched to my Jeep and built a heavy-duty axle. I then bent three 1.75″ matching roll bar hoops and began to enclose the little trailer. I cut two 14 gallon steel plates to fill the voids where the doors once fit. The trailer’s face plate was created by a section of 1/16 aluminum diamond plate to protect rock and mud damage. I also installed a lockable steel storage box that I picked up at my local metal yard’s scrap pile for $6. I used this box to mount all of the trailer’s electronics such as the solar charge controller, A.C. Inverter and batteries. Next I fabricated a fold out side table for mounting the stove and the all important coffee maker. This was made from 1″ box tubing and topped with expanded steel mesh. I then shifted my efforts to the hitch. I spliced and gusseted in 2″x4″ frame rails and tied them together at the apex with a military style, fully rotating pintal hitch. Next on the list was to make all of the specific brackets and mounts to securely attach all of my required gear: water tank, stove, solar panel, 3 folding tables, sink, shower, awning, Hi-Lift jack, propane bottle, batteries and more.
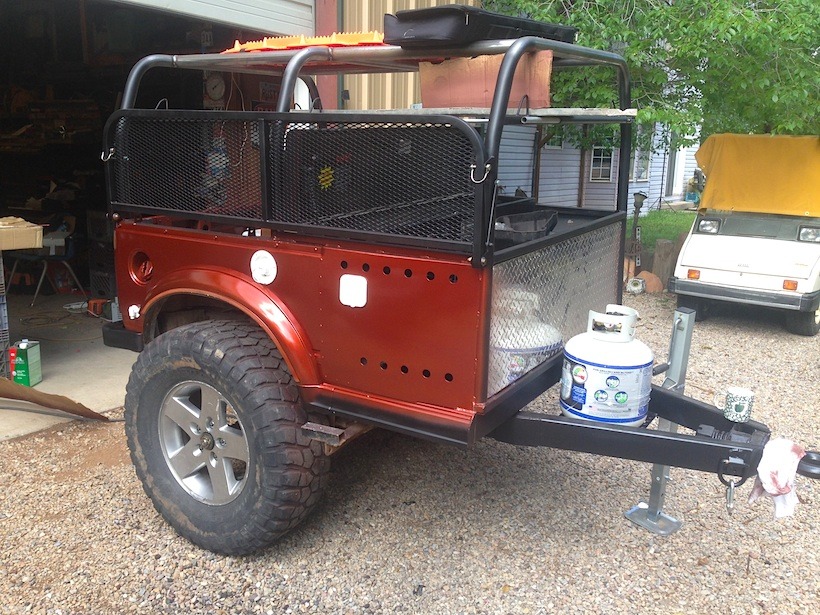
Once I had made the last weld and applied the last bracket, this trailer needed some paint. Fortunately, I happened to have a quart of paint leftover from when I had painted the Jeep. An hour of sanding and prep work and I was spraying paint. Once dry, I reassembled the trailer and began packing for my expedition. It could not have worked out any better.
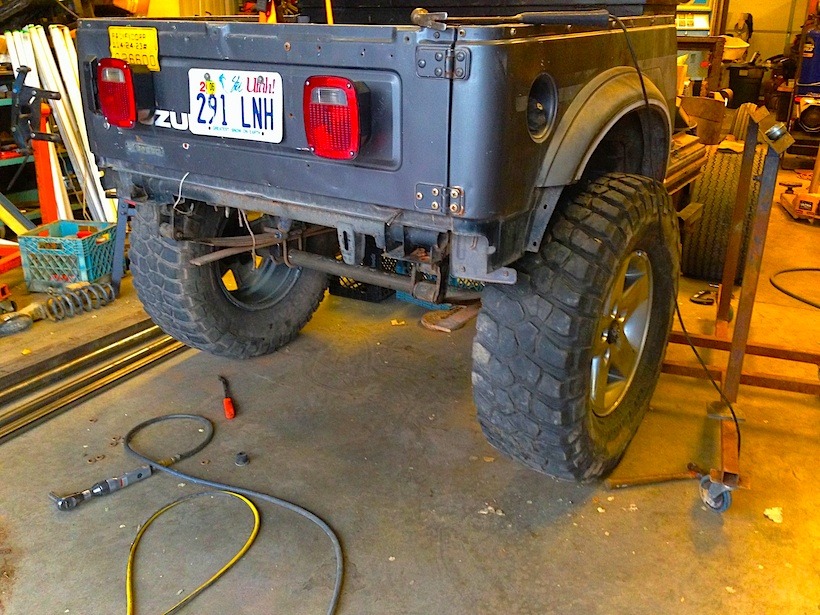
I still found myself in the need for more cargo space. With all of this equipment accounted for, with a place for everything and everything in its place, I discovered that I still needed to travel with two large ice chests inside the Jeep. So I turned to the rear of my little trailer and decided to fabricate a bumper. This bumper would not only look great, but would also give me the ability to add a cargo rack to the rear. This afterthought turned out to be a perfect solution to the space problem. The rear rack makes getting to the ice chests fast and easy.
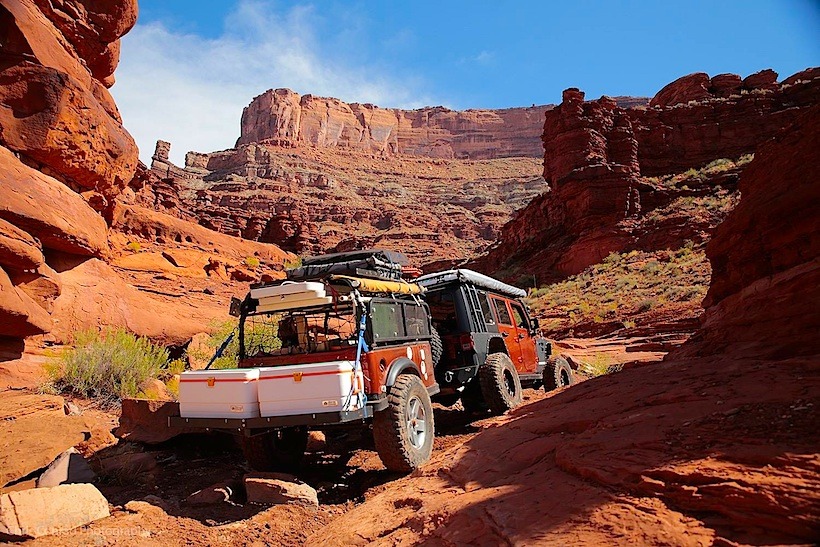
On the trail, the trailer was a rock star and took the obstacles, ruts, ledges and rocks in stride. My guests were amazed at how well it handled the terrain. Having running water for washing dishes and showers was worth every effort needed in the build. Everything else was just a huge bonus.
This build originated out of necessity and limited time. The unforeseen benefit was the ability to build the trailer specifically matched to my exact needs. Initially my biggest hurdle was the short timeframe, but it forced me to come up with a solution. As the build continued, I was slapped in the face by the reality of just how affordable I could build a trailer that could completely fill my needs. However, when all was said and done, I looked back and tallied the total cost for my build. Understand that some of the items were at no cost and still others I had bouncing around in my shop.
Samurai donor vehicle………………..(Free)
Cargo Roof Rack……………………….(Free)
Metal Cargo Box………………………..$6.00
Axle Build………………………………….$105.00
Roll Cage…………………………………..$96.00
Tires&wheels (used)……………………$55.00
Water Tank………………………………..$44.00
Water Pump………………………………$65.00
Shower Head ……………………………$37.00
Pintal Hitch………………………………..$70.00
Solar Panel (100 watt) yard sale…..$15.00
Solar charge controller ………………$50.00
Electrical 12v and USB ports………$40.00
Deep cycle battery……………………..$125.00
Awning Tarp………………………………$45.00
Color Matched Paint…………………..(Free)
All other building materials………….$100.00
TOTAL COST OF BUILD……………..$753.00
TOTAL TIME OF BUILD……………..( 5-Days)
It is true that not all DYI builds can come together this quickly, and yes, I do have an advantage in the fact that I have a very complete home shop. However, building your own Expedition Trailer is not as difficult as you may think. With any build project, a well planned design will save the builder countless hours. Before you begin, a true and honest evaluation of your needs must be put to paper. Begin by assembling a list of items you feel are necessary in your build.
LIST SHOULD INCLUDE ITEMS SUCH AS:
Amount of water you need, Cooking & Cleaning, Drinking
Electrical requirements & Batteries, Solar Panels
Recovery Gear, Jack, Straps, Hardware
Food Storage, Ice Chest, Fridge, Freezer
Cooking Gear and Supplies, Pots & Pans
Tools, Tents, Tarps, Ropes, Tie-downs
Other Fluids and Spare Parts, Extra Fuel,
First Aid
DESIGN CONSIDERATIONS:
(A). The environment that it will be used in:
If cold weather is expected, freeze protection and insulation must be incorporated to protect your water supply as well as your pumps and plumbing. If heavy rain is in the forecast, food storage, electrical and many other items will need added protection from the wet. Dust and deadly heat are also considerations that will play a role in your final design.
(B). The type of terrain will it be used in most often:
If your intended purpose of a trailer is simply to help bring supplies up groomed roads to your basecamp, your consideration list may be much smaller. If designed with a lower overall center of gravity and minimal ground clearance, your design will certainly be more stable on this type of terrain. If your trailer is to be used in any true off-road environment, then ground clearance will obviously play a major role in your design. Higher ground clearance will shift the weight skyward and inherently make your trailer less stable. Using your tow vehicle’s clearance as a benchmark may be a little excessive, but a good goal to aim towards.
(C). Length of a trailer is also an important consideration:
Length must be looked at in two different ways. First, length from hitch to axle. Second, the overall length of the trailer. When the distance between the hitch and axle are increased, the trailer is more stable at higher speed. But as this length increases, so does the trailer’s turning arc path. This is an important negative in the off-road world. If the tow vehicle is maneuvering between sharp rocks or trees, this will cause trailer tires to hit these undesirable obstacles. Due to this, most off-road trailers will tend to be on the shorter side. What they give up on highway stability, they make up on off-road maneuverability.
(D). Track width of the trailer axle in comparison to the track width of the tow vehicle:
On a straight road, if the two-track widths are the same the trailer will follow in the same tire tracks. This is a great concept especially if the terrain is deep mud or snow. This will allow the trailer to be pulled with must less resistance. But if the axle width is wider or more narrow than the tow vehicle, it will cause the trailer to wander from tire rut to tire rut, looking for a home in the mud and snow.
However, if the driving surface is typically dry and hard, we can use this to our advantage. As stated above, the trailer will always have a smaller turning arc than the tow vehicle. By utilizing a trailer axle track width that is less than the tow vehicle, we can help to avoid the tight navigational problems that come from the reduced arc path of the trailer. This will allow the trailer to stay within the steering path of the tow vehicle and avoid the nasty side wall tire punctures.
(E). Weight and balance:
It goes without saying that it is important to try to keep the lowest center of gravity possible. We all understand that we should pack the heavy stuff low and the lighter stuff on top, but remember that on the trail, things change. The heavy water jugs become empty and need to be shifted upwards, their space being replaced by something heavy that may have been stored higher. Also, picture a large water tank mounted sideways across the trailer. If this tank is full, the weight is quite static. However, as the tank becomes half full it allows the water to slosh from side to side. On a severe side hill maneuver, this shifting water may be all it takes to flip the trailer onto its side. Because of this, I try to use my 5 gallon jugs to refill my main tank before extremely difficult terrain sections. Balance of the trailer is another huge consideration in your overall design. As a generic rule, I was always told that the weight balance of any trailer should be as follows. 60% of the weight in front of the axle and 40% behind. For the most part, this ratio holds true. However, I have found that as the length of the trailer becomes shorter, I like to push this 60% to 65 or 70% off-road. This added tongue weight seems to not only add stability but it aids in tow vehicle traction and helps to quiet the pintle hitch in rough terrain. Also, remember that this weight also changes as supplies are consumed on the trail.
In conclusion, have fun with your build. Use safe and proven fabrication techniques. Test your build to the extreme before you take it out on an extended trip. Lastly, never be afraid to fail. You may not get it right the first time. But learn and try again. I have been building vehicles for nearly forty years and I still make plenty of mistakes. I do feel that on this Expedition Trailer build, I hit a home run, but it too will receive some winter upgrades.
The Author of this article, John Marshall owner of Coyote Adventure in Moab UT, offers single and multi-day training and touring trips as well as expedition type trips. Check it out to see more detail about the services that John offers.
Photos: John Marshall and Chris Conrad of Chris Conrad Photography
Editor: Lori Palmer


