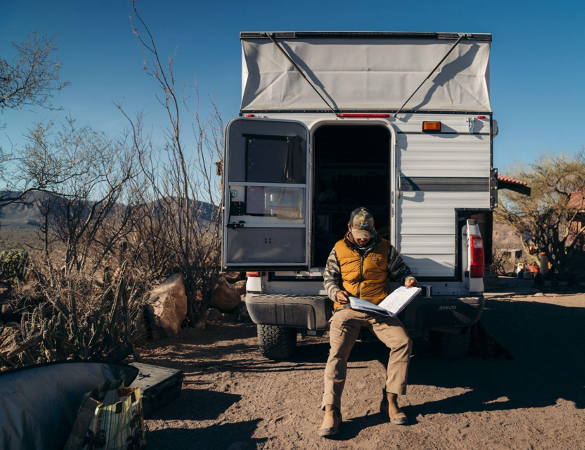
Generally speaking when I’m on an adventure photography Trip, I’m also looking for some solitude, far away from the madding crowd. Because of this, gear and rig preparation is really important and my upcoming overlanding week in the SW backcountry demanded extra care. TAP1, one of our 2014 JKU’s, had recently turned the corner on 100k, so I decided to change all the fluids, flush the engine, replace the spark plugs and generally give it a solid look over from bumper to bumper. Everything checked out just fine and I confidently left on the offroad adventure.
So, what do you do when you’re 170 miles into a 1400 mile trip and the check engine light comes on? Well, you curse profusely, spend the next hour worrying about it and then settle into a state of blind hope, ignorance and the zen like thought of, “It’ll be just fine as my wingman can always tow me out”.
Day 1:
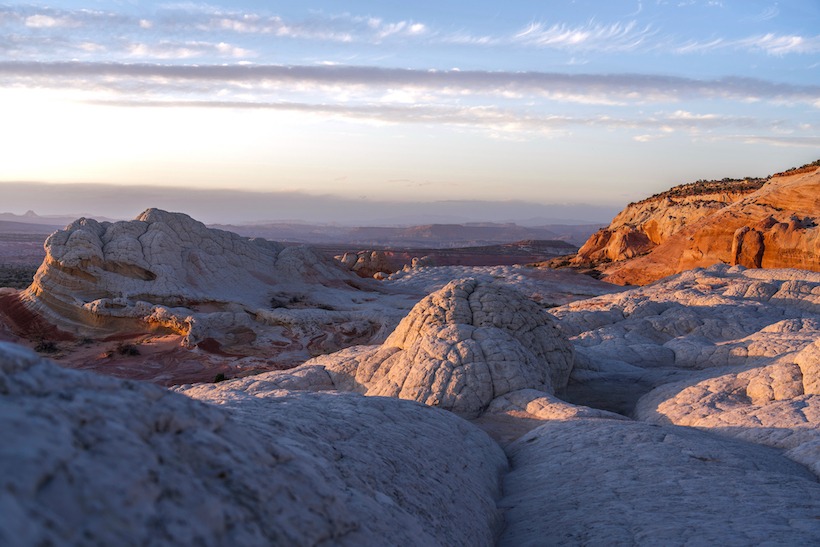
The plan was to drive from San Diego, CA to Hurricane, UT and camp at Gooseberry Mesa. The scenery and terrain is dramatic and world renowned due to the Red Bull Rampage held there each year. It was early Sunday night when myself and my wingman for this trip, David Griffith from Explore California Pics , finally arrived. Most people had left after the weekend and we found a quiet and hidden away little dispersed camp site. Despite the engine light hiccup, this adventure photography trip was starting off well.
View from our campsite
Even though we had driven 7 hrs and 450 miles, we were eager to start some Astro Photography, as the Milky Way was back in the Northern Hemisphere after its long winter absence. Adventure Photography and especially Astro can be tiring and we awoke at 2.30am. Unfortunately to be greeted by significant cloud cover and no visible stars, so back to bed as the local coyote crew yipped and howled for our entertainment.
Golden Hour sunset over camp
Day 2 – 3:
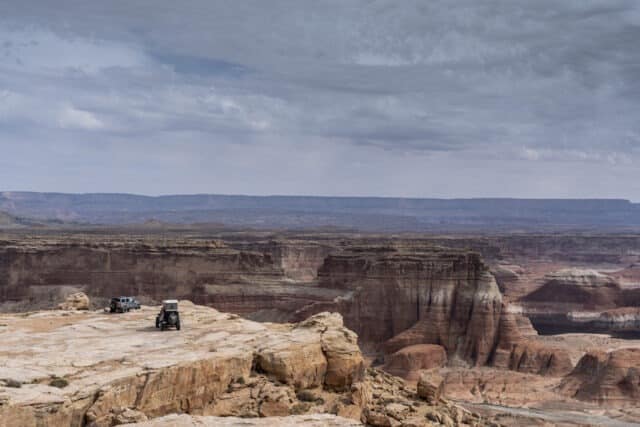
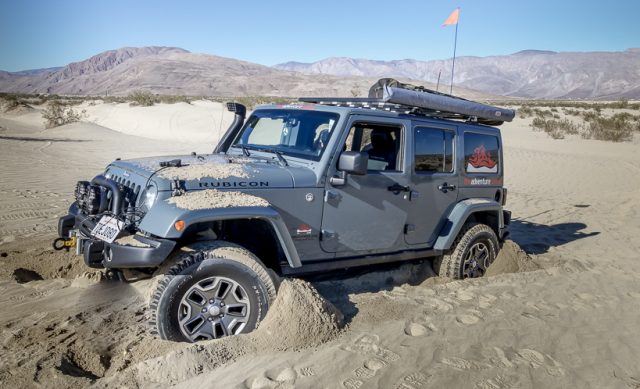
Leaving Gooseberry Mesa, we headed out on our 3 hr and 140 mile journey to Big Water, where we were to leave the pavement and head into the Glen Canyon National Recreation Area. Our ultimate overland destination for the next 2 days was Alstom Point, which has a renowned view of Lake Powell, UT. The road to the point is an easy, bumpy and dusty trail, and only on the last 3 miles after the first viewpoint did we to need to engage 4Hi. This last section will however, cause pause for inexperienced drivers and should not be attempted without 4WD and high clearance. This is a very remote area to get stuck in, so think it through before attempting, especially if the weather is inclement.
Don’t camp next to the boulders!
Frankly, there’s a total WOW factor as you come upon Lake Powell. A sense of absolute beauty and remoteness and a perfect place for Adventure Photography. Dispersed camping is limited so, I was fairly impressed with the lack of human impact. I implore you all to “Pack In and Pack out” everything (Yes, that means Poop too!) and please Treadlightly.
Lake Powell Sunrise
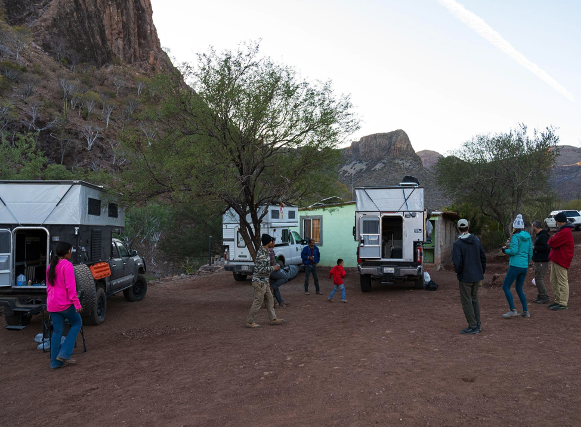
We spent 2 days camped on the bluff, with the first day being alone, then being joined by 3 other rigs on the second day. The weather conditions varied from warm during the day to chilly at night and most of the time, the wind howled in classic desert fashion. As I said, this was a photography trip, so everyday we caught the sunset before hitting the sack early. Up at 2.30am to shoot the stars for an hour and again at 6.30am to capture the sunrise. As you can imagine in between our product testing, we took long naps throughout the day.
Nearly getting blown off the cliff.
We’ve had worse campsite views!
Galactic Core over Lake Powell.
Day 4:
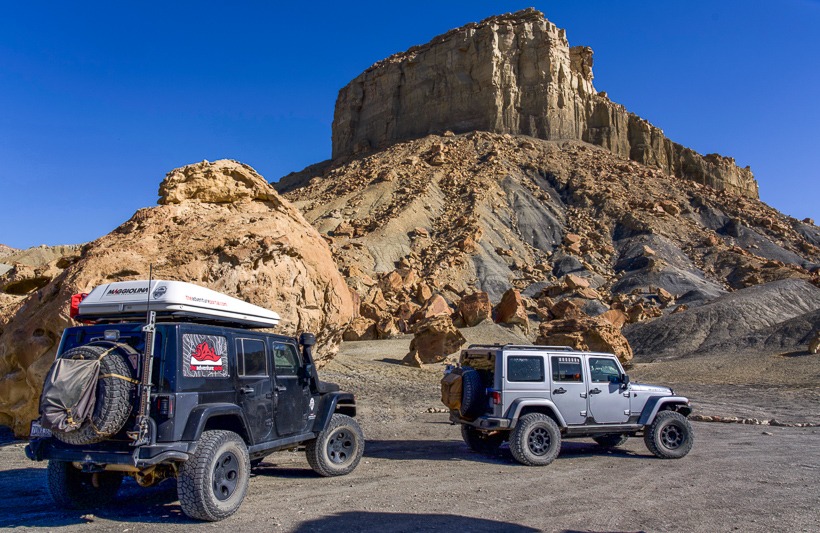
With sadness it was time to leave and continue our vehicle supported Adventure journey back west to Northern Arizona. Our destination was White Pocket an acclaimed remote photographic location in the Vermilion Cliffs National Monument region.
Sunrise over the White pocket
Again, once you leave the pavement, the off-road trail is easy until the last 9.5 miles. At this point you will need high clearance and 4WD to deal with the various deep sand areas you will encounter. This is a remote region, so take it seriously by being prepared (Recovery gear, extra food, gas and water) and we recommend you don’t travel alone.
Easy section of the trail to White Pocket
The weather was windy and as we sheltered in our camped vehicles, there were gusts that felt they could relocate the Roof Top Tent. Luckily by nightfall the wind had abated and by our 2:30 am alarm call, it was fairly quiet. Although we had scouted the area during the day, locating a perfect location in the dark to shoot the stars was, shall I say, “challenging”. This being said, the temps were perfect at a crisp 37F and the skies were clear in the early hours and at sunrise. Success!
The Galactic Core over the famous Brain Rock
Day 5 and 6:
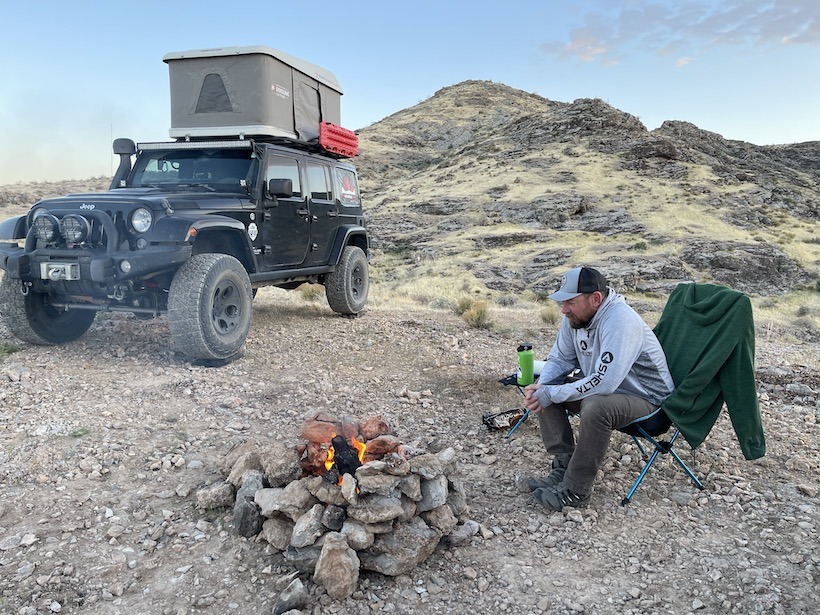
Our time was coming to an end at White Pocket and it was time to hit the road again. We didn’t want to drive 12 hours straight home to San Diego, so our plan was to camp half way home on BLM land outside Valley of Fire State Park, 60 or so miles north of Vegas. Finally, the wind had ceased and for the first time in 6 days we put our cameras away, lit a fire and just relaxed, ready to sleep through the night!
Now back home, the memories of this amazing overland trip make me anxious to hit the road soon. Of course the check engine light has now disappeared.
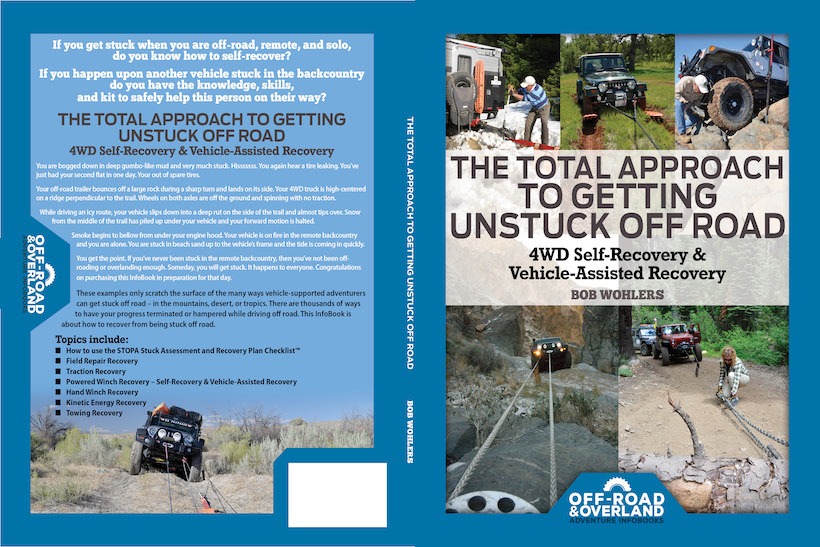
TAP Editor’s Note: The following is part two of a three-part series on off-road recovery. The author, Bob Wohlers, teaches government, corporate, and recreational off-roading as a full time profession. He is one of only a handful of fulltime 4WD trainers in the USA. Some of the content in this multi-part series comes from Bob’s book The Total Approach to Getting Unstuck Off Road – 4WD Self-Recovery & Vehicle-Assisted Recovery. While other authors of 4WD books try to cover the topic of recovery in a single chapter, Bob has the only complete book on the topic – 352 pages of step-by-step information.
There’s No Embarrassment in Getting Stuck Off-Road
If You…
As I tell my all of my students, “Off-Road long enough and you will get stuck in the remote backcountry.” Prepare for that day, then prepare some more – with knowledge, skills, and off-road recovery equipment that you should carry along on your journeys.” What can happen? Here’s some possibilities:
You get bogged down in deep, greasy, gumbo-like mud; one wheel from each axle begins to spin.
Photo courtesy of Tour-De-World.com
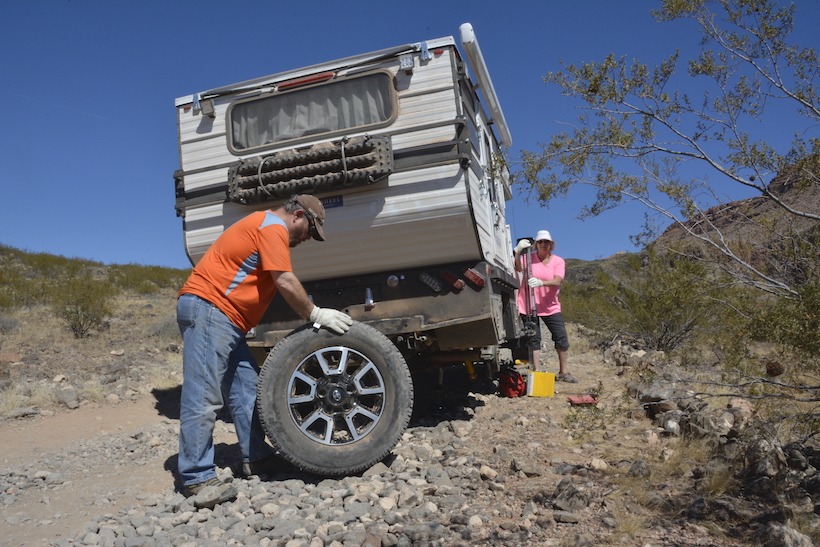
Hisssssss. You hear another tire leaking; you just had your second flat.
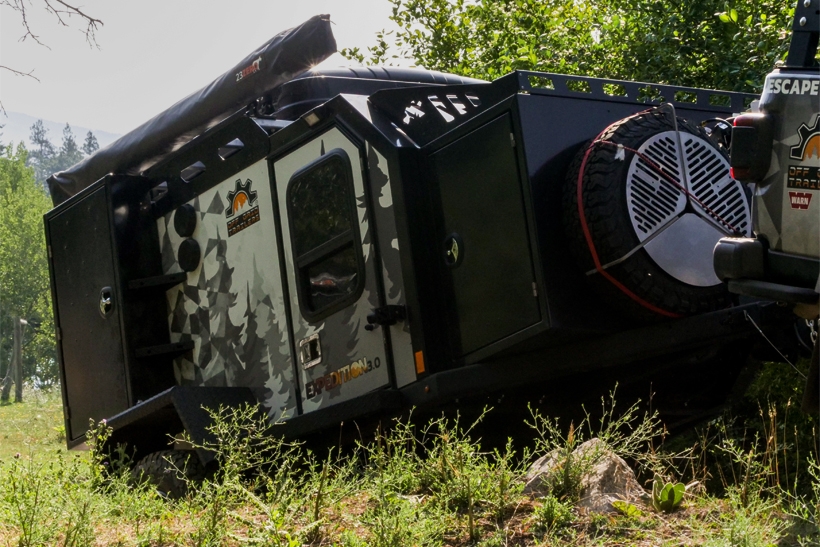
Your off-road trailer bounces off a large rock during a sharp turn and lands on its side.
Your 4WD truck is high-centered on a ridge perpendicular to the trail; wheels on both axles are off the ground with no traction.
While driving an icy route, your vehicle slips sideways, down into a deep rut on the side of the trail and almost tips over. Your wheels have no traction.
Snow from the middle of the trail has piled up under your vehicle and your forward motion is completely halted.
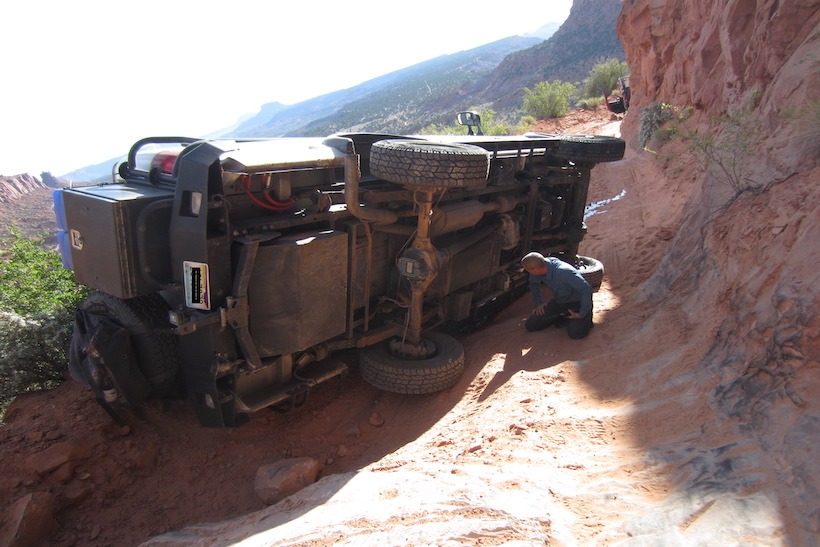
You’ve accidentally tipped your vehicle over on its side on a very narrow trail.
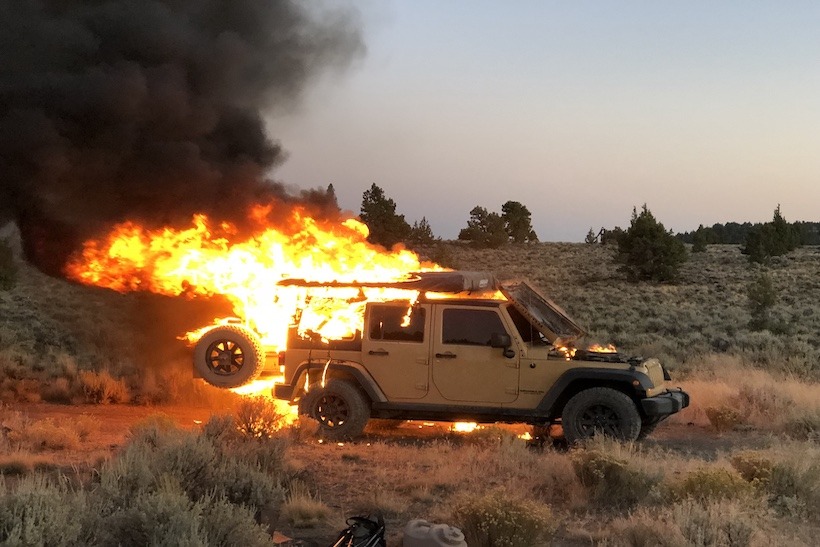
Your vehicle catches on fire in the remote backcountry.
Photo courtesy of Coyote Works
You get the point. Someday, you will get stuck. It happens to everyone. Hopefully when it happens, no one gets hurt. There are thousands of ways off-roaders have their progress terminated or hampered when driving off road.
Let’s be honest. Getting stuck off road is often due to driver error. We all make errors, from the most experienced to the least. Errors can be due to a lack of off-road driving skills. You may misjudge the amount of momentum you need to climb a sandy dune or pick a poor line while traversing a rocky trail. Errors can be due to a lack of knowledge. It’s easier to get stuck when you don’t have a basic knowledge or understanding of your 4WD vehicle or the terrain you are traversing. Errors can also be due to a poor attitude, such as “showing off” in front of peers or performing vehicle maneuvers that defy common sense. I call this a “hold my beer, watch this”mentality. In my opinion, this type of attitude lacks maturity.
Regardless of the reason for getting stuck, it is a part of off-roading. So, if you aren’t thoughtless, cavalier, or alcohol-fueled, there is no real dishonor in getting stuck off road. You will make errors when off-roading or overlanding. Sometimes you get stuck even when you do everything right. There’s no embarrassment in getting stuck if you do all you can to mitigate potential difficulties. Here’s how to lessen backcountry difficulties:
Take Training from an Expert. Taking formal training from a professional off-road educator can reduce your chances of getting stuck in the remote backcountry. You don’t know what you don’t know. A knowledgeable off-road recovery trainer can teach you all the ways you can avoid getting stuck and what to do when you do.
Venture Within Your Personal Limitations and Abilities. Especially in remote and international settings, you need the proper knowledge, attitude, and skills to problem-solve and get unstuck. Avoid driving a remote trail or section of a trail solo that is beyond the capabilities of both you and your vehicle. If you are solo and reach an extremely challenging section of trail, think about your capabilities. If you decide to attempt the challenging section of trail, plan how you would recover should you get stuck, or the situation worsens.
Venture Within Your Vehicle’s Capabilities. Not all 4WD vehicles are created equal. Even 4WD vehicles designed from the factory to venture off road have limitations. You will probably get stuck if you push your vehicle beyond its capabilities.
Know Your Vehicle Intimately. Today’s off-road-specific 4WD vehicles are more complex than in the past. Many have traction-aiding features that should be mastered to get the most from a vehicle. Whether you purchase or build your 4WD, learn how your vehicle functions to avoid getting stuck. To keep from getting stuck, you also need to know intimately your vehicle’s, including lift clearance, articulation capability, and angles (approach, breakover, and departure).
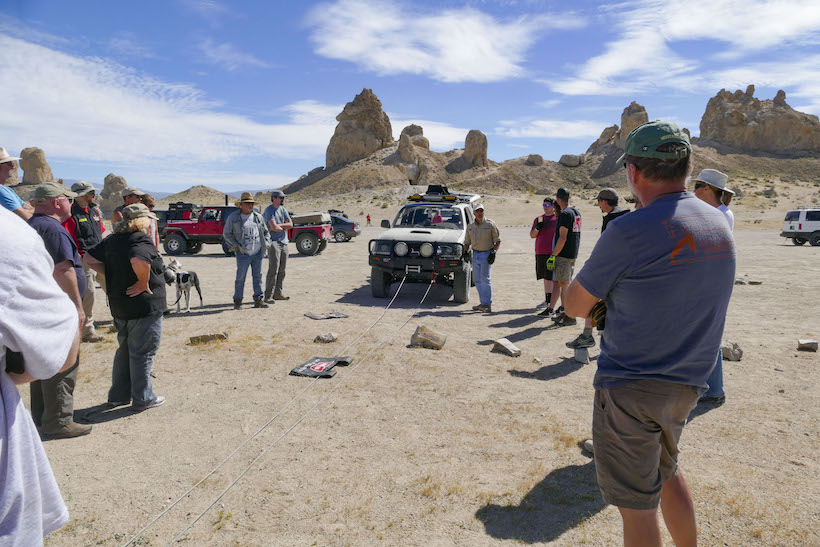
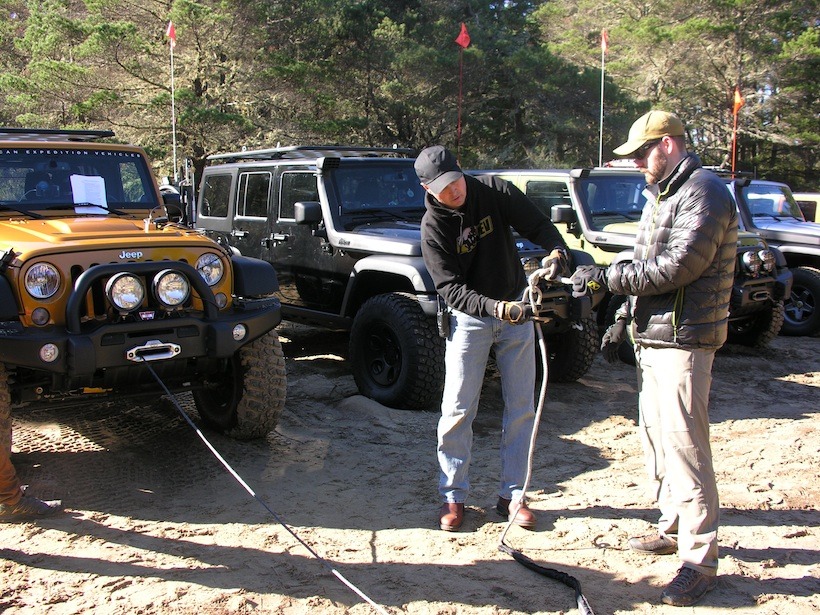
Travel With Other Vehicles. Recovery efforts are almost always easier and more relaxed mentally when traveling with other vehicles into the remote backcountry. This is especially true when you also are traveling beyond your country of origin and within Third World countries. Having other vehicles along on a journey also widens your recovery options. Now you can use vehicle-assisted off-road recovery methods.
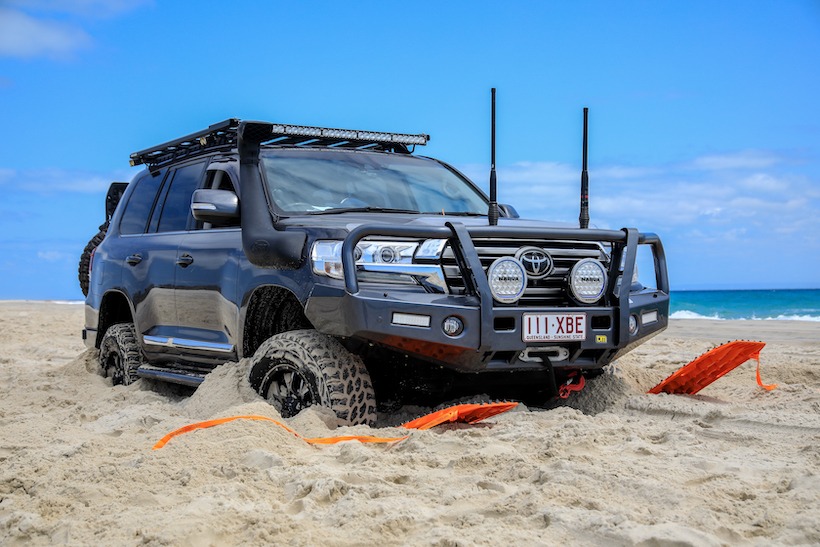
Have With You and Know How to Use Traction-Aiding Devices. Traction-aiding devices can be built into your vehicle (e.g., lockers, airing down tires, electronic traction control) or taken along with you when you are off-road (e.g., traction boards, shovel). Use as many traction-aiding devices as you have available to completely avoid getting stuck. When you do get stuck, use the same devices to methodically assist you in your recovery efforts.
Have the Correct Kit, Accessories, or Tools to Get Unstuck. It’s hard to carry every piece of recovery gear with you on every trip. If you’ve researched the trail prior to departure, you should have an idea as to the type of terrain you may need to traverse, helping you bring the right equipment. When with a group of vehicles, you can divide essential equipment between all the vehicles (e.g., not every vehicle may need a heavy Hi-Lift Jack).
Practice Recovery and Problem-Solving Skills at Home. Practice your skills at home prior to stressful situations in the remote backcountry. Recovery and problem-solving proficiencies are all perishable skills that should be practiced periodically when not under duress.
Research the Trail You Intend to Drive. Regarding knowledge of a particular trail, get as much accurate information from a qualified source as possible. Keep in mind that trails can change for the worse after one day of intense rainfall or earth movement. In reality, you can never have enough information about a trail. Have several maps that show the trail, as each may tell you something different about the surrounding area and the possible side routes. Before heading out to a trail, try to get current, up-to-date information from other off-roaders and local land-management officials. What’s the water level in streams you need to cross, are there wildfires in the area, what’s the trail’s difficulty rating, what is the typical temperature in the area at the time of use? Answering questions such as these and mining important information can help keep you from getting stuck on a really difficult trail, beyond your capabilities.
Solve Problems in a Methodical and Effective Manner. When stuck off road, follow an intelligent problem-solving checklist that results in a complete stuck assessment and an effective recovery plan. We will cover this topic in part three of this series in The Adventure Portal.
Try Low-Energy Methods of Recovery First. As often as possible, first try low-energy and/or saferrecovery techniques (e.g., shovel use, lowering tire pressures, use of traction boards) before trying other, more aggressive and higher energy methods (e.g., kinetic energy, winching) of getting unstuck.
Photo courtesy of MaxTrax
Refuse to Get Frustrated During Off-Road Recovery Events. When you do get stuck, calm yourself. Stop, Think, Observe, Plan, and then Act.
Avoid Hurried Recovery Efforts Due to Peer Pressure. Don’t let others on a trail hurry your recovery efforts to get unstuck.
Safeguard the Environment During Off-Road Recovery Operations. Sometimes getting unstuck in the remote backcountry means disturbing the environment just a bit to get out and going again. A good driver minimizes this disruption as much as possible. In the end, however, you’ll need to do what is necessary to get home alive.
Use Common Sense. Most of the above points have to do with common sense. Same for the use of drugs or alcohol that may be contrary to safe driving. Use your common sense each and every time you get stuck off road.
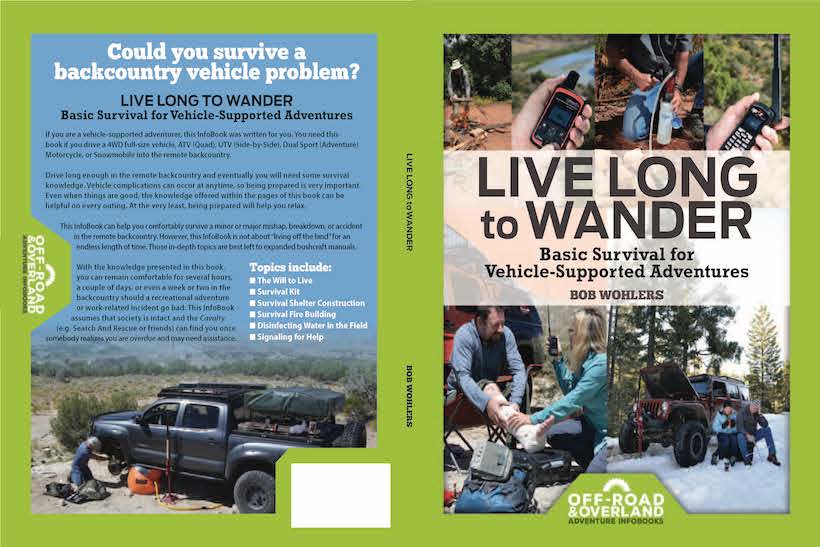
Be Prepared with Survival Knowledge, Skills, and Kit. Should you not be able to recover and get unstuck if you are remote and solo in the backcountry, you need to have the knowledge, skills, and kit to remain comfortable for several hours, a couple of days, or even a week or two should an adventure or work-related incident go bad. The companion Off-Road & Overland Adventure Info Book Live Long to Wander – Basic Survival for Vehicle-Supported Adventures is a must-read for all vehicle-supported adventurers.
Fun fact: Lori and Andy from TAP are the “injured” couple on the cover.
Live Long to Wander: Basic Survival for Vehicle-Supported Adventures– $25.95 BUY HERE
Raising Your 4WD Vehicle Off-Road & In-Field Tire Repair – $44.95 BUY HERE
The Total Approach of Getting Unstuck Off Road– $59.95BUY HERE
We created the Deadman™Earth Anchor™(patent pending) because we wanted to explore with confidence. We often found ourselves venturing solo, and with very little room to spare in our vehicle we needed recovery gear that was at once lightweight, small, and adaptable to different terrain. The Deadman was our solution to this need. With this single device, we can create a winch anchor point out of almost anything Mother Earth throws our way — without breaking the bank or taking up precious cargo space. For us, this opened new avenues to adventure and the freedom to explore. We believe in having many different recovery tools in our recovery kit; the addition of something as versatile as the Deadman gives us options — and since every recovery is unique, and conditions are never ideal, having options might just be what’s needed to get us home.
WHAT’S AN EARTH ANCHOR?
Ok, anything you bury in the ground as a winching anchor point is defined as a deadman anchor. So yes, we named our product The Deadman in honor of this, however its versatility both above and below ground has led us to refer to it as an Earth Anchor. You see, the Deadman is not simply a ground anchor: it can anchor to a tree, a rock, or the ground unlike anything else. Most anchors only work in one scenario, meaning you must carry multiple anchors to ensure preparedness. The Deadman’s unique design allows it to be extremely capable in all three scenarios, making it the most versatile off-road anchor ever.
THE DEADMAN EARTH ANCHOR:
Our primary design objective was to create something small and lightweight that could be easily buried – and be retrieved without more digging – for self-recovery in areas where there is nothing else to attach a winch to. What we came up with surprised us! It weighs less than 5lb, fits underneath a seat, and works to anchor to so much more than just the dirt. Because it’s a soft product, it can also be used around trees and rocks with increased safety relative to traditional anchors… and we keep finding new uses for the Deadman all the time. For instance, because it’s made from industrial grade, non-stretch polyester webbing (same as a tree strap), it can also be used as a 15′ winch extension. We’ve also found it useful as a ground mat, a fluid catch, a shade, and more – we’re looking forward to what ideas our customer community comes up with as well!
THE DEADMAN MATERIALS & CONSTRUCTION:
The Deadman is constructed in USA from the finest USA-made, industrial grade materials. The tarp in the center is industrial 18oz vinyl with a rip-stop polyester skrim that’s both tough and malleable, allowing it to conform to misshaped objects like rocks without ripping. The webbing is 2″ Class VII industrial sling webbing, manufactured by Murdock Webbing (est. 1936) in Rhode Island, which is the same stuff used in industrial rigging and hoisting applications. Each line has a breaking strength of 19,600lb in a straight pull configuration and 39,200lb in a basket configuration. Because the Deadman uses two of these, when both lines are in use its breaking strength doubles, giving the Deadman a minimum breaking strength (MBS) of nearly 80,000lb in a basket configuration (still over 66,000lb after assembly). Additionally, because more than one strap is in use, the Deadman offers something no other anchor can: redundancy.
Everywhere you look these days, you see articles about Vehicle Supported Adventure, “Looks pretty cool” you say to yourself, but where do I start? Alternatively, maybe you simply want to experience a different states adventure opportunity without wasting days driving 1000’s of miles to simply get there? Titus Adventure Company (TAC) answers these questions for you and a couple weeks ago we sat down with them and asked them about their rapidly growing business.
What is TAC and how and why did you start it?
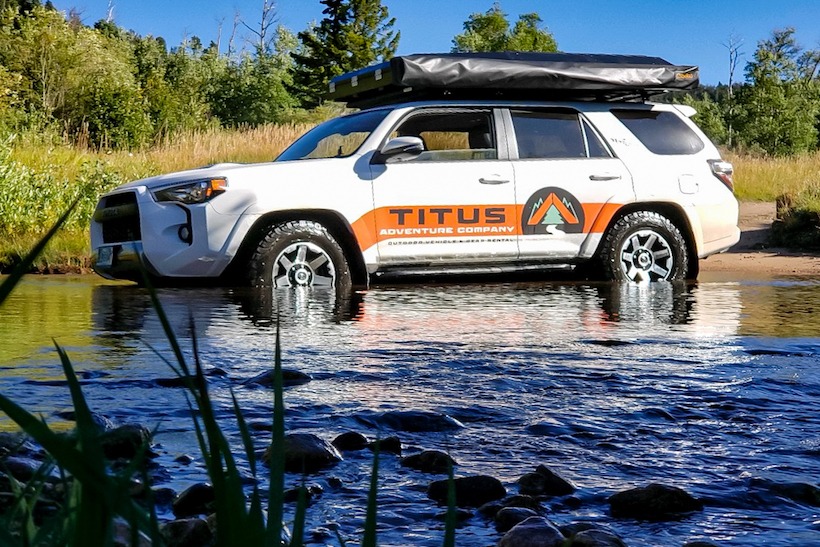
Titus Adventure Company (TAC) is an overland adventure vehicle rental outfitter based in Denver Colorado and we see ourselves at the “Uber of Overlanding.” Our mission is to help provide access to the outdoors while being good stewards for the environment and community. I started TAC mainly out of a personal need: how to live the outdoor Colorado lifestyle while reducing my family’s carbon footprint. As a young family of 4 (with a dog) we need a big SUV for weekend adventures in the mountains, but we don’t need it to run to the grocery store. Why not rent the times we need an adventure rig and have a much more fuel efficient car for the other 90% of our driving? We have since purchased an EV for our daily driver and offer 20% off to all other EV owners. The other major motivation for starting the company was that I believe life is better outdoors and as a Colorado native I have spent a lifetime getting outside, but not everyone is so lucky. How can we help get people outside? We do that by removing barriers. Don’t have the right vehicle? We bring ours to you. Don’t have time to pack/ unpack and then clean? We provide the gear and clean it for you. Don’t know where to go? We help plan your experience. Don’t have $60k to put into an overland rig? Rent only when you want to go out. To solve these problems I quit my mechanical engineering day job and jumped all-in on this business with no idea really how to start a business, how to market it, how to get insurance, or how to make financial projections. What I did know was that this was something I was incredibly passionate about and I felt confident the timing was right for this type of business.
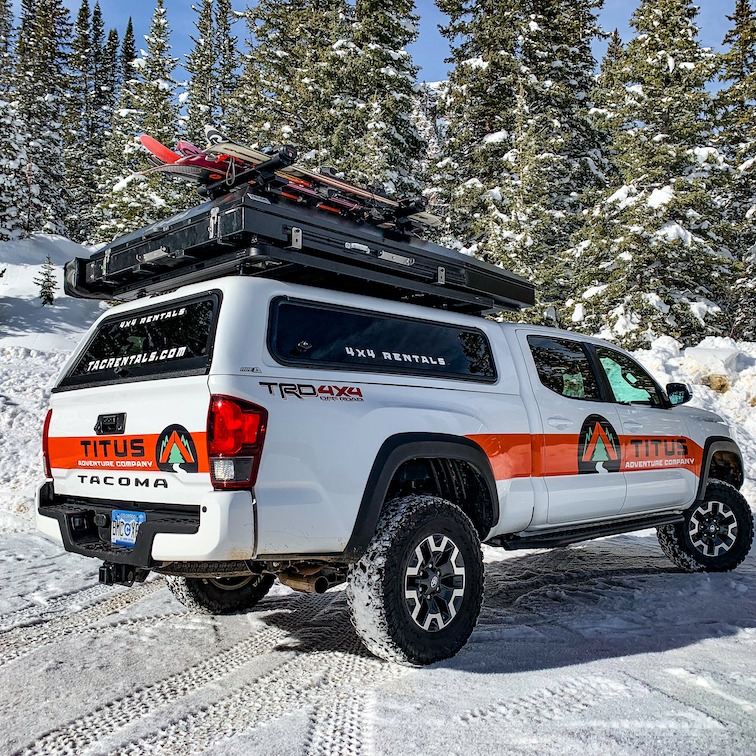
Titus Adventure Company (TAC) Rigs and their builds
The Titus Adventure Company fleet is Toyota 4x4s that are perfect for the Colorado market. We have a 2019 4Runner TRD Off-Road Premium, a 2019 Tacoma TRD Off-Road Premium, and 2019 Sequoia TRD Sport. These were selected to offer a range of vehicle types to suit different needs but all under the same family. We also wanted to start with a variety and test out assumptions about which vehicles would be most popular. One of the most important factors in the vehicle selection process was reliability. We can’t have rigs breaking down on guests in the backcountry. Another factor was we felt it was important to have the vehicles the locals drive. This makes our rentals appealing to the folks who just moved to Colorado and want to get into the lifestyle and also critical to our mission of changing the type of cars locals drive. If we are asking people to give up their 4Runner as their daily driver, they darn sure want to be able to rent one on the weekends. Lastly, we wanted vehicles that are very capable but also very easy to drive and don’t feel overwhelming. It is one thing to trick out a vehicle you drive everyday and know well, it is another to have a stranger drive it.As such, we have left the vehicle fairly stock but have done the following mods
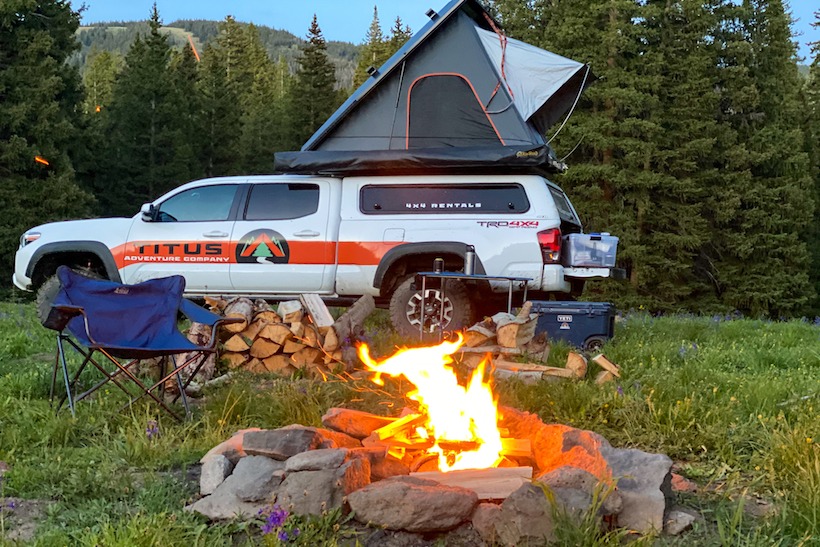
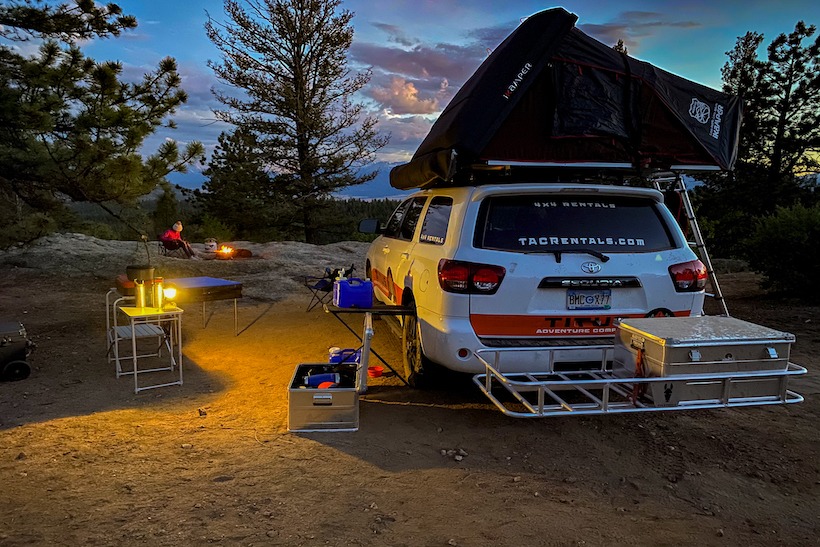
Titus Adventure Company offers a ton of gear in addition to the vehicles to help outfit your adventure. Included with the vehicle rental, guests get a standard camping package which includes things like stove, fuel, chairs/tables, cook kit, Yeti cooler, water jug, and camp lighting. We also offer a deluxe camping package that has the items above plus things like Yeti coolers, Maven binoculars, portable toilet seat, supplies for S’mores, and firewood. We have gear for watersports (inflatable SUPs and packrafts), bike racks, ski racks, a PakMule hitch carrier, rod vault, portable shower, kid sleeping bags, and Goal Zero power banks. The list goes on!
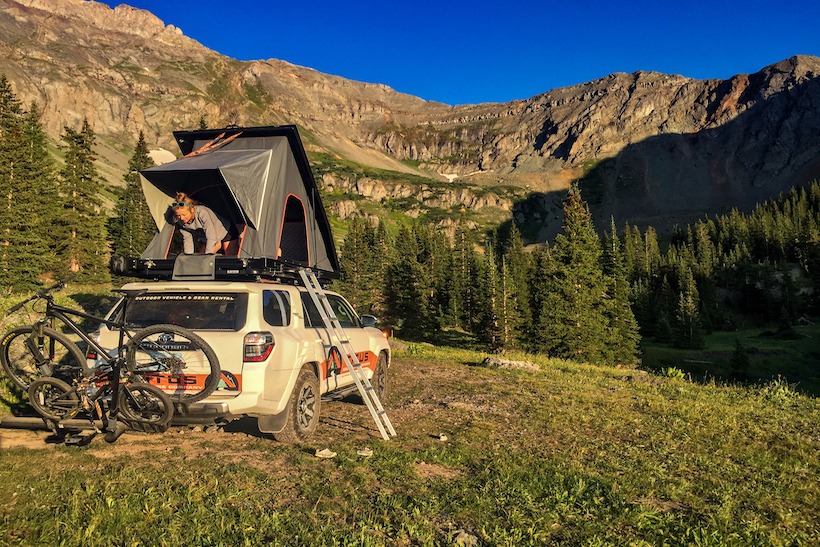
TAC Tacoma on a ski mission
Are your audience local or from all over the US and International?
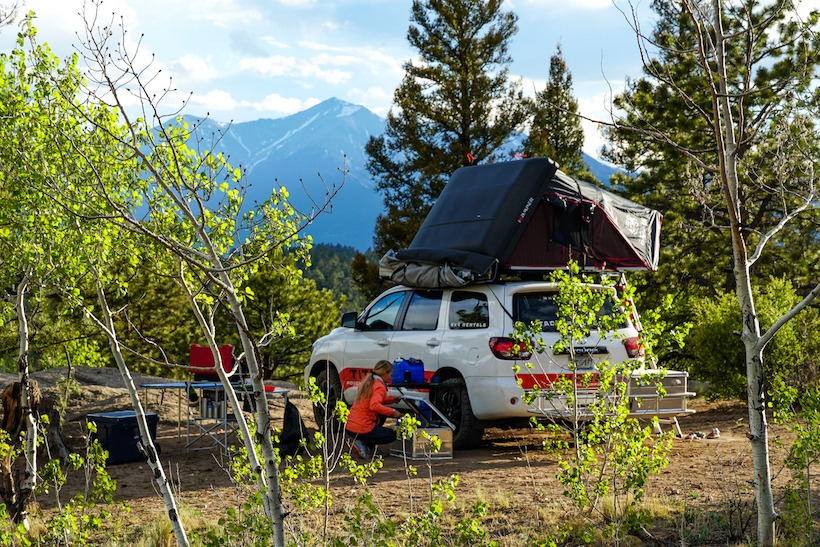
We are seeing a mix of local and out of state. In the winter most of our guests are from out of state coming to ski and want a guaranteed vehicle with snow tires and 4WD. The summer season is more of a mix. One of our goals is to be a resource for locals who want to explore the mountains on the weekends in a rigged vehicle and use a smaller efficient city driver the rest of the time. We are marketing heavily to urban dwellers and suburban families who are in Colorado because they want to explore the outdoors, but for them having a lifted vehicle with RTT and tons of outdoor gear just isn’t practical.
Chillin around the fire
Does TAC curate areas, trails, POI’s for the renter?
Yes, Titus Adventure Company hears from a lot of guests that they are excited to try an overlanding trip but don’t know where to go. It is awesome to be able to camp for free in the national forests but can be overwhelming too. We are developing some recommended routes in various parts of the state and then also offer more personalized trips. We also ask about their off-road driving experience, other activities they want to do and recommend routes accordingly.
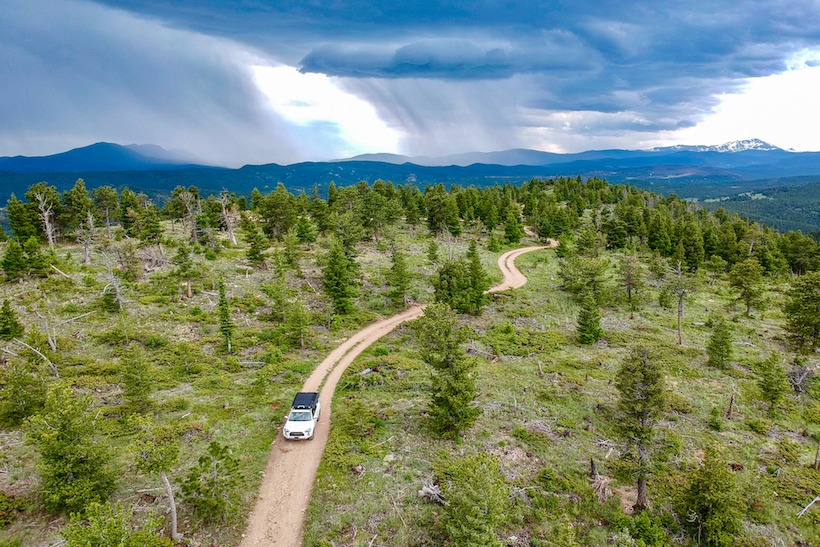
Tacoma in the backcountry
Define the process of renting with you?
Bookings can be made online or by giving us a call. The website shows the vehicle availability and also allows the guest to add on any extra gear for their trip. Once they book we reach out with confirmation email and pre-trip survey to help us learn about their needs/wants. If the guests are looking for a more pre-planned trip we will put together a Google Earth presentation that shows them potential campsites and then create a trip route guide. A few days before the trip we will reach back out to confirm the pickup details and answer any last minute questions. After the trip we do a quick vehicle walk around, guests get their personal items out of the vehicle and they are all done!
A room with a view
What have been the challenges (apart from Covid of course)?
Getting commercial insurance for a small, new business that lets renters go off paved roads has not been easy to say the least. It took over a year to find a policy we were comfortable with. The other main challenge has been brand awareness. While overlanding is a rapidly growing trend, it is far from mainstream and even less known is that you can rent one of these vehicles. Most people know you can rent a Jeep for a day and most people know you can rent an RV and we are trying to bring awareness to the big gap in the middle. It is far from common knowledge that you can rent an adventure-ready mountain vehicle loaded with gear.
Any funny rental stories?
A guest came back from the Sand Dunes (Medano Creek) missing the front license plate and the bumper valance. He really had no idea how it came off or when and it seemed hard to believe something would rip it off driving forward and not damage the car anywhere else. Was he backing up and caught something? Later I learned that during water crossing at just the right depth and vehicle speed, the water can swirl up at the front bumper and that is what peeled the licence plate off. I also learned that replacing a specialty plate is not cheap…While cleaning a vehicle after being returned, we found some very nice Italian cheese in the car, vacuumed-sealed and uneaten. We got a hold of the guest and it turned out they had bought it in Europe on a trip just before their rental with us and were saving it to bring to their mother-in-law. The guest lived in Vermont and we happened to have family in town from Vermont who were more than happy to fly the cheese home with them and reunite it with the guest. We also have a guy planning to propose to his girlfriend on a trip in a few weeks!
Driving off road presents a host of challenges and fears for any driver. Four wheeling can be especially intimidating for new drivers. Those initial concerns are understandable. It takes off-road experience to build skill set and confidence.
If you’ve considered going off road but are reluctant to do so, relax. The following information may convince you to take up the hobby. While you are reading this remember: in town, you get into a pile-up as the result of other driver’s errors and actions. Off-road, in almost every instance, the driver makes the decision and judgment that lead to his own predicament.
After years of talking with new 4-wheel drive owners, here is my perception of the Top 10 Fears of newer drivers, and what to do about them.
1. Damage to a new vehicle:
This fear is mostly with regard to cosmetic damage; minor pin-striping and scraped bumpers. On occasion an air dam gets torn off or a license plate is bent out of shape. If you intend to explore more challenging terrain, I recommend you add rock sliders on the sides of the vehicle and skid plates to protect the undercarriage in case you bottom out. The first little dents will probably hurt you more than the vehicle. But on the bright side, you can now justify an aftermarket bumper.
2. Rolling over:
This is normally a rare issue. What makes good YouTube fodder is the extreme stuff with above average risk. When it does occur, the driver is often in an extreme situation or driving recklessly. Take your time going through rough terrain and around obstacles. Avoid high risk situations whenever possible. This may not be a comfort to you, but if you do make a mistake that causes your vehicle to roll, most times, the vehicle will only tip over onto a side (what we call a flop). A flop tends to occur while driving slowly, so damage to the vehicle and the driver is limited.
3. Stuck forever:
This rarely happens. Sure you are going to get stuck sometimes. Your buddies will help you out of a jam. Most stuck situations are what we call shallowly stuck – lightly hung up on a rock or mud just up to the side walls. A quick pull by another vehicle will usually remedy this situation. If you go by yourself, a winch will get you out of most situations. Of course you should avoid dangerous situations; areas where you think, “Yeah, I might be able to do that.” Bottom line? It’s always preferable to go out with at least one other vehicle.
4. Breakdowns:
The most common issues are resolved with proper training and tools. Remember, you’re likely to be with other drivers, who can lend experience and a hand. Read up on and poke around your vehicle to prepare you to be able to deal effectively with breakdowns. In my opinion, tires are the number one cause of problems. Focus on learning the skills on how to fix tires (they are not hard) and acquire the necessary tools. Bottom line: a breakdown need not end your four wheeling trip.
5. Not knowing where to go and not knowing other drivers:
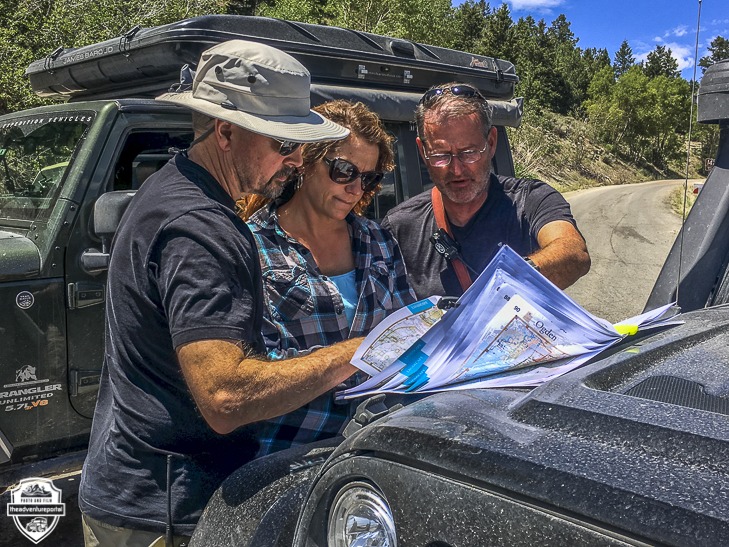
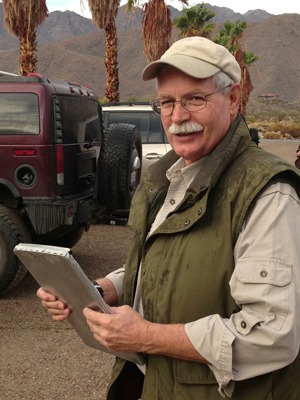
The Federal Bureau of Land Management (BLM) produces maps that show open trails in the western states. Since 2011, they have provided “Off-Highway Vehicle Route Supplement” maps by Field Office sub regions. All open trails (with trail numbers) are identified. These maps do not have contour lines or other details and should be used with other maps like the BLM Surface Management Status maps. All national forests are required to publish a “Motor Vehicle Use Map” (MVUM). The maps are little more than line drawings of the trails with trail numbers. They show the major paved road to help orient you. In California, the California Trail Users Coalition publishes maps with the MVUM over laid on more fully featured maps for $3.00. Obtain several maps so you know where to find legal trails.Another good resource are trail guides. You can find a list of publishers on my web site www.4x4training.com/w/trails.html. A critical point here is that even if you feel well equipped with your trail loaded on a GPS, always bring a paper map! Electronics can fail.
Map meeting outside Soldier Summit.
In terms of finding other likeminded off roaders, look for events that are open to the public. Stop by and introduce yourself. You are likely to meet lots of other folks willing to hit the trails with you.
6.Breaking a bead:
Also called losing a bead, this is common. This concern is warranted but easily mitigated. Four wheelers air down nearly every time they go off road. If you turn too sharp, too fast in soft stuff or against a rock, the deflated tire is likely to lose its bead. The issue sounds worse than it is, though. As you’ll learn in this article, Tire Problems Shouldn’t Deflate Your Day, the problem is easily corrected with an air compressor and jack.
7. Embarrassing yourself in front of others:
Understand that everyone has to start sometime. Heck, I can recall some of my boneheaded newbie mistakes. The hope is that your fellow drivers are patient and understanding. To build your confidence, take some introductory classes. Everyone in these classes are in the same position as you, and you’ll learn together. (I offer a number of beginners’ classes.) Bear in mind that making mistakes is a part of your training. Don’t get worked up if, for example, you pick the wrong line. You’ll quickly recover, and you’ll be a smarter four wheeler as a result.
8. Lack of skill & knowledge:
There is no need to jump into driving on high risk, difficult trails. One trail book I have for Southern California lists over 150 trails (representing about 1500 miles). Only 19 of them rate above a difficulty Level of 4 (out of 10), although you do need 4-wheel drive and good clearance. Most of the trails take you to scenic overlooks, old ghost towns, old mines, and great camp sites. There are so many things to see and places to go on moderate to easy trails. An off-road training clinic will quickly eliminate any doubts about your ability to drive this level of trails safely. There are so many trails, and such a wide variety of terrain, that you’ll easily find a path that is enjoyable and surmountable.
9. Going off camber:
This is the official term for driving when tipped at an angle. As a newbie, being tilted over can be an unnerving experience. Even veteran drivers are uncomfortable driving off camber. Off camber isn’t a real issue until you get up to around a 30-degree pitch. In most cases though, you’re not likely to tip over, unless you’re traveling fast. Go slow and control the bounce. In my Getting Started Off-Road Driving & Safety Clinic I put students through a 30-degree pitch exercise. They learn what it feels like and how to respond. That way they are less likely to freeze up while off road. You can also buy a couple of tools that will help you determine your angle. One is an angle finder carpenter’s use, available in any hardware store. Another one, you can find at 4WD stores can be glued to the dash, it shows pitch and yaw.
10. Lack of immediate emergency services:.
Some 4WD areas as so remote, you’re outside the 2-hour window that normally defines urgent care response. Worse, you may be outside of cell range, as well. Here are a few things you can do to help keep you safe when dealing with an emergency in a remote location:
-Get basic first aid training. Learn how to stabilize an injured person. Take a basic survival course, too. You may need to camp out one or more nights while waiting for help. -Pack alternate forms of communication. These can include ham radio (requires a license), a satellite phone and a personal locator beacon or SPOT device. -Always ride with at least one other vehicle. I can’t stress that enough. Especially while still inexperienced, don’t consider driving alone on anything but the easiest trails.
I hope you have a better understanding of how to address four wheeling issues. The trails await you. Get the training you need, pack your vehicle, and then get out and enjoy the ride.
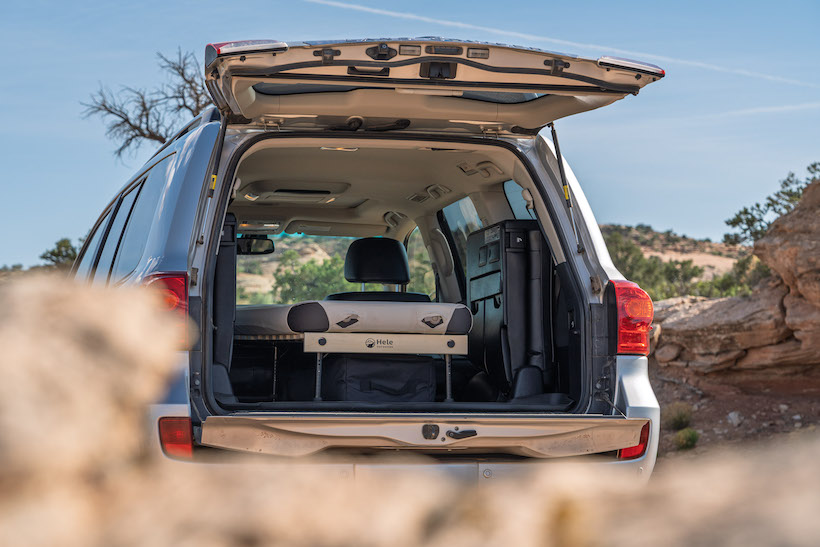
Doomscrolling Instagram one night, I stumbled upon the Hele Box – an innovative SUV sleeping platform/storage solution – and shortly thereafter, a plush air mattress by Luno Life. Is this the perfect sleep system I was looking for?
So, last year I bought a 2013 Land Cruiser, a vehicle I would use for regular long-distance commutes as well as adventuring off-road in pursuit of spectacular locations to photograph. It would serve as my home on the road for short trips, and as such I needed to figure out the perfect sleep system to comfortably camp out of it. I gave myself a budget of $1,000, with the additional requirement that the solution had to be simple to use, lightweight, and easily removeable for those times when I needed to use the rig for non-overlanding things. Luckily, it didn’t take long to develop a system that checked all the right boxes.
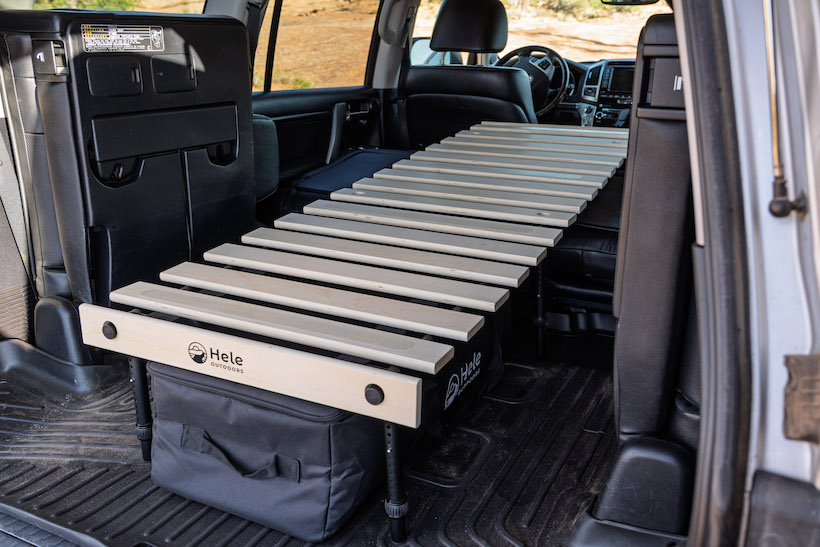
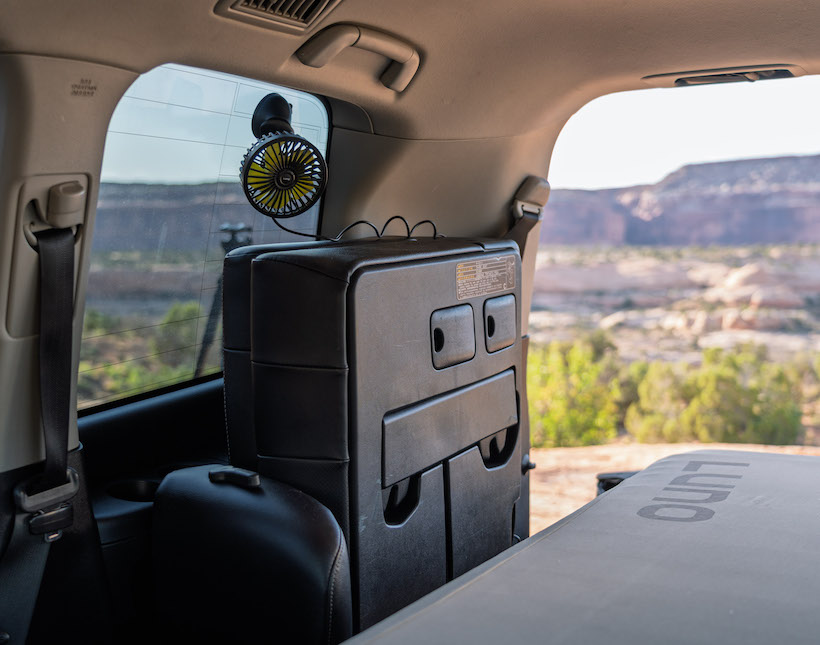
My Land Cruiser has third row seats that fold up and somewhat out of the way but still consume a good chunk of space in the rear cargo area when stowed. The second-row seats fold forward, leaving just enough room for me to lay my 5’9” frame diagonally and stretch out, but a small hump just behind the rear seats made it uncomfortable and awkward.
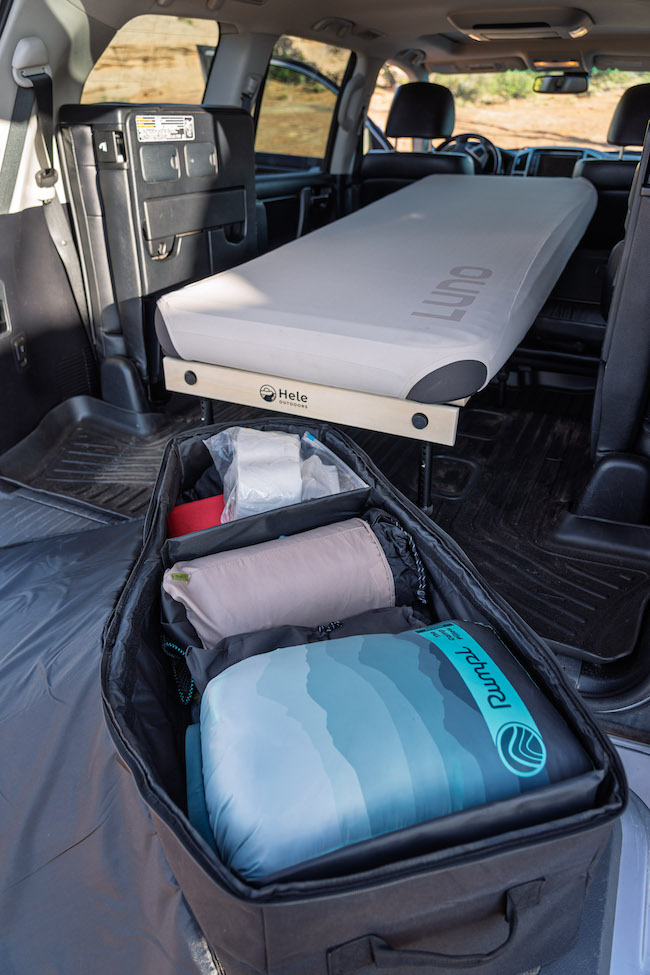
The Hele Box Solo is packaged in a large zippered soft case with adjustable dividers that can be used for storage under the platform; a two-for-one! The Hele Box uses six adjustable legs to create a 24” x 72” level platform inside your rig, regardless of how oddly shaped the space may be. At the front, long legs extend to the floorboard behind the front seats, with the platform hovering just above the folded second row seats and extending rearward to the liftgate. In the middle and rear of the platform, short legs support the rest of the frame. A dual-locking system on the legs creates a stable and wobble-free platform. Wooden slats that roll up for storage are laid horizontally across the frame and secure at both ends to create a solid platform for your air mattress. The included storage case fits under the platform and has plenty of room for camp essentials like a stove, cookware, food and more. The Hele Box can be setup or taken down in about five minutes, getting your rig camp-ready in no time. My one complaint is that the wooden slats rattle against the metal frame on rough roads. I haven’t tested it yet, but I suspect bungee cords or a couple small ratchet straps could mitigate this issue. The Hele Box is available in a solo or double size, and the solo I have retails for $499. There are other, similar products on the market, but I haven’t seen anything at this price point.
There was a time when I could sleep soundly in a sleeping bag laid on top of an emergency blanket on the cold, hard ground. Those days are long gone. I now require a certain level of comfort and the Luno Life AIR+FOAM Camping Mattress supplies it in spades. As the name suggests, this 4” thick mattress combines air with memory foam for a truly decadent camping experience. It inflates quickly with the included stuff sack pump and can remain inflated for the duration of your trip. Mine has been inflated in the back of my rig for over a month and hasn’t lost any noticeable amount of air. Available in short, regular and tall, all mattresses are 25” wide and my regular is 72” long. While it’s too heavy and bulky to backpack with, it can be used in a ground tent while car camping and if you spring for the fitted sheet(!), it feels that much more luxurious. The Luno Life AIR+FOAM mattress is, hands down, the most comfortable camping mattress I have ever used. At $279.99, it isn’t inexpensive but it’s also not much more than a quality backpacking air mattress and provides an unparalleled level of comfort. Luno Life also makes car window screens that allow you to leave a pair of windows open for ventilation without bugs ruining the experience, and a fan that suction cups to any smooth surface, plugs into a power bank, and moves a surprising amount of air to keep things cool at night.
The Hele Box and Luno Life mattress are a perfect combo to turn any truck or SUV into a comfortable place to snooze in the wilderness, without having to make any permanent or difficult to reverse vehicle modifications.
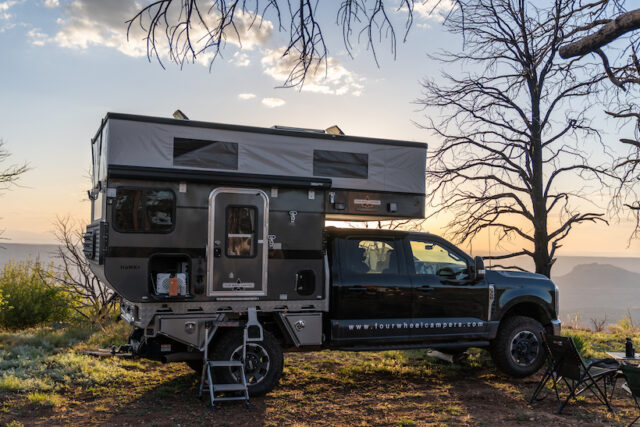
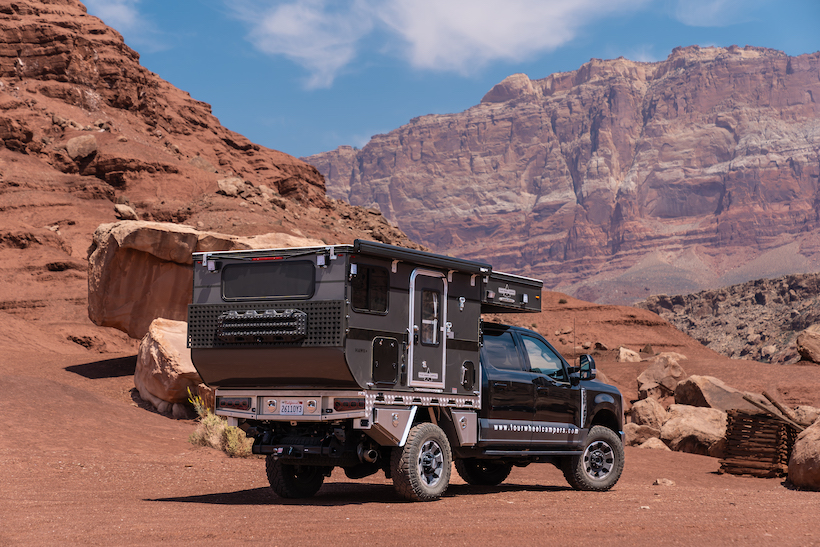
Bret is a professional adventure and nature photographer in Moab, Utah. He, his wife Melissa, son Jackson, and adventure pug travel frequently throughout the West in search of the best trails to mountain bike and hike, and the most epic campsites for their 2021 F250 and Four Wheel Campers Hawk UTE or Land Cruiser 200. Some of his favorite places include the Sonoran Desert, Oregon Coast, Northern Rockies and the Cascades.
Check out Bret’s Photography Adventure in Southern Utah HERE
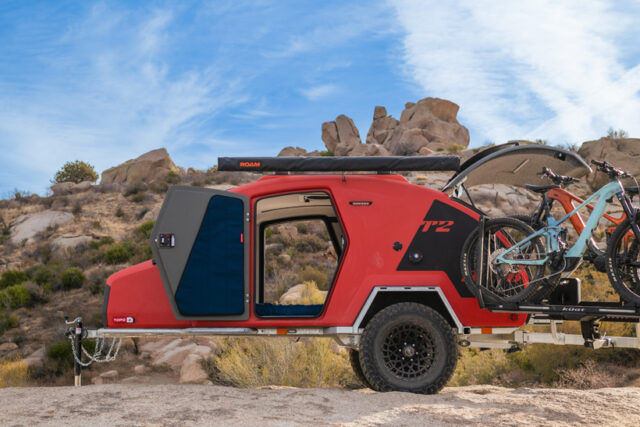
Escapod TOPO2 MTB: A Purpose-Built Basecamp for Riders Who Go Further
For mountain bikers chasing remote trailheads and multi-day adventures, lodging often becomes the weakest link. Hotels are rarely near the action, and traditional camping setups can be bulky, under-equipped, or just plain inconvenient. Enter the Escapod TOPO2 MTB, the first camper trailer designed specifically with mountain bikers in mind.
Built on Escapod’s proven TOPO2 platform, the MTB trim adds purpose-built features that transform it into a self-contained basecamp. This isn’t just a teardrop with a bike rack. It’s a fully integrated system designed to support riders before, during, and after long days on the trail.
The foundation is a one-piece fiberglass body that is leakproof, rot-resistant, and insulated with an R-9 rating. The cabin includes a queen-size memory foam mattress, ample storage, USB charging ports, and dual entry mudrooms with space to stash gear and remove dirty shoes. Heated water and cabin climate control come courtesy of the Aqua-Hot system, which keeps things comfortable in all seasons.
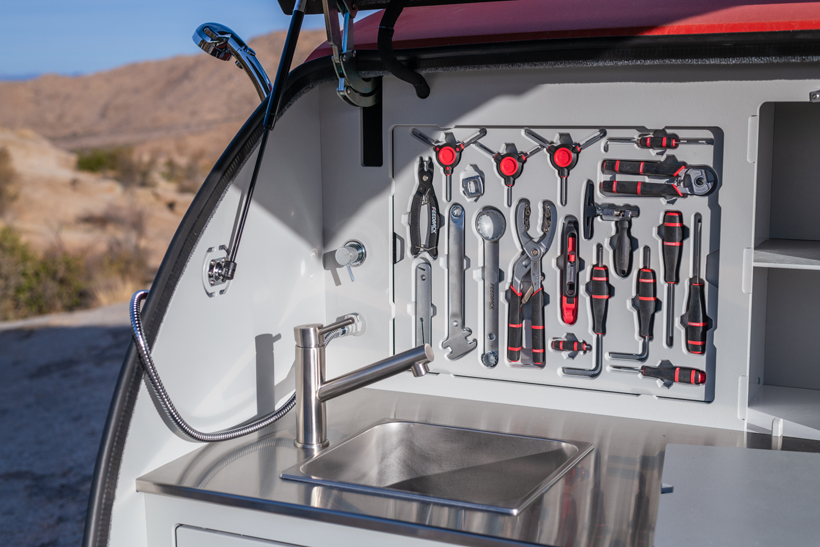
Out back, the galley kitchen blends cooking utility with trail readiness. A stainless steel sink and two-burner stove are paired with an ARB fridge and a full Feedback Sports bike tool kit, neatly stowed where most trailers keep a knife rack. Powered by a 240Ah lithium battery, 140W solar panel, and 2000-watt inverter, the system offers reliable off-grid performance. A 21-gallon freeze-resistant water tank provides pressurized water for both the galley and a rinse-down station for bikes and bodies.
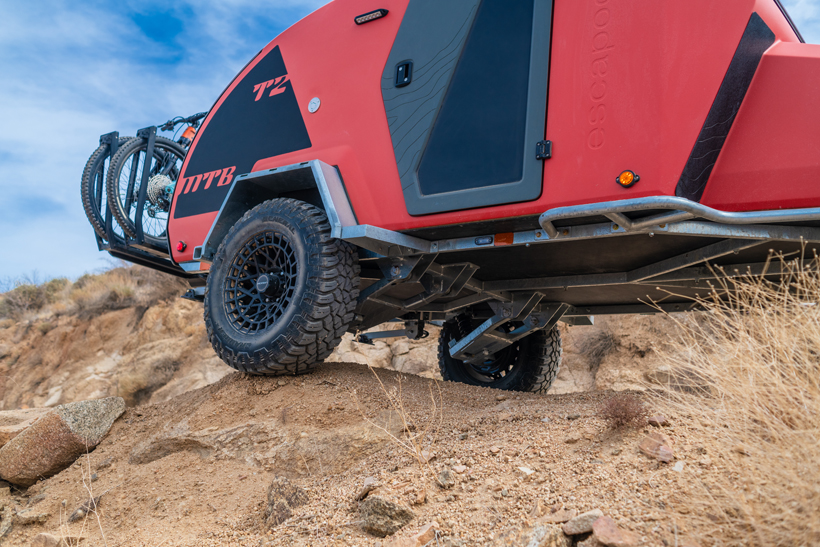
Storage and transport for bikes are equally considered. The TOPO2 MTB comes standard with a Küat Piston ION rack, mounted to Escapod’s proprietary Switchback Hitch. Built to withstand the heavier weight of eMTBs and off-road travel, this setup ensures safe transport on even the roughest routes.
The trailer rides on Escapod’s Freeride Suspension System, which delivers 23 inches of ground clearance and smooths out technical access roads. Below the body, galvanized rock sliders and subframe components resist corrosion and shrug off trail abuse while lending the trailer a rugged, utilitarian aesthetic.
At $53,990, the TOPO2 MTB is a premium product. But for those who prioritize time on trail and value self-sufficiency, it delivers unmatched utility. It replaces a hotel, a bike stand, a shower, and a gear hauler in one compact, durable form. Escapod also offers financing options, including zero-down plans for qualified buyers.
For serious riders looking to elevate their adventures and stay closer to the trails they love, the TOPO2 MTB is more than a camper. It is a mission-ready command center that brings everything you need wherever the trail leads.
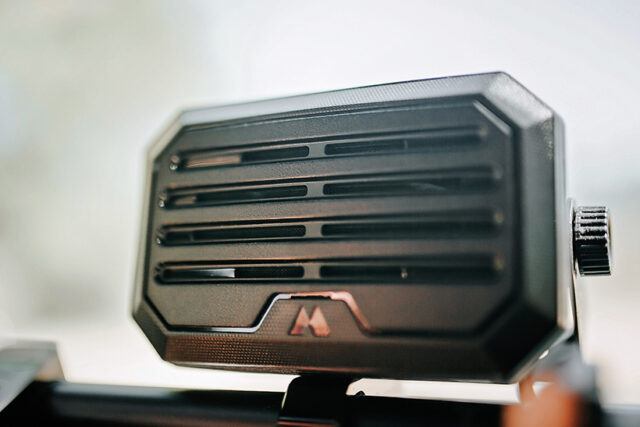
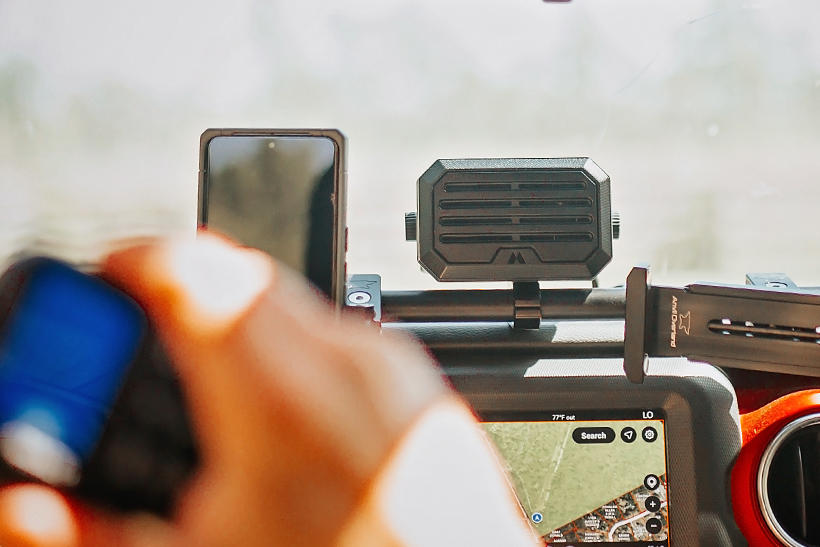
When it comes to building out an overlanding vehicle, space is limited, but communication is absolutely key to safety and connection. Midland’s Mini External Speaker (SPKMINI) is the perfect solution to bring crisp and clear communication to the smallest spaces.
Designed for tough environments and tight spaces, the SPKMINI proves that size doesn’t have to compromise sound. Whether mounted in a packed 4×4, side-by-side, or a rooftop tented Tacoma, this ultra-compact speaker ensures your message cuts through engine noise, wind, and wilderness chatter.
At just 4.5″ x 3″ x 2″, the SPKMINI was built with overlanders in mind. With a low-profile build and a 180-degree adjustable mounting bracket, it’s as versatile as the terrain you’re driving through. From dashboard to roll bar, the speaker mounts just about anywhere, making it a favorite among those who need audio clarity without sacrificing interior space.
Powering up to 10 Watts of dynamic sound, the SPKMINI delivers crisp audio that stands up to the chaos of open-air travel and off-road engines. Coupled with its IP67 waterproof and dustproof design, this speaker thrives in muddy, dusty, and wet conditions—meaning it’s as tough as the rig you drive.
For those running GMRS, CB, or other two-way radios, the SPKMINI integrates seamlessly thanks to its standard 3.5 mm audio plug. It comes with a 6.5-foot heavy-duty cable, giving you plenty of length to run clean installs through dashboards, consoles, or custom overland builds. And with 8 Ohm, it’s built for broad compatibility with virtually any mobile radio setup, including Midland’s own MicroMobiles.
Out on the trail, every second counts. That’s where the SPKMINI shines. It’s not just about cranking up the volume—it’s about delivering vital messages that help avoid wrong turns, flat tires, or worse.
With Midland’s legacy of reliable communication gear, the SPKMINI is more than a speaker—it’s peace of mind in your overland setup. Compact, clear, and built to endure—Midland’s SPKMINI is the audio upgrade every overlander didn’t know they needed. Mount it, plug it in, and never miss another message in the great wide open.
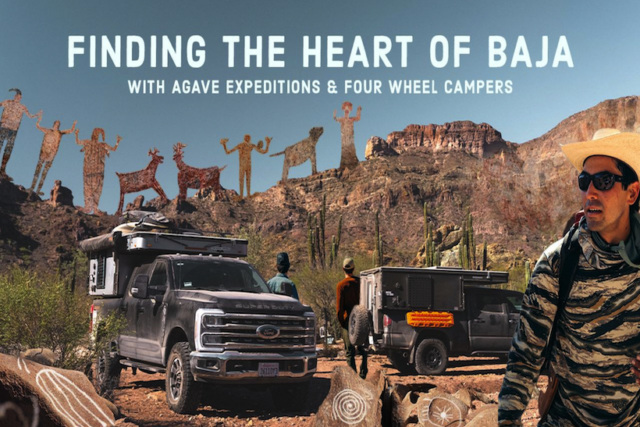
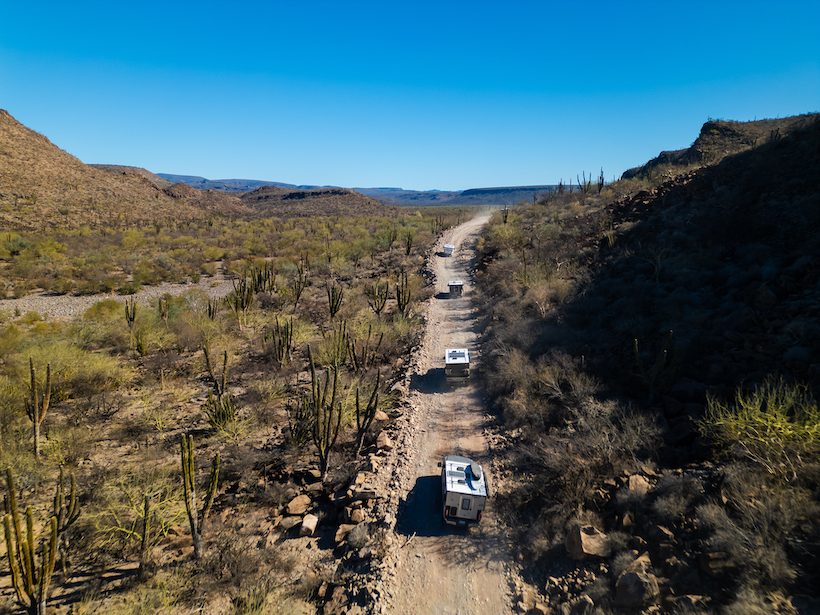
It’s not just the cacti towering over the desert floor, or the turquoise water lapping at a sun-bleached shore. It’s something that sneaks up on you between the miles and moments. I joined a group of fellow adventurers – Four Wheel Campers team members, dealers, and even the former president of the company – on a guided trip through the peninsula in early 2025. We traveled with Gabe Erivez, founder of Agave Expeditions, whose relationship with Baja is decades deep. What started for us as an overlanding trip became something else entirely: a lesson in history, geology, and humility.
“This trip was about peeling back the layers and really getting to know the soul of this place,” Gabe said early on. He meant it.
We documented it all in a short film called “Finding the Heart Of Baja” but what the camera doesn’t always catch is the way the place makes you feel.
Day 1: An Explosive Beginning
We kicked things off with a geological bang—literally. Our journey began with a boat ride to an ancient caldera, the youngest landmass on the Baja Peninsula, a living testament to the volcanism that once cracked this continent in two. Gabe pointed to the dark, jagged rocks around us. “This is where it all began,” he said, explaining how the Baja Peninsula sheared off the mainland and drifted westward.
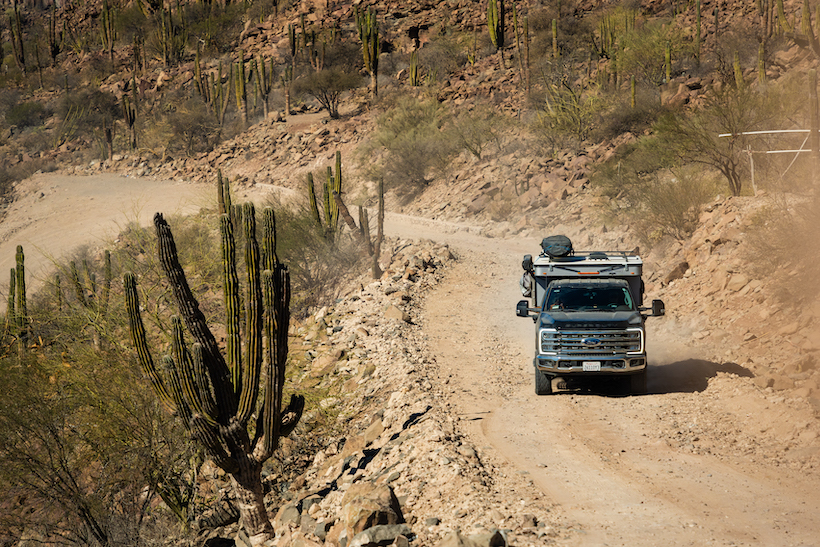
Day 2–3: Into the Spine of Baja
We headed south in a convoy of six Four Wheel Campers, driving along the second-longest peninsula on Earth. Massive cardón cacti – some over 20 feet tall – lined the road like ancient guardians. Gabe explained how, after summer rains in Baja, some of them weigh up to 25 tons. These weren’t just plants. They were landmarks of time.
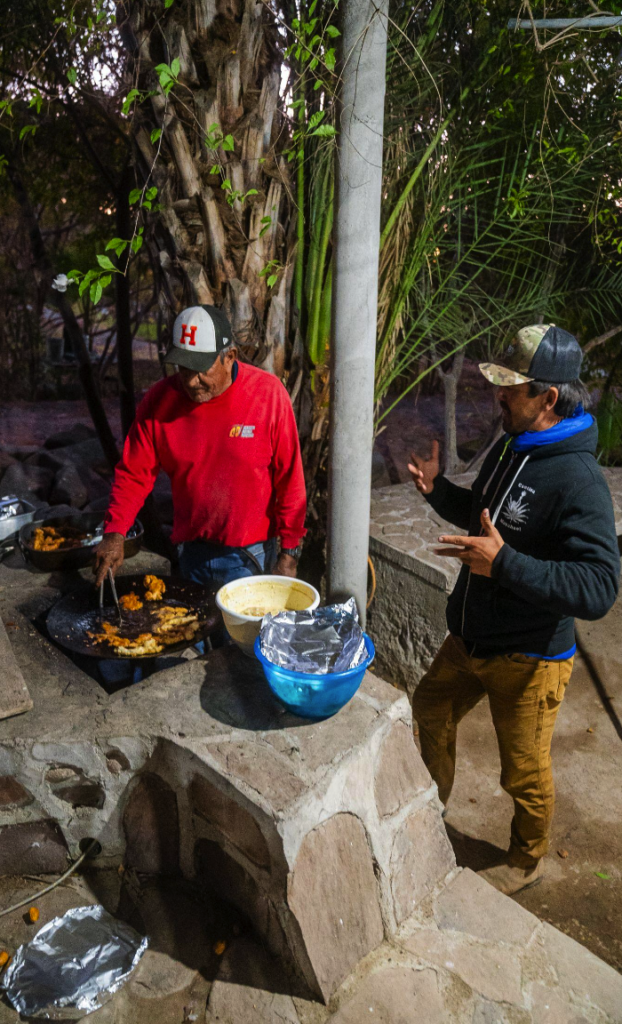
Lunch in the historic town of Loreto was our first taste of Baja’s rhythm – slow, delicious, grounded. Then we made our way to La Purísima, nicknamed “The Nile of Baja.” At Cabañas La Purísima, we were treated like family. We were served halibut tacos, caught just offshore, with hand-pressed tortillas and wine made the traditional way – four generations strong. We ate until our stomachs hurt and I still reminisce about the fried fish and tortillas.
Day 4: Following the Path of the Cochimí
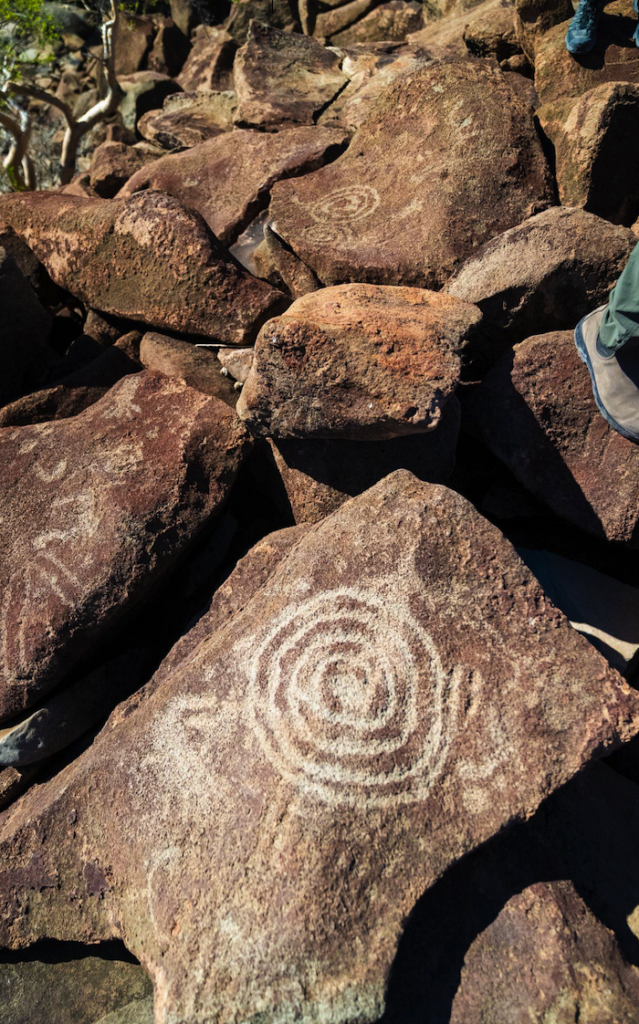
The next day took us into a field of petroglyphs, revealed only thanks to Gabe’s personal relationships in the area. The ancient Cochimí people – Baja’s original overlanders – left markings here, signs of seasonal migration and full ritual life.
“I’ve never seen this many petroglyphs in one place,” Gabe said, tracing the outlines with their eyes. There were no fences or signs. Just stone, story, and silence. We were walking in their footsteps.
Day 5: Life on the Movein Baja
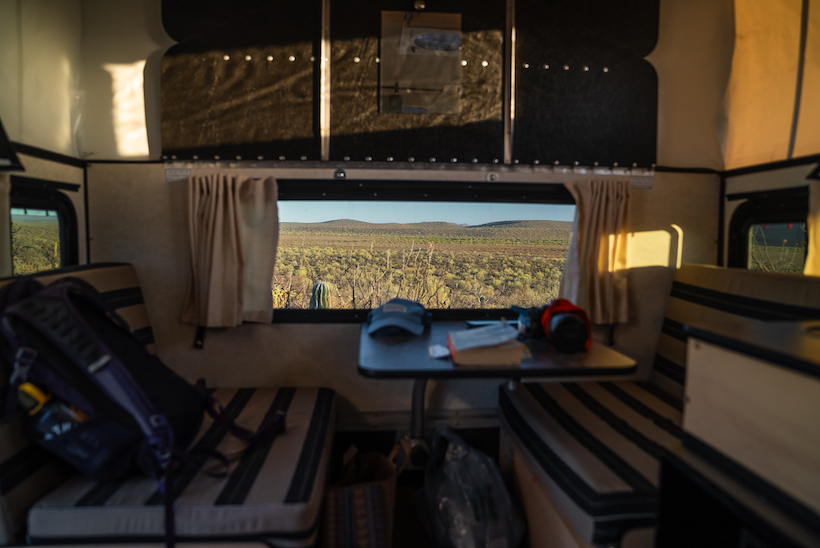
By now, our rigs felt less like vehicles and more like companions. Outfitted with everything we needed – fridges humming with fresh food, beds ready to collapse into after long days, and power to keep our gear running. Gabe’s rig – a Ford 250 with a Hawk slide-in was his office, kitchen, and sanctuary. Our truck campers provided a ton of freedom that we were all thankful for.
“Having that freedom changes how you move through a place,” he told me one evening, pulling out a map to plan the next day’s route. He was right.
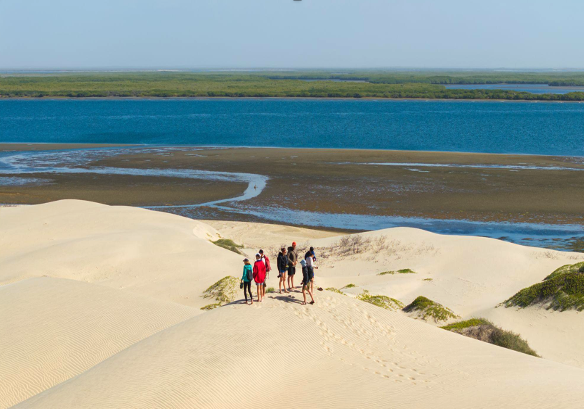
Day 6: Where Desert Meets Sea
Our route veered west to Puerto San Carlos, the largest lagoon and mangrove complex in Baja. From here, we boarded boats operated by the Mario Bros Adventours to explore Magdalena Bay – Mexico’s second-largest lagoon network.
Cormorants flew in formation over our heads. The dunes were vast and rippling, formed over thousands of years by shifting winds. The desert met the sea in an exceptional way. I could’ve stayed there forever.
“This place is awe-inspiring, it’s as cool a place as I’ve ever seen,” said well-traveled Dan Welty, the former Four Wheel Campers president. We all nodded in agreement and were like kiddy children running up and down the dunes.
Day 7: Standing on Lava
Next up: Tres Vírgenes, a stark and powerful stop atop an andesite lava flow. We walked across rock that was once molten, a snapshot of Baja’s fiery birth. A nearby fumarole hissed and steamed, a visible reminder of the tectonic forces still shaping this land. Gabe used this opportunity to show us how Baja’s geologic volatility helped shape not just the landscape, but also its unique ecology.
It was science class, spiritual moment, and photographic gold all at once.
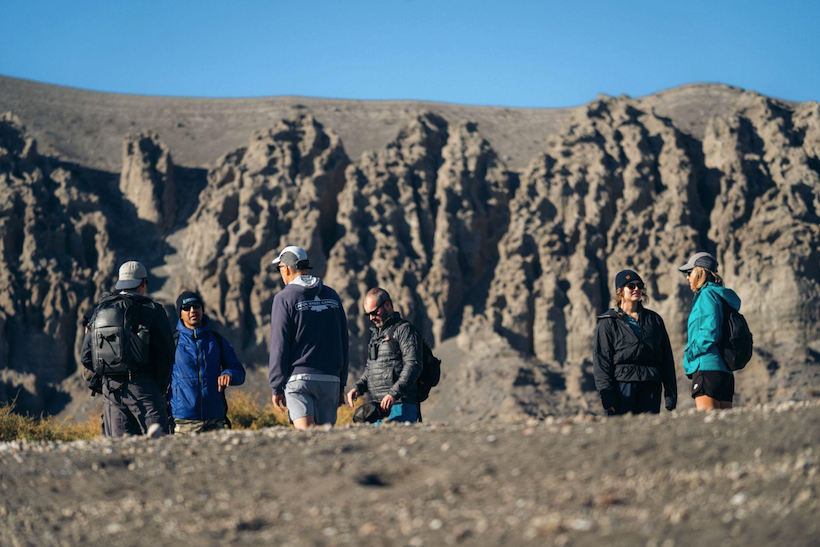
Day 8–9: Into the Canyon
Our Four Wheel Campers carried us to the end of a rugged road deep in the Sierra de San Francisco, where a local ranching family welcomed us for the night. This family plays an important role in protecting the land – they help preserve the surrounding area and issue permits to visit the ancient rock art sites we’d be hiking to the next day.
As the sun dipped lower in the sky, we all gathered outside and kicked around a soccer ball with the youngest member of the family. What started as a simple way to entertain him quickly became a shared moment of joy – an easy, genuine connection with our hosts through something as universal as a game.
After coffee at sunrise, we set off for Cuesta Palmarito, sensing that this hike would be the high point of our journey—both physically and spiritually. Before beginning the steep ascent, Gabe gathered us to mentally prepare for what lay ahead. This wasn’t just another stop; it was sacred ground, and we had dedicated a full day to it. Permits were required, and we were told we were the first visitors in nearly a year.
We were about to witness some of the most extraordinary rock art on Earth.
As we hiked, anticipation built. The canyon terrain – with its towering walls and layered textures – reminded some of us of Zion. Our group, usually chatty and lighthearted, grew quiet the closer we got. Cameras stayed tucked away as we began to absorb the gravity of the place. The trail wound through lush canyon floors, the vegetation growing denser as we climbed.
Then, we arrived.
Towering above us were ancient cave murals – painted nearly 9,000 years ago. Human figures, animals, arcs, and symbols covered the rock face. Some were instantly recognizable. Others sparked curiosity and wonder. The scale of it all was overwhelming—they dwarfed us in size and presence, leaving us standing there, necks craned, mouths open, in total silence.
In that moment, you couldn’t help but reflect on what these murals meant. In today’s world, it’s easy to assume we’re the most advanced humans to ever live. But these works tell a different story. The Cochimí people didn’t just survive here – they thrived. They created lasting art using pigments from the earth, so chemically advanced that they permanently altered the rock surface itself.
Places like this force you to take a step back. They strip away the noise of modern life and leave you with a deep sense of reverence – for the culture, the endurance, and the ancient creativity that called this land home.
“Finding the Heart of Baja” – The Heart of the Film
The resulting film isn’t a highlight reel. It’s a deep dive into what it means to experience a place. Finding the Heart of Baja, produced by Four Wheel Campers’ Sarah Daniels and Eric Hyde and captured and edited by filmmaker Jake Lamons, is intentional and immersive.
You’ll see the sweeping drone shots, yes. But you’ll also see ranchers, hidden geologic and cultural history, and hopefully gain an understanding of what Gabe encouraged us to do – “Be. Here. Now.”
What I Took Home From Baja
Somewhere along the way, I stopped thinking of it as a trip and started feeling like it was a conversation – with the land, with history, and with each other. It’s easy to treat overlanding like a checklist. But Baja asks you to linger. To ask questions. To listen.
We came with campers and cameras. We left with perspective.
Finding the Heart of Baja is streaming now on YouTube – give it a watch when you’re ready to slow down and take it all in.
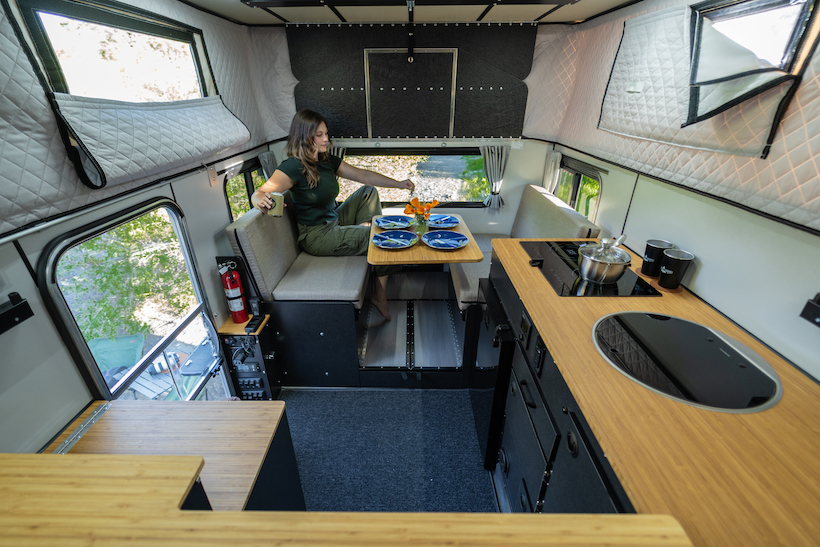
Four Wheel Campers has been on a roll recently, releasing the modular CampOut a few months ago and now the Hawk+, their most advanced flatbed camper yet.
Built for extended travel on or off-grid, Hawk+ delivers expanded power capacity, increased fresh water storage, an integrated gray water system, smarter interior layout, and full self-sufficiency – all built on the dependable foundation that has defined FWC’s legacy of durability and performance.
Designed for heavy-duty trucks with a 7-foot flatbed tray, Hawk+ reimagines what a pop-up flatbed camper can do – maximizing every inch of space to deliver high-performance features that support longer, more comfortable adventures.
More Power
Up to 810Ah lithium battery capacity (optional) – Massive energy storage for extended off-grid adventures.
Up to 500W of roof-mounted solar panels (optional) – Harness the sun to stay powered anywhere.
RedArc Manager Alpha 75 (optional) – Advanced power management for monitoring and charging.
2000W inverter with transfer switch (optional) – AC power for appliances and gear.
External 12V/120V ports with USB & USB-C – Charge up outside.
Dedicated exterior DC port for Starlink Mini – Stay connected anywhere.
More Resources
40-gallon fresh water tank – Twice the capacity of standard FWC slide-ins and flatbeds.
Built-in 5-gallon gray water tank – A brand-new feature for Four Wheel Campers, designed for added convenience and compliance.
Inset portable 2-burner induction stove (optional) – Removable for cooking flexibility indoors or out.
More Space
+6” of floor, counter, and cabinet space – Expanded interior footprint compared to the original Hawk Flatbed.
+6” of dinette space (compared to original Hawk Flatbed) – Seats up to four, ideal for meals or working on the go.
Pass-through external storage – Includes a convenient flip-down table for outdoor use.
New front countertop – Features integrated pantry storage for organization.
Rear MOLLE rack (optional) – Exterior system for mounting gear and accessories.
With these major upgrades and a thoughtfully refined interior, Hawk+ empowers adventurers to go farther, stay longer, and travel more comfortably than ever before.
Whether you’re a seasoned overlander, a first-time explorer, or a campground regular needing a fully self-contained setup, Hawk+ is built for extended journeys – on or off the grid.
Availability
Hawk+ is available for order through Four Wheel Campers dealers beginning May 14, 2025, starting at $43,995.
This flatbed pop-up truck camper will make its public debut on May 16, 2025 at Overland Expo West, where visitors are invited to step inside and experience Hawk+ for themselves.
Looking for the Perfect Overland or Off-Road Trailer? TAP’s Ultimate Guide to Overland and Off-Road Trailers is your go-to resource for finding the ideal trailer to support your vehicle-based adventures. Whether you’re planning short weekend getaways or long-term off-grid expeditions, this guide covers a wide range of trailer styles and brands to help you make an informed decision.
This guide, accurate as of May 2025, includes information sourced directly from trailer manufacturers across the USA. Please note that the content is informational and not based on TAP’s personal testing or opinions.
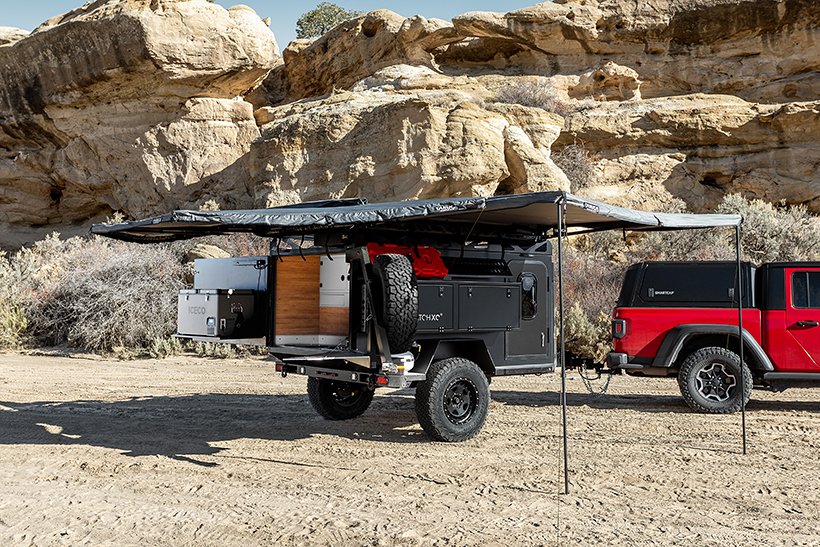
Types of Off-Road Trailers to Consider:
🔹 Teardrop Off-Road Trailers Compact and enclosed, these trailers often feature a cozy sleeping area with a rear kitchen. Ideal for solo travelers or couples looking for comfort and simplicity.
🔹 Expedition-Style Off-Road Trailers Versatile and rugged, these tub-style trailers offer internal gear storage, built-in kitchens, and are often topped with a rooftop tent. Perfect for serious off-grid adventurers.
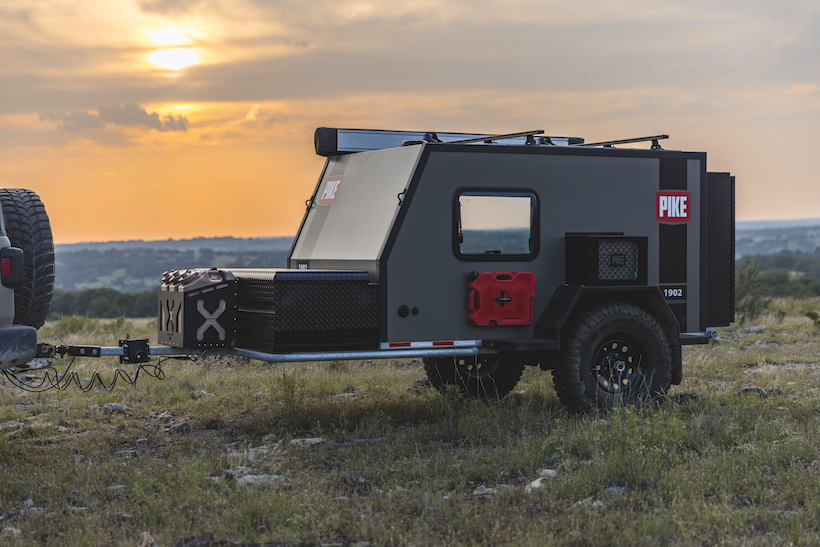
🔹 Cargo-Style Off-Road Trailers Focused on utility, these trailers offer large storage capacity without built-in living space. Great for hauling gear if you already have a tent or prefer a minimalist setup.
🔹 Off-Road Travel Trailers Larger and more luxurious, these trailers come equipped with full amenities like indoor sleeping, kitchens, and even bathrooms. Best for families or those seeking comfort in remote locations.
Brands featured in the Guide (Click on any brand below to go directly to their feature)
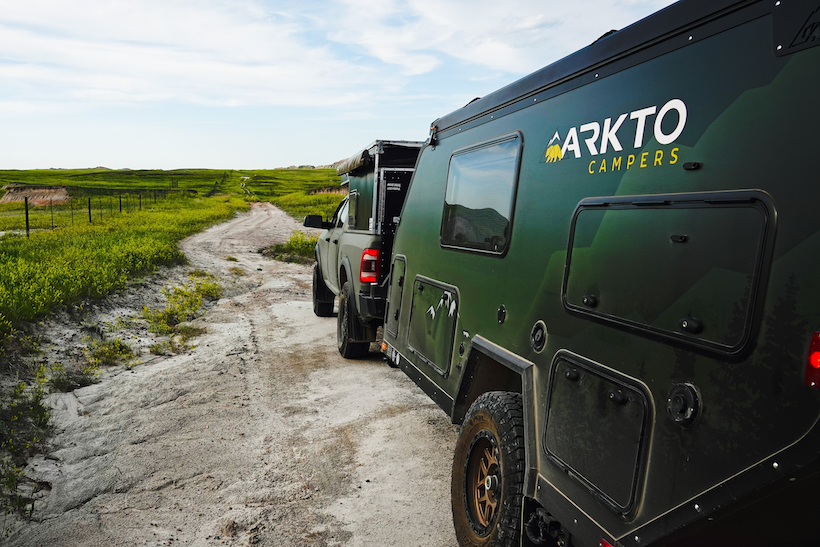
Boreas Campers builds offroad and off grid camper trailers designed and manufactured in Pueblo, Colorado. With a heavy duty powder coated steel frame and aluminum exoskeleton our campers are purpose-built to withstand the most rugged conditions and terrain. All Boreas Campers models come equipped with Cruisemaster axle-less suspension and are constructed using no wood so you can get off the grid for years to come without worrying about rot or decay.
The XT model is our nimble square-drop option ready for any adventure. It boasts a full galley kitchen, instant hot water shower, awning, furnace, 100w Zamp solar panel (upgrade up to 500w!) and lithium Battle Born battery, Maxxair fan and LED lighting in the cabin and kitchen. Its small footprint allows it to fit in a standard garage and easily slip down tight trails. The chassis is designed to hold a 400 lb moto on the tongue, or use the front hitch receiver to carry up to 3 bikes. And with 42 sqft of storage space between the cabinets and oversized toolbox all of the toys will fit! The AT base model is built on the same frame and suspension without the bolt-ons. The UB is even more stripped down, available at $14,900 and ready to build out to your perfect specs.
The four season, hybrid EOS-12 features 400w of solar and 540ah of lithium batteries with the option to upgrade to 1000w and 1080ah. The large outdoor kitchen includes a 3-burner Furion stove, Truma C96 dual-zone fridge/freezer and pass-through pantry to the cabin, all covered by a 270 degree awning. With sleeping for 4, dry flush toilet and indoor/outdoor shower this unit is the perfect backcountry basecamp. Heated tanks and lines make adventures possible any time of the year.
The OPUS Camper line features a range of air-inflatable tent trailers and hybrid hard-sided campers. While each model is designed to fit different lifestyles… every model comes fitted with the same robust off-road package. OPUS Campers come equipped with an independent trailing arm suspension, dual shocks, coil springs, an articulating hitch, and a full outdoor kitchen that slides out with a 4-burner stove and hot water sink.
Since 1993, Kimberley Kampers has set the standard for luxury off-road travel, earning a global reputation for rugged innovation, superior craftsmanship, and uncompromising quality. From our manufacturing headquarters in Ballina, NSW, Australia, we continue to lead the industry in off-grid capability, comfort, and design excellence.
Backed by a strong dealer network across Australia and the United States, Kimberley Kampers is proud to bring world-class adventure vehicles to explorers around the globe.
Driven by an enduring commitment to innovation, sustainability, and excellence, we have built a legacy as Australia’s premier manufacturer of luxury off-road campers and caravans. Today, we are proud to unveil the next chapter in this journey.
The All-New KUBE: Compact Luxury Without Limits
The Kimberley KUBE Teardrop Camper redefines off-road travel, delivering an unmatched fusion of cutting-edge technology, compact versatility, and legendary Kimberley durability.
Nothing compares to the luxury, strength, and security of the KUBE. Engineered for true adventurers, the KUBE is built to go where others simply can’t—earning its title as the King of the Off Road™.
Key Features Include:
Plush living space and a super-comfortable bed, offering the perfect place to recharge after a day of discovery.
Award-winning slide-out stainless steel kitchen, ensuring that even the most remote settings feel like home for the outback chef.
Lightweight, rugged construction, crafted to withstand the toughest environments.
Smart storage solutions, energy-efficient systems, and stylish interiors, blending convenience with sophistication.
With the KUBE, life begins where the road ends. Immerse yourself in nature’s splendor and experience the ultimate in off-grid comfort, style, and security.
The all-new, re-designed Off Grid Trailers Expedition 3.0 has the same world-class craftsmanship as its predecessor with all new upgraded components. This RVIA-compliant all-metal off-road camping trailer has a completely upgraded electrical system with lithium battery options, an all-new Trauma Aqua Go Comfort Plus hot water on-demand system, Truma Vario Heat forced air furnace, and high-output Dometic dual burner cooktop.
The Expedition 3.0 is still built on a steel 4-inch c-channel frame with a standard Timbren 3500 HD Axle-less suspension and optional OGT Evolution Series trailing arm suspension with 25 inches of ground clearance and 8 inches of wheel travel to ensure your trailer will follow anywhere your 4×4 can go. The integrated roof rack is tested to carry 1000 lbs. of static weight, ensuring no need to leave any gear behind. The innovative exterior-mounted drop-down kitchen includes a dual burner cooktop and stainless-steel sink with a faucet and does not occupy any interior or storage space. The massive rear storage compartment comes with adjustable shelves to suit your needs. Inside you will find a comfortable queen-sized bed, interior storage compartments, your electrical display, and an optional furnace display with a thermostat.
Beyond the Expedition 3.0 Off Grid Trailers has also updated its rugged off-road teardrop with the release of the Pando 3.0. If you are looking for something different be sure to check out the fully modular sleep-in Sprocket as well as the Switchback overland adventure Trailer.
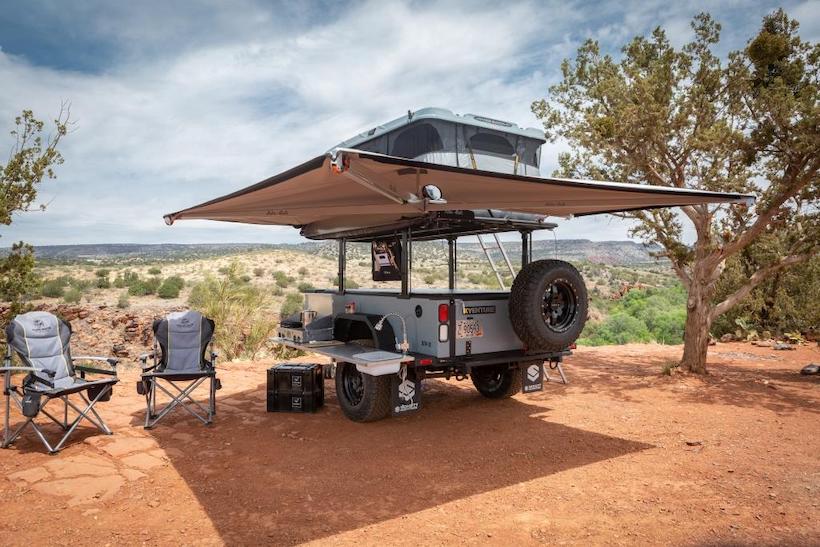
Xventure trailers (built by Schutt Industries) have a Military pedigree and long history of providing the most substantial build quality in the industry. Starting with their Military inspired chassis that carries a 10-year warranty, aluminum extrusion frame and huck bolt fasteners, Xventure gives you quality found nowhere else in the Overlanding market. Our flagship XV-2 has been developed from the J8 military trailer and has seen extensive adaptations to become a perfect fit for the Overlanding community. Now available with a 25-gallon water tank, on-demand water heater, propane system with a 20lb. tank, full galley system with 7’ stainless steel table, tonneau cover, elevating rack, full lighting system and numerous other options, the XV-2 gives you the capability to carry motorcycles, a full size quad or just all the gear you need for an extended trip to your favorite destination. Our 25+ years of manufacturing the toughest trailers made give us the confidence to say we will be “BEHIND YOU ALL THE WAY”. Outfit your Xventure the way you want with or with a roof top tent, awning or fridge, remember it’s “YOUR LIFE…YOUR TRAILER”.
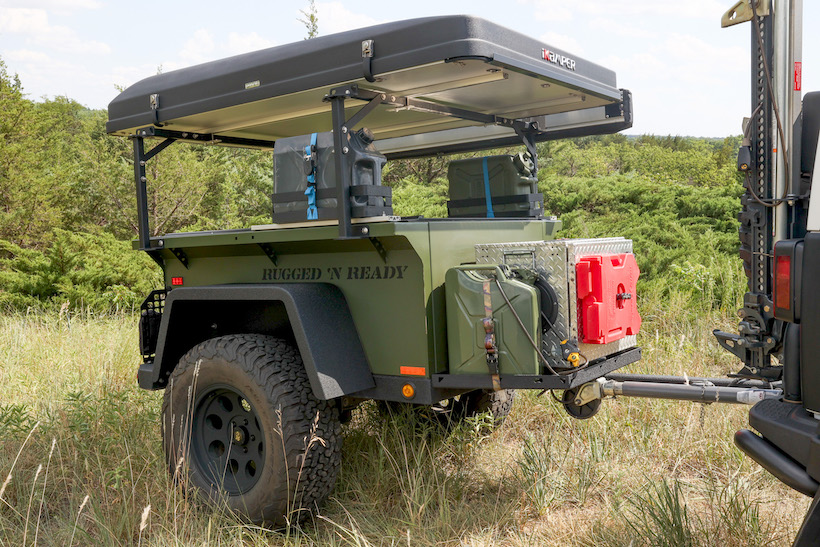
Rubicon-Tested. Trail-Proven. TO Extreme’s Rugged ‘N Ready Trailers™
Off-roaders, meet the trailer that can keep up with your toughest adventures. TO Extreme Off Road & Overland™ delivers unmatched durability, functionality, and reliability with its Rugged ‘N Ready Trailers™—battle-tested on the legendary Rubicon Trail.
These heavy-duty trailers feature UL-lined fenders and frame, powder-coated body panels, LED lighting, Timbren Axle-less® suspension, off-road tires, and a 2” rear receiver. You’ll also get an adjustable cargo management system, forward cargo rack, lockable tailgate, and automotive-grade wire harness—everything built to conquer the wild.
Choose your adventure rig:
60” Rugged ‘N Ready High Country Trailer™ – Offers 35 cubic feet of storage, 20″ ground clearance, and a lightweight base weight of just 860 lbs.
72” Rugged ‘N Ready Backwoods Trailer™ – Provides over 50 cubic feet of storage, 20″ ground clearance, 3,500 lb. Timbren Axle-less® suspension, surge hydraulic brakes, and a base weight of 1,160 lbs.
Both models come with optional upgrades, like heavy-duty racks and retractable lids. They meet all Federal Motor Vehicle Safety Standards and are VIN-certified for road legality.
As the official trailer of Jeep Jamboree USA, featured in 50+ events nationwide, these trailers aren’t just tough—they’re trusted.
Explore TO Extreme Off Road & Overland’s™ online store to find your perfect off-road partner and browse other trail-tested gear.
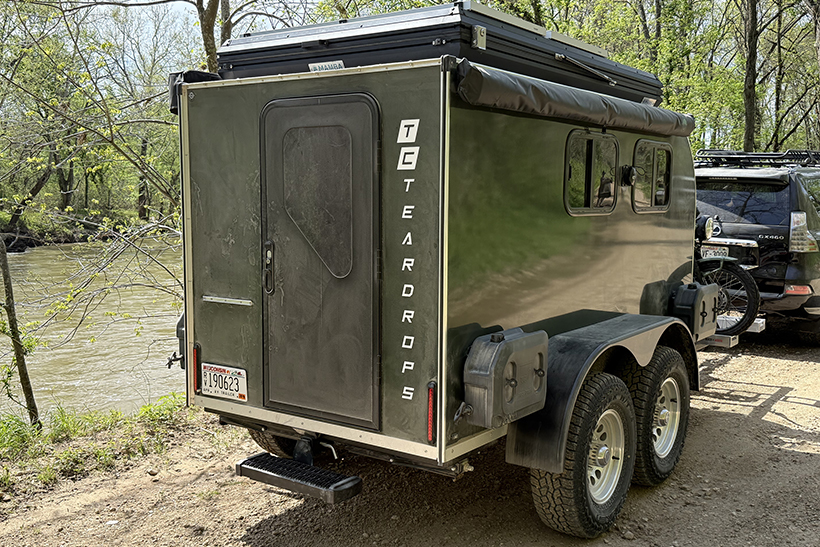
TCTeardrops newest model, the TCTerrain, is the culmination of our experience and expertise, combined with feedback from our customers. We raised the roof and stepped it up with a comfortable living space, table and bench seating for four that converts into a couch and table for two, or unfold the mattress completely into a queen size bed. The indoor galley and optional porta-potty allow you to stay dry inside if the weather takes a turn! The TCTerrain is built on the same platform as the 5×10 ISO Tandem and Off-Road Expedition models. With 56” interior ceiling height and 6’6” bed, the Terrain offers loads of storage and space! Take it off road or take off across the country! For larger families, add a roof top tent with access from inside and/or outside. Choose your options from our extensive list of add-ons including solar, awnings, rooms, water and fuel storage. TCTeardrops new Terrain can also carry a small motorcycle or light weight adventure bike on the single axle, or with the tandem axle version you can carry a Ural motorcycle with sidecar, or a pair of dual sport motorcycles!
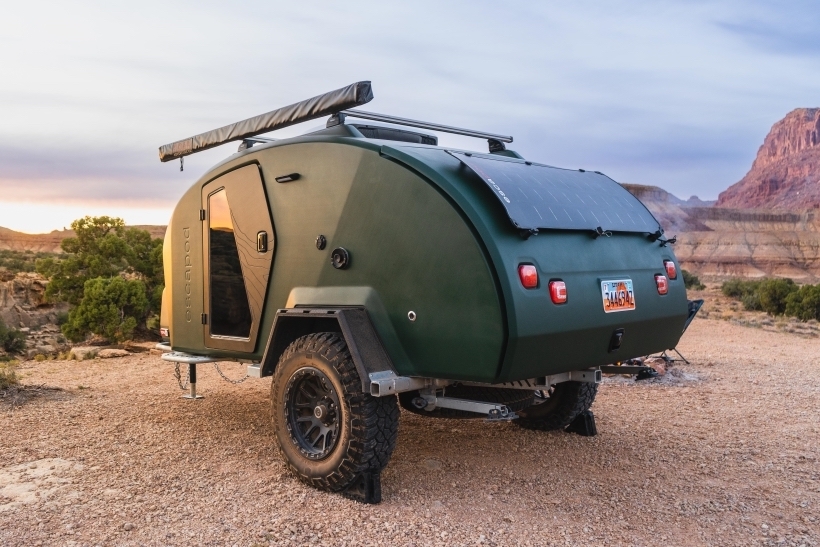
Escapod Trailers builds premium teardrop campers that prove beautiful and capable aren’t mutually exclusive. With a galvanized steel frame and single-piece structural composite body, the TOPO2 delivers a feature-set with an unmatched strength-to-weight ratio weighing in at 1920 lbs dry. The vacuum-infused monocoque design means that roofline leaks are a thing of the past and the wood-free structure guarantees that mold & rot are of no concern. The core, made of recycled milk cartons, not only provides the structural integrity of the trailer but also its insulation, with an R-value of 10.
The TOPO2 is the first utility camper to nest all mechanical systems inside of the insulated & heated trailer. The Utility Closet protects all systems from the elements and hazards of the road. This not only extends the life of the trailer & its components but also makes the TOPO2 the first true 4-season teardrop camper on the market.
Every TOPO2 off-road trailer comes standard with our Freeride Suspension System offering 5″ of independent travel and 23” of ground clearance, a galley kitchen with a rackout two-burner stove, 75L YETI Tundra cooler, TRUMA Combi Eco-Plus heater (providing cabin heat and hot water to the sink & shower), 100-amphour Expion360 LiFePO4 battery, 140W portableable solar panel, LED lighting throughout the cabin and galley, MaxxAir 4-speed fan, battery & water systems monitor, integrated tongue box, 2.5’ x 5’ stargazer window, 6” queen-sized memory foam mattress, spacious cabin with a heated mudroom, and more!
With an Escapod TOPO2, you are guaranteed to receive premium craftsmanship, intuitive design, and a trailer ready for adventure in any season. Offering a 5-year manufacturer’s warranty, you can focus on what matters most. Start your adventures now. Use our interactive custom camper builder to bring your dream trailer to life today!
What started as a conversation in 2015 between founder Kevin Molick and his wife, Paula, has since skyrocketed into one of the top names in the world of Teardrop Trailers. Kevin and Paula were discussing their desire to get back out to camping and traveling their back yard of Colorado and the neighboring states but wanted to get away from the cold and discomfort of tent camping. Large pull-behind RVs or motor-homes just weren’t their style and after some searching, Kevin discovered the teardrop trailer and was instantly intrigued.
The teardrop trailer seemed the perfect fit, it checked all of the boxes: light enough to pull with their Subaru Outback, the ability to park it as a base camp, comfort and warmth for sleeping, ample cooking space, and visually appealing.
Our Handcrafted trailers are exceptionally easy to tow and built with quality craftsmanship which is evident in every detail from start to finish. Teardrop Trailers are quietly taking the RV world by storm. Our custom teardrop trailers offer overlanders comfortable sleeping quarters, as well as a functional, and beautiful rear galley kitchen. We offer a multitude of custom options for our lightweight teardrop trailers, including different off-road versions of the Classic and the Pika. Timberleaf Trailers are available in an array of colors, from vibrant to subdued, every trailer is hand built to order in our shop in Grand Junction, Colorado.
Australian Off Road, a recognized leader in Australia for building the toughest and most luxurious off-road camper trailers and caravans for 25 years, continues its distribution in the US with the AOR Sierra.
Weighing in at only 2300lbs dry, the AOR Sierra is capable of nearly any adventure you can throw at it with the proprietary trailing arm suspension, cruisemaster DO35 hitch, and an aggressive 41-degree departure angle. The US models come equipped with 52 gal of water, 300Ah lithium batteries, 2000W inverter, solar panel, and Webasto diesel combi furnace and hot water system. The Sierra is powered by the REDARC Redvision system providing shore, solar, and dc to dc charging. Optional accessories include the Bush Company 180XT Awning, Cook Partner 18” dual burner cooktop, Dometic CFX 75L fridge/freezer and multiple options for roof top tents.
One of the most popular features of the AOR Sierra is the rear pod which includes a drop-down annex. The annex allows for an enclosed changing room, mud room, or space for additional sleeping or even pets. The large, side-access, dual purpose window, allows you to experience the outdoors, from inside the comfortable cabin. Add on a roof top tent and expand your sleeping space for families of all sizes.
The AOR Sierra is available through the US distributor, XGRiD Campers and can be viewed at their Las Vegas NV and Knoxville TN showrooms.
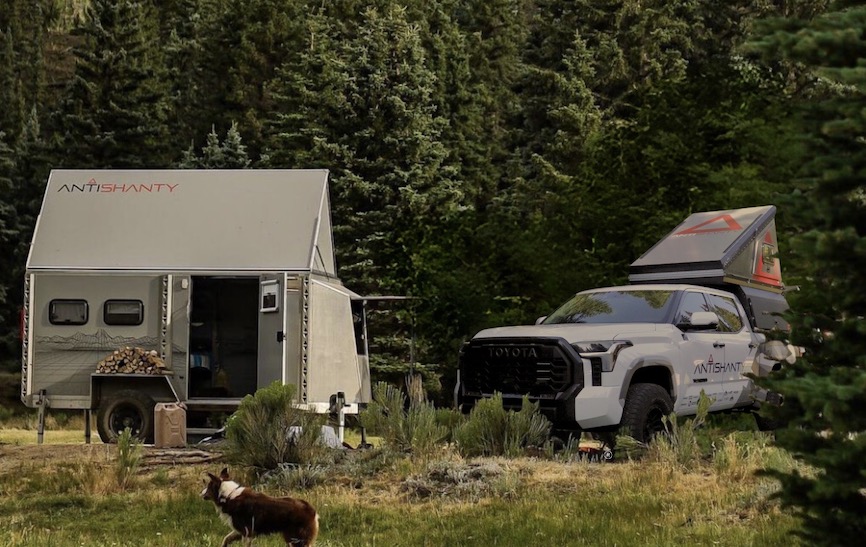
ANTISHANTY was founded with a simple, bold vision: to build rugged, adaptable trailers for outdoor enthusiasts who live for adventure and refuse to settle. With over 30 years of experience designing and manufacturing complex trailers, the founders brought their expertise and love for the outdoors to a new frontier. As passionate mountain bikers, skiers, snowmobilers, and campers, they understood the frustrations of traditional trailers — too fragile, too limiting, too temporary.
From this personal need, ANTISHANTY was born. The name itself tells the story: ANTI, meaning against, and SHANTY, a small, crudely built shelter. This brand stands against flimsy, short-lived structures and sets out to create something better — ultralight, modular, hard-sided dwellings crafted from sustainable, rot-proof materials like aircraft-grade aluminum and insulated composite panels. No wood to rot, no canvas to flap in the wind, and built to last.
The dream took shape with the AS-1, a quick-deploying, A-frame pop-up trailer with modular queen bunks that sleep four, convert into a picnic table and bunk combo, or haul motorcycles and mountain bikes. Then came the RR-1, a Rigid Roof version offering the same flexibility as the AS-1 without any setup — ready to camp the moment you park.
Building on that hard-sided, insulated technology, ANTISHANTY introduced the RTD — Roof Top Dwelling — the first fully hard-sided, insulated shelter that unfolds on top of your vehicle. The RTD quickly became part of the DWELL SHELL, a fully hard-sided truck camper with a passthrough to the sleeping area. No fabric. No compromises.
Designed and built in Logan, Utah, every innovative product is made to DWELL DIFFERENT — enjoy the outdoors to the fullest with ANTISHANTY.
Equipped with a beefy 400Ah lithium bank, roof-mounted solar array, and high-output inverter let you run lights, fridge, and even A/C days from the nearest hookup, all monitored from an intuitive touch panel or on your phone. Pair that power with a lifetime-warrantied galvanized steel chassis, articulating hitch, and a robust independent suspension, and you’ve got a trailer that tracks confidently over washboard, sand, and rocky two-tracks yet still lightweight enough that it tows easily behind most midsize trucks and SUVs.
Inside, the vibe is modern and efficient: a pillow-top east to west queen bed up front, and a full wet bath so you can rinse off. Storage cabinets with locking latches, a tall wardrobe, and hidden cubbies hold your bulky gear, while ducted heat and air conditioning keep the cabin comfortable from hot desert nights to cool alpine mornings.
The exterior is built for “living large” outdoors. Swing open the stainless slide-out kitchen with hot-cold water and a 3-burner stovetop, keep recovery gear in the twin pass-through lockers, and tap a button to deploy the electric awning. Also included is the wrap-around annex and you’ve got a shaded lounge or an extra sleeping area for guests.
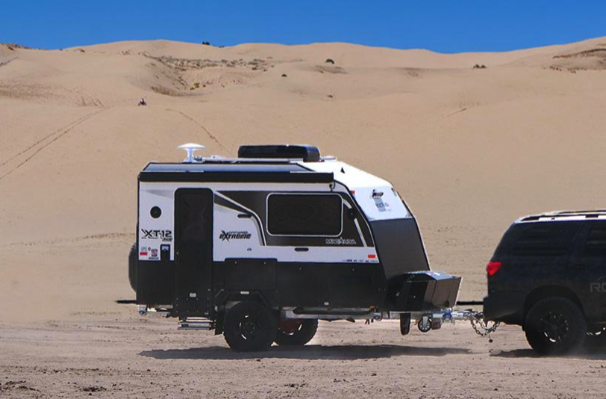
Light enough to handle tight trails yet loaded with the systems you need to linger off-grid, the XT12HR Off-Grid Extreme lets adventurous couples explore farther, stay longer, and relax in style which means no hookups, no compromises.
Its charcoal-matte shell and CNC-milled aluminum badges refuse to look like anything else on the highway, yet the beauty is more than meets the eye with composite fiberglass + Azdel walls which means zero wood, zero rot, and insulation worthy of high-end luxury RVs.
This camper sits on a huck-rivet aluminum chassis riding on MORryde’s independent air bag suspension with 12” of travel. This is truly a trailer that floats over washboard and crawls rocky trails, giving you peace of mind no matter when obstacles you encounter.
Off-Grid is this camper’s middle name! With 1080Ah of Battleborn lithium battery & up to 1400W of solar paired with a robust Victron electrical management system, you’ll be able to camp in comfort no matter how far the campsite is from civilization. Also enjoy hot showers and warm home-cooked meals with 65-gallons of fresh water with indoor & outdoor kitchens.
Inside this 19-foot box, you’ll find a true queen bed up front, a roomy dinette that converts to a bed for guests, and four-season climate control options to keep you comfortable. Solid-surface counters, hardwood table upgrades, and a one-piece fiberglass shower lend a residential feel so you truly feel at home no matter where you are.
No wasted space, just a bold, rugged travel trailer ready to camp in style where ordinary trailers turn back.
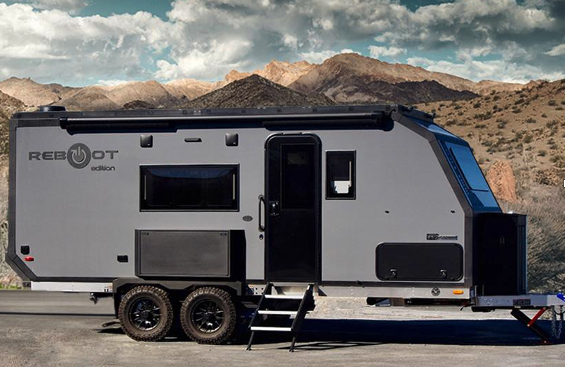
With more durability, more power, and more freedom. The Pause XC22.4 rides on an industry leading independent air suspension with 12” of travel, so you can confidently travel to remote destinations without breaking a sweat.
With unmatched off-grid capability, the XC22.4 comes equipped with a massive 1,080Ah BattleBorn lithium battery bank, 1,800 watts of solar, a 3,000W Victron inverter, and a built-in 4,000W propane generator. Together, this system delivers the ultimate power setup, allowing you to run A/C, microwave, furnace, TVs.. Off-Grid.
Inside, the XC22.4 offers a choice between a king bed or split twin beds, plus a convertible dinette, sleeping up to four people. The spacious layout includes a private bedroom, a full bathroom with a one-piece fiberglass shower, and both indoor and outdoor kitchens finished with solid surface countertops, hardwood dinette tables and locking aluminum cabinets.
Climate control is handled by premium Truma appliances, including a dual-zone VarioHeat furnace, Aventa air conditioner, and AquaGo instant water heater, making it a true four-season trailer. Its wide-body design provides ample comfort and robust usability.
The Pause XC22.4 leads the pack and is arguably the best off-road trailer ever built. Engineered for serious adventurers who want true independence without sacrificing comfort.
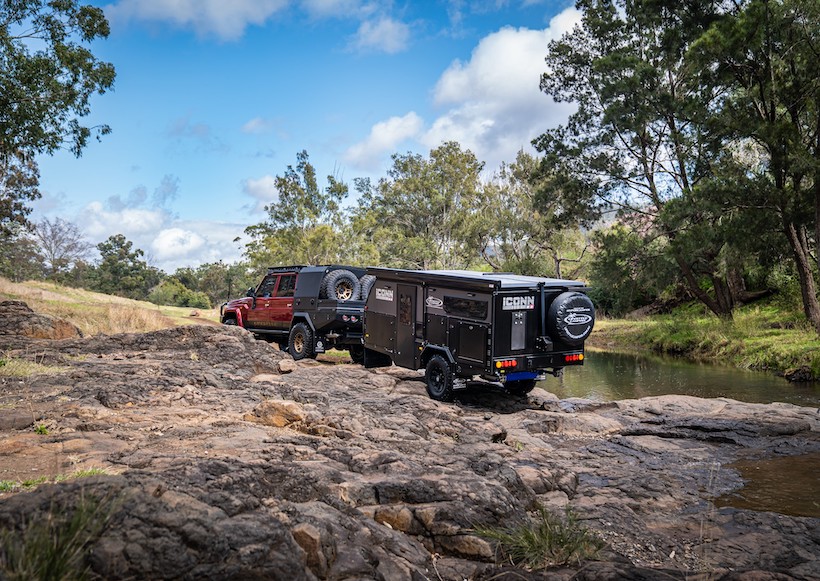
Lifestyle Campers, one of Australia’s leading off-road camper trailer and caravan manufacturers for over two decades has now made the Iconn E2E available for distribution in the US.
The Iconn E2 Hypercamper® has been expertly designed to meet the demands of an aggressive, off-road hybrid caravan, in a lightweight footprint that comes in at only 3800lbs. The Iconn E2E provides for three different floor plans, including the dinette and interior cassette toilet, double bunks, and interior ensuite layouts.
The interior of the Iconn E2 provides a bit of luxury with a residential-style pillow top queen mattress, interior sink, and 6 large drawers. If storage is important, just lift up the bed with the strut-assisted platform, to expose the storage garage, large enough to carry all the camping gear or other equipment needed. On the rear of the camper is dual-room shower enclosure providing privacy and comfort.
The technology on the Iconn E2 includes 4000W of solar, 200-600Ah lithium, REDARC Redvision, and an automatic powered lift-up roof. A 110v rooftop Air Conditioner is available as well. The dual shock, trailing arm suspension and Cruisemaster DO35 hitch, provide you the capability to traverse down the most rugged trails you encounter.
The Lifestyle Campers Iconn E2 is available through XGRiD Campers and can be viewed at their Las Vegas NV and Knoxville TN showrooms.
SasquatchXC are revolutionizing the off-road camping landscape with their innovative design and superior functionality. These off-road camper trailers are handcrafted using rugged aluminum, making them the perfect choice for outdoor enthusiasts craving adventure and comfort.
Both models feature an in-house designed steel suspension system with FOX coil overs, ensuring a smooth ride on any terrain. They’re built to handle tougher tracks without compromising comfort or performance.
What sets SasquatchXC apart is its industry-leading cargo storage and instant-setup kitchen. Unlike complicated modular systems, SasquatchXC trailers use durable and secure compartments for easy access to gear.
Each trailer features a fully integrated kitchen equipped with on-demand hot water, a three-burner cooktop, and spacious prep areas set at standard counter height—making it easy to cook gourmet meals, even in the most remote locations.
The Highland 60, weighing 2,275 lbs dry, features a queen-size mattress, LP forced heat, ventilation, interior cabinet storage, and flexible power options—offering all the comforts of home in a compact package. The Smuggler, at 1,850 lbs dry, shines as a cargo-focused trailer with industry leading storage for gear-heavy trips.
Both models include heavy-duty aluminum roof racks to support rooftop tents, awnings, shower enclosures, solar panels, and more—allowing you to customize your setup for any adventure.
Whether you’re planning weekend getaways or longer overland expeditions. SasquatchXC have the quality of craftsmanship to ensure your experience will be one of comfort and confidence. All backed with their industry leading lifetime plus 24 month warranty.
Designed and built in Alberta, Canada, the Arkto Campers G12 combines functionality, quality, and durability for a convenient overland camping experience. Built on a galvanized steel chassis with Timbren’s axle-less HD suspension, the trailer’s composite body is topped with a pop-up roof, ensuring a low profile for travel and storage, but extends to give an interior head height of 6’8”. The design offers excellent performance and longevity, with the trailer weighing just 3,600 lbs, allowing the G12 can be towed by some mid-sized SUV’s.
The Arkto Campers G12’s outdoor kitchen is one of the most functional on the market. Unique to the G12 is its massive outdoor pantry (12 cu ft), which sits above the large slide-out kitchen module. It features a folding countertop extension, a 12,400-BTU dual-burner gas stove, a stainless-steel sink with hot and cold water, a cutlery drawer, a spice drawer, and a propane quick connect for a secondary appliance. This U-shaped kitchen area also includes a fold-down prep table and a slide-out 75L dual-zone fridge/freezer, giving you all the amenities to prep your favorite camping meal.
Standard equipment includes a 270-degree awning, an outdoor shower with an enclosure, a Truma Combi furnace/hot water heater, a 37-gallon freshwater tank, a full-size spare tire and carrier, and a bike rack receiver on the trailer tongue. The electrical system is managed by a REDARC Rogue and Manager30 combination, handling up to 960Ah of lithium batteries. Optional upgrades include a 2,000-watt inverter, up to 1,000W of rooftop solar, air-conditioning, an electric toilet, and an insulated pop-up canvas.
Arkto Campers’ commitment to customer satisfaction is evident in their personalized service and attention to detail. The Arkto Campers G12 embodies the luxury of freedom and the spirit of overlanding adventure, ensuring every journey is well-equipped and enjoyable.
Atlas Outdoors exists to provide adventurers with extremely heavy-duty off-road camper trailers that provide a comfortable and convenient camping experience. Each custom-built trailer is hand crafted in the USA with care and innovation that stands the test of time.
Must-have Features
All Atlas Outdoors trailers boast the same rugged backbone: a formidable 2×5” steel tube chassis that carries a 5-year warranty. The exterior structure is comprised of metal and composite materials for excellent durability. They also have the smooth ride of the Nomad air ride, independent trailing arm suspension, and 6’8” of standing room inside. Furthermore, the trailers have a cutting-edge Victron electronics system with dependable lithium power, spacious storage solutions inside and out, and a smart kitchen design.
The flagship TetonX model has all the options above along with a roomy interior design thanks to the walls extending out over the wheel wells. This allows for bunk options and sleeping up to 5 inside, and a rooftop tent option that sleeps 2 more. The TetonX base unit weighs in at 3,000 lbs, and fully loaded models are just over 3,600 lbs.
AppalachianX
The new AppalachianX model has the walls positioned inside the wheel wells giving it a narrower profile for tighter, more secluded trails. The slimmer profile gives solo adventurers and couples a lighter option, with the base at 2,600 lbs and fully loaded models around 3,000 lbs.
Atlas Outdoors trailers are not just about being rugged, they are about bringing comfort to the campsite. Whether you are off-roading in the mountains or setting up camp in the desert, these trailers provide a home away from home, making every adventure memorable.
Pike Offroad Campers was born in the deserts and sands of large Texas ranches. If it can’t do 100’s of miles a week on washboard roads, and 2 tracks, it’s not good enough. PIKE campers are reliable. Day in day out. Parked on a mountain side serving as a basecamp for a 2 week hunt, or heading down the coast with the family shark fishing, we build equipment to last. We learned that complicated things break. For this reason, The PIKE1902 was built with as few moving parts as possible, no overly complicated Electrical systems, and very few proprietary parts. Being Overbuilt is a badge of honor. The PIKE 1902 frame and box structure is constructed from 3/16” steel with built in rock rails and then hot-dip galvanized for decades of rust free use. The box skin is .063 aluminum with both a primer and color powder coat on both sides. All trim and fenders are line-x coated after receiving a primer powder coat. The PIKE 1902 is built to help you Outdoor simply and stress free.
The Sno Alpine is a premier, rugged off-road adventure trailer and the largest model in Sno’s fleet. Alpine is lightweight, compact, and highly capable.
It comes fully equipped with all the accessories you need for an unforgettable overlanding experience. Built on a durable steel frame with an aluminum body, it has an impressive dry weight of 1,600 lbs. The standard suspension features an independent, axle-less design suitable for off-road use. There is also an option to upgrade to Fabtech off-road suspension for enhanced performance, allowing the trailer to tackle any terrain with ease. Methods wheels and 33” tires are standard, but can accommodate tires up to 40”.
The front and rear slides can hold a 75L electric cooler, giving you the freedom to stay out and explore for more days. The spacious rear compartment features an executive chef-grade stainless steel kitchen, complete with a built-in sink. Designed with versatility in mind, the universal rack can support the most popular tents on the market while providing ample storage space for tie-down gear. Consistent with Sno’s open design concept, the adjustable awning mount allows you to raise the awning while camping and lower it for driving. The side boxes are equipped with control panels to manage lights, inverters, and monitor the onboard solar system. The toolbox securely holds all electronics while allowing for easy access. The modular design of the Alpine allows for easy upgrades as your needs change, offering options like a spare tire carrier, shower mounts, Maxtrax mounts, and more.