Home Blog Page 20

The Redcliff 6P By Seek Outside

Screen Shot 2023 11 09 at 1.59.39 PM

The Redcliff 6P is designed to be an Ultralight Hot Tent. Which can be run with Seek Outside’s line of Ultralight Titanium Wood Stoves. Weighing in at 5lbs 3ozs for the shelter, poles, and stakes, the Redcliff offers an impressive space to weight ratio. The addition of their Lightweight Titanium Wood Stove brings the weight to 8 lbs 12 oz. This means if you’re car camping or packing it into camp with friends, you can beat the late season elements and enjoy the warmth of a wood burning stove.

When the seasons warm and the bugs come out, Seek Outside offers many options to transform the Redcliff into the ultimate summer shelter. With options like their Nest systems, you can sleep up to 6 people in a shelter that packs to the size of a basketball. A Nest provides a completely enclosed pod that connects to the shelter. Giving you a bathtub floor and bug netting to protect you from anything that crawls, slithers, or buzzes. Setup on the Redcliff is extremely easy due to its single pole design. Simply stake out your 4 corners. Insert the single carbon fiber pole. Then stake out the rest of your shelter with the remaining 6 stakes.

redcliff 6p, overlanding, overland, off-roading, off-road, ultralight hot tent light tent, hot tent, camping, seek outside,

Unlike traditional dome shelters, the Redcliff boasts standing height in the middle of the shelter with a shelter height of 6 foot 10 inches. You can also use the Redcliff full nest as a stand-alone screen room for camping on clear summer nights. Or just a spot to get away from the bugs. Now, if the versatility hasn’t convinced you yet, let the Redcliff’s storm shedding capabilities impress you. Made out of a 30 denier high-tenacity ripstop Sil Nylon, the Redcliff can shed wind, rain and snow without a problem.

redcliff 6p, overlanding, overland, off-roading, off-road, ultralight hot tent light tent, hot tent, camping, seek outside,

Many of Seek Outside’s customers have faced winds upwards of 60-70 mph with little to no issues. When properly pitched, the Redcliff will take what Mother Nature has to throw at it. Overall, the Redcliff has become one of the most versatile shelters in Seek Outside’s line. You can backpack it into the backcountry in any season, with ample space for family or friends. With floored and floorless options, along with the ability to run a stove, the Redcliff is the ultimate do it all shelter.

redcliff 6p, overlanding, overland, off-roading, off-road, ultralight hot tent light tent, hot tent, camping, seek outside

Seek Outside designs and manufactures all of their shelters in Grand Junction, Colorado. They started making tents in their basement in 2010. Because founder Kevin Timm thought there had to be a better solution to high mountain backpack elk hunting. Seek Outside build their shelters to have an excellent space to weight ratio. As well an excellent durability to weight ratio. 

redcliff 6p, overlanding, overland, off-roading, off-road, ultralight hot tent light tent, hot tent, camping, seek outside,

Seek Outside offers countless sizes of Ultralight Hot Tents with similar features to the Redcliff. From our 1 person Silex, t 16 person tipi, they have a size and variation to fit nearly every user. Check out their website for more info about the variety of shelters, lightweight backpacks, and ultra light titanium wood stoves.

The above article is a Sponsored Post. TAP does NOT receive any commissions from sales originating from this article.

The IBEX™ Panel Kit from Kuat

overlanding, off-roading, overland, off-road, kuat, ibex, ibex panel kit, gear, mount,

The IBEX™ Panel Kit from Kuat.

Increase the versatility of your IBEX™ with the addition of the IBEX™ Panel Kit.

The panels easily mount to your existing IBEX™ frame and help protect your gear and your gear’s gear from the elements. Plus, they’re fully locking, offering security while still allowing quick access to the bed when you need it. Designed for versatility, emphasizing performance and clean design, the IBEX Panel Kit stands in a league all of its own. All metal construction and weather resistant, the IBEX Panel Kit is built burly, ready for any adventure, and backed by Küat’s renowned No Worries Limited Warranty. 

kUAT Ibex panel, overlanding

That’s it. In a nutshell.

overlanding, off-roading, overland, off-road, kuat, ibex, ibex panel kit, gear, mount,
Features Include:

-All metal construction

-Weather resistant

-Locking system for added security

-Mounts directly to existing IBEX frame

-Third brake light for added visibility and safety 

-Access to crossbars for mounting to the top of IBEX

-Quick access to bed with gas-spring operated side and rear doors

-Initially available for the IBEXA1 SKU only, more coming later

MSRP: $1489 BUY HERE

To check out the Kuat Ibex TAP Trail Test CLICK HERE

The above article is a Sponsored Post. TAP does NOT receive any commissions from sales originating from this article.

Lowa Boots – Zephyr GTX Mid Trail Test

Lowa boots, zephyr gtx mid, hiking boots,

A good trail shoe or boot is an essential piece of gear when out adventuring in the backcountry. TAP was provided the Lowa Zephyr GTX Mid boot to test and here are our thoughts after a few months of use and abuse, at shows, on trails, around camp and hiking.

In-Field Conditions:

  • Trails hiked: 200+ miles
  • Some rock scrambling and general camping use in the desert and mountains
  • 500+ miles of working the pedals of the TAP Media Rig both on and off trail
  • Cold and wet to hot and dry conditions
  • Used with Superfeet Hike Support in-soles (I always replace OEM insoles of every shoe/boot I use)
Lowa, Zephyr GTX Mid, Tap TRAIL Tested, Trail shoes, Trail boots, hiking boots,

Pros:

  • Relatively light and definitely kept my feet warm in wet and cold conditions.
  • Gore-Tex works as described. Editors Note: This boot was used in very wet conditions at Overland Expo West and performed flawlessly.
  • Excellent traction on dry loose and uneven surfaces. Average traction in wet conditions.
  • Great ankle support and a firm hold of the foot when laced tightly.
  • After 7 months of use all seems and stitching has held up as expected. The lugged outsole has worn well.
  • Great looking tactical styling and design (Caveat..see comment below)

Cons:

  • Felt a little stiff straight out of the box and took a couple of weeks to get really comfortable.
  • Sizing slightly larger than expected. I use a 10.5 mens and these felt slightly big. This was overcome by inserting Superfeet in-soles and using thicker socks.
  • The light outsole color may not be for everyone however, the alternative colors of Reed and Beige/Brown are more in-line with a traditional hiking boot. ***Also please note, the in-field photos were taken in bright sunlight and make the shoe look a brighter blue than reality. Our test pair in person, reflect the correct color below.
  • Price $230
Lowa, Zephyr GTX Mid, Tap TRAIL Tested, Trail shoes, Trail boots, hiking boots,

Conclusions:

I’m giving these boots a 4 out of 5 star rating and can definitely recommend them. Overall, they are comfortable and performed to our expectations. At $230 they’re a premium price, however are well made and the obvious quality construction has stood up to our 7 months of use and abuse.

To Buy CLICK HERE

Camping Trailer – Build It Out Yourself!

off-roading, off-road, overlanding, overland, camping trailer, turtleback trailers, build it yourself, overlanding trailers,

My wife once told me that there is nothing wrong with owning two motorcycles – as long as they serve different functions.  That led to the purchase of a KLR650 in addition to my dirt bike.  I promptly pocketed this axiom of wisdom for the future.  Eventually, I decided to see if it would apply to trailers. 

Background

Most of our travel is done in our truck camper – a RAM 3500 Diesel equipped with a Norweld Aluminum Tray and a FourWheelCamper (FWC) Hawk Flatbed Camper.  It is our custom home on wheels and is equipped to take us just about anywhere we want to go.  The under bed and dinette seat storage in the flatbed camper are game changers. Even our dog has ample lounging room among the gear packed in the second seat of the cab.  For an average exploration trip, we lack little. In the event an extra box of firewood or bag of dog food is needed, we have somehow found room.     

But what if we are heading out on a trip that offers opportunities for kayaking, fishing, motorcycle riding or simply an extended stay far from services – like our annual pilgrimage to remote beaches in Baja Mexico?  In this scenario, the truck camper by itself is usually not enough.  Let’s face it; even a few extra six packs of ice cold cerveza mandates a dedicated cooler!  A camping or overland trailer can be a good option if the benefits exceed the burden for you. 

We discovered the need for a camping trailer a decade ago.  At that time, all of our overlanding was done in a Toyota Tacoma equipped with a FWC Fleet slide-in camper.  It was reliable, lightweight and very capable.  But, it did lack storage – especially on longer trips where we bridged the cusps of two seasons.  We eventually tired of moving duffel bags of clothes and gear to free up a little more floor and counter space.  So, we built our first camping trailer.  We sure learned a lot along the way.  The intent of this article is to highlight some design features worth considering if you plan on adding a camping trailer to your own overland stable.     

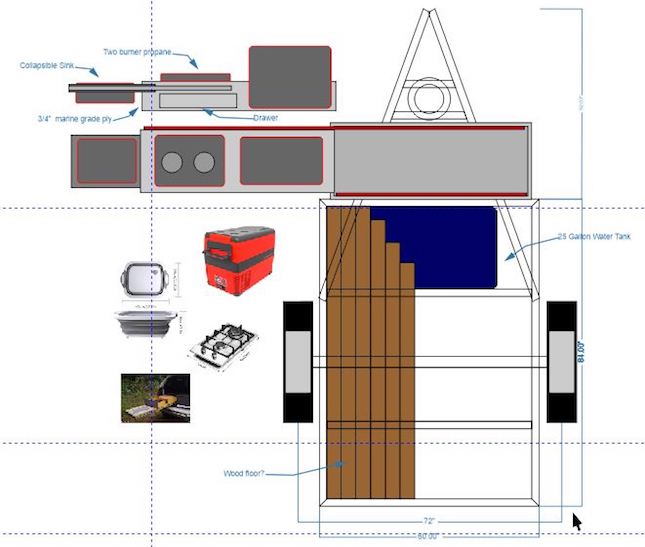
Our first Baja Buggy started out as a semi-custom 4’x7’ heavy duty utility trailer with a 3500 pound rear axle.  It was just the right size to hold two motorcycles without hauling any unnecessary width or length.  It tucked behind our Tacoma/Fleet like a baby opossum to her mom.  Over the years, we modified the camping trailer to include a built-in loading ramp, overhead kayak supports, swing up cooking tables and multiple lock boxes.  We also extended the tongue length to 54” which is approximately two feet longer than most trailers. 

The extra ‘hitch to axle’ pivot length enabled me to back the trailer into the tightest of locations with relative ease.  This is an example of a simple design consideration that allowed us to ‘jack knife’ the trailer in tight situations without damaging the kayaks or the camper.  To further aid backing up on narrow roads, we also added break-away PVC extensions (with orange tips) on the rear of the trailer.      

Aside from the enhancements, we kept notes on a few obvious flaws that would continue to plague the Baja Buggy.  First, the solid axle design proved tougher than the contents.  On several occasions our motorcycles sprung free from their tie downs after hitting a big pothole or rock.  Other times, our kayaks were precariously hanging onto their supports.  The harsh ride and low axle clearance of the buggy prevented our truck from going into some off-the-beaten-path gems.  On washboard roads, our friends said it danced to the ‘jitter buggy’!  Second, storage was limited to three pickup-style aluminum bed boxes.  They worked fine for small items like shoes and helmets, and provided sufficient weatherproofing but security was suspect.  A hard pull on any of the lids could easily expose the contents. 

Consequently, the extra cooler and wood tote were either exposed and secured or left behind.  (I also did not want to tell my wife, who previously proclaimed ‘two can be better than one’ that she had to leave her paddleboard and beach recliner behind!)  Finally, with each modification the weight of the trailer and contents continued to climb.  So, after years of faithful service, we sold our Baja Buggy to a friend.  Although it had faithfully transported our motorcycles, kayaks and gear down the Baja Peninsula on more trips than it had lug nuts, the time had finally come to upgrade.  We began by tabulating some of our key learnings and criteria.   

Our Trailer Criteria
off-roading, off-road, overlanding, overland, camping trailer, turtleback trailers, build it yourself, overlanding trailers,

The operative word is ‘Our’.  There is an abundant number of overland oriented trailers available on the market.  Prices can range from $40K for expedition style trailers (with roof top tents, kitchens, power inverters, slides etc.) down to $10K cargo boxes with an independent suspension.  The choices reflect the many needs of the buyer and their tow vehicle.  For us, the most important criteria was that our new trailer had to complement our truck camper; not be redundant.  We wanted one plus one to equal three; not just two.  We did not need a trailer with a mattress or galley.  It did not need hundreds of watts of solar power or an inverter.  Anything more than a basic solar charging system would be too much. Keeping it simple and practical was our mantra.  Fewer components meant less to maintain or break over rough roads.  Ultimately, we identified the following criteria:

  • Off-road capable independent suspension with high clearance
  • A large and secure weatherproof storage box with two access doors
  • Ability to carry a dual-sport motorcycle and two kayaks
  • On-board auxiliary power and exterior lighting
  • Easy to hitch / unhitch and backup
  • Spare tire and gas can storage

Finally, the trailer quality had to be rock solid from a proven manufacturer.  Once we anchored on this criteria, the playing field was quickly narrowed.

Turtleback Trailers

Our first interaction with Turtleback Trailers (Chandler AZ) was in 2021 at the Overland Expo in Flagstaff Arizona.  Coming off of COVID restrictions, it was an out-of-cycle year-end event and the energy was engaging.  For the first time, Turtleback was showing their new Adventure trailer platform – an elongated and feature-rich version of their Expedition trailer.  It was loaded with options and immediately got the gears turning between my ears.  Thought:  An amalgamation of the longer platform combined with the storage box simplicity of their Getaway model could get us close to what we wanted.  After a few follow-up conversations with their engineering department, Turtleback agreed to build us a custom trailer.  (It turns out they were exploring several similar design options for future products so this was a win-win for both of us.)   

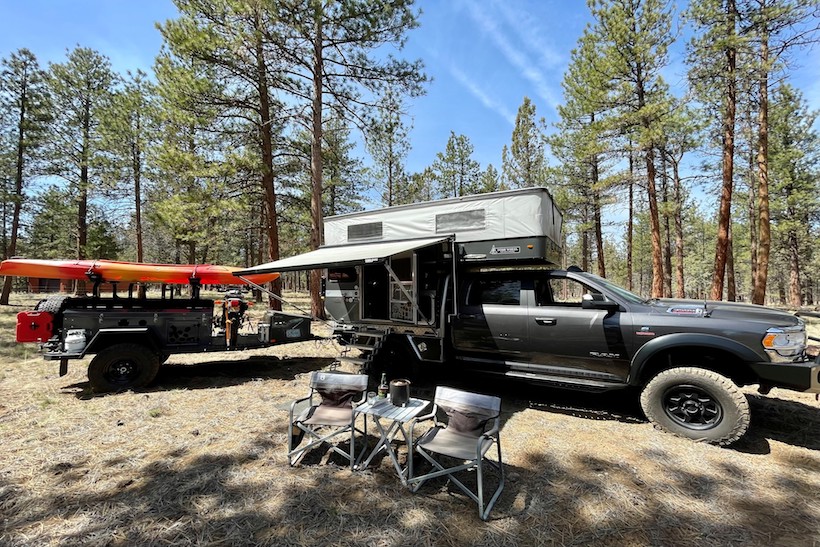
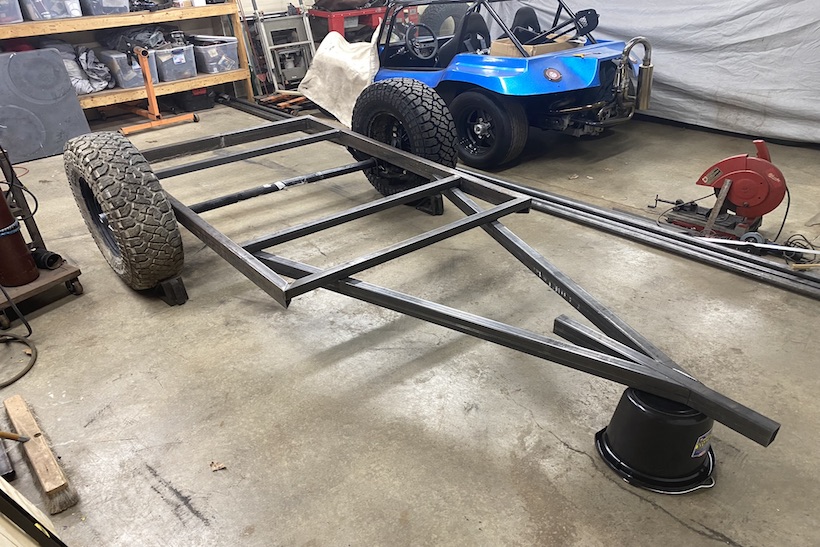
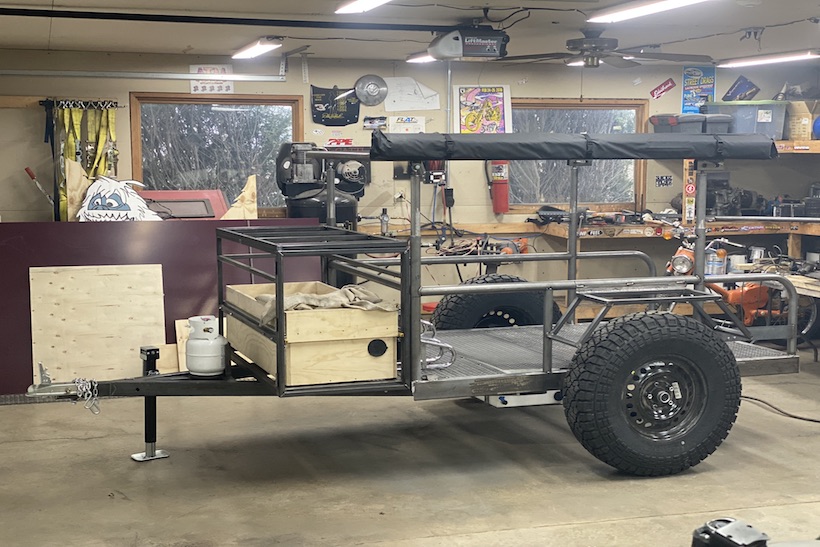
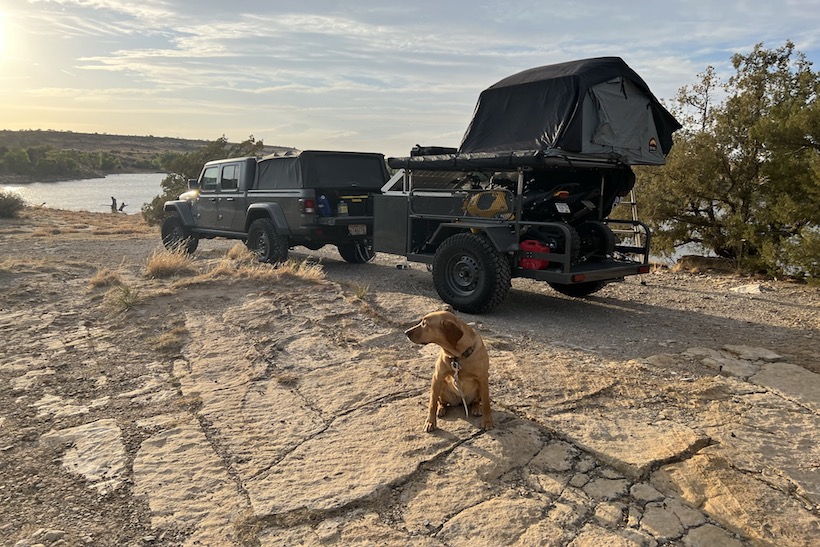
Nate and the team at Turtleback Trailers were easy to work with. Once we firmed up the feature set and made a deposit, the company placed our camping trailer in a relatively short build queue. During the early stages, we established checkpoints to validate the design.  For example, the engineers had to modify the frame structure (between the nose and rear box) to accommodate the motorcycle bay and associated load.  The following list identifies the feature set of our ‘Baja Turtle’.  .  

Trailer Features
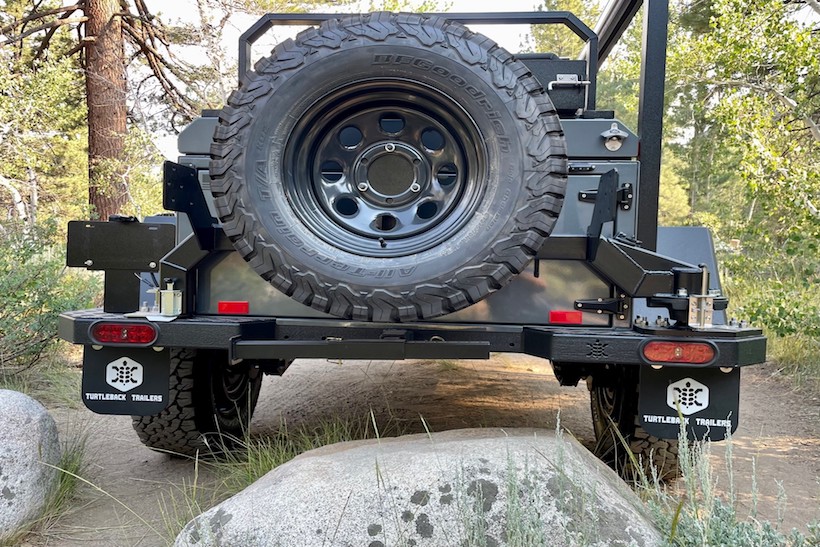
  • Platform and Suspension:  Structural steel construction, corrosion protectant, independent swing arms  
  • Main Storage Box:  6’x4’x2’ (48 cubic feet), HD hinge locking lid with gas-shock lift assist  
  • Front Nose Box:  2’x4’x2’ (16 cubic feet), HD hinge and locking lid 
  • Access Doors:  Small passenger side and large rear; HD hinge and locking (for cooler / quick access)
  • Power and Lights:  12V AGM battery, 100W solar panel, charging plugs and exterior lights  
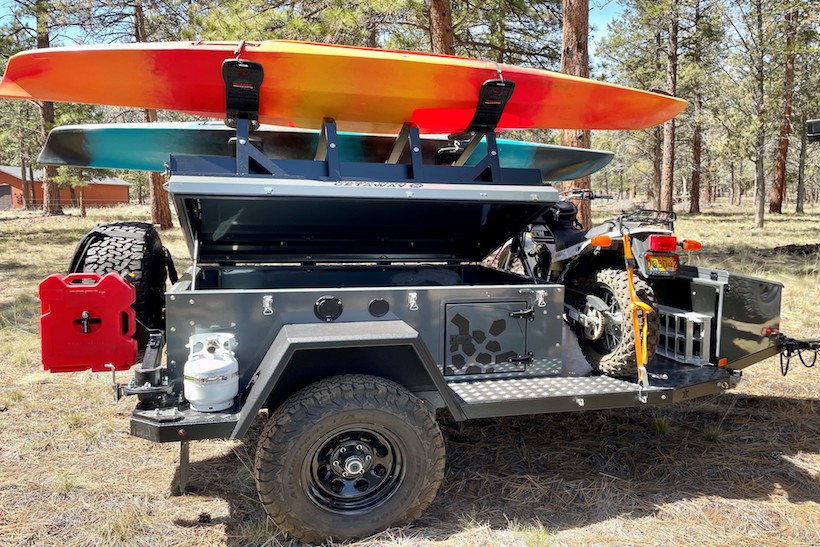
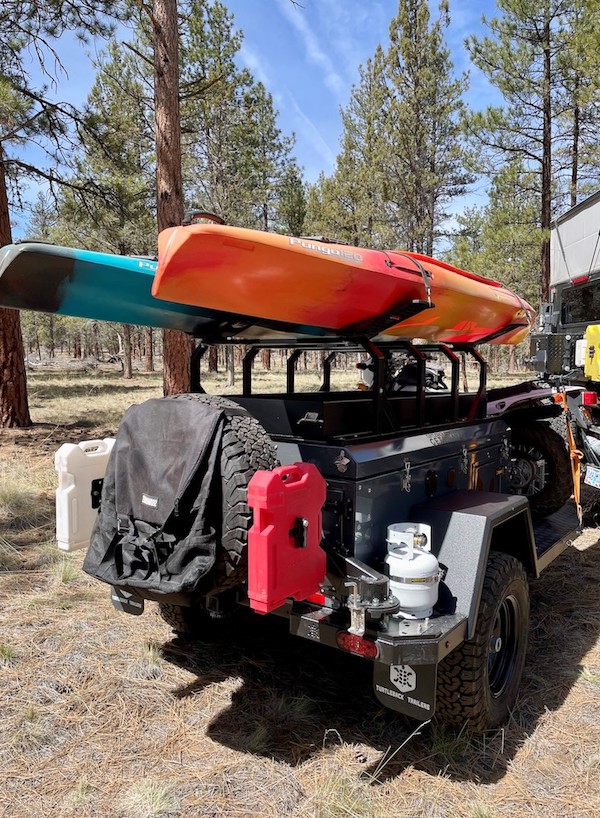
  • Motorcycle Bay:  3’x6’ which accommodates (1) mid-size motorcycle or two camp bikes. 
  • Rear Swing Arm:  Spare tire and (2) Rotopak fuel holders
  • Propane Holder:  Fender mount, passenger side; 5 lb bottle
  • Kayak Rack:  Tall configuration (to clear motorcycle), structural steel, powder coated
  • Kayak Holders:  Malone SeaWing saddle style (owner supplied)      
  • Tires:  BF Goodrich K02 33” 
  • Hitch:  Max Coupler

Note:  Again, it is important to keep in mind that individual requirements will vary.  A feature set that worked for us may be a non-starter for someone else.  

Turtleback trailer, overlanding, overland, off-roading, off-road, camping trailer,
Off-road Experience

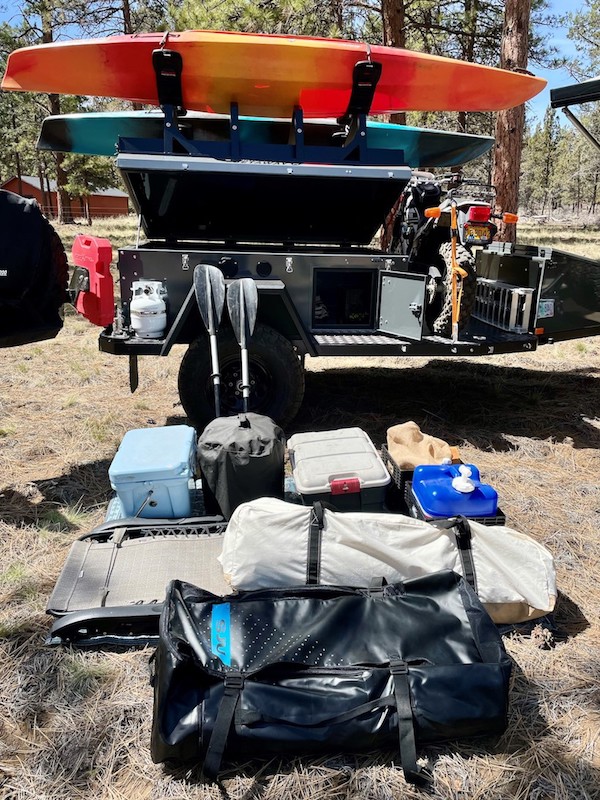
Since taking possession of the trailer last year, we have used it a half-dozen times (albeit on one occasion it hauled firewood in a pinch).  In short, the performance exceeded our expectations.  Certainly a big difference from our old Baja Buggy days.  The gas-shock assist storage box lid is easy to lift and the inside storage is colossal.  A lot of gear can be packed into a total of 64 cubic feet! 

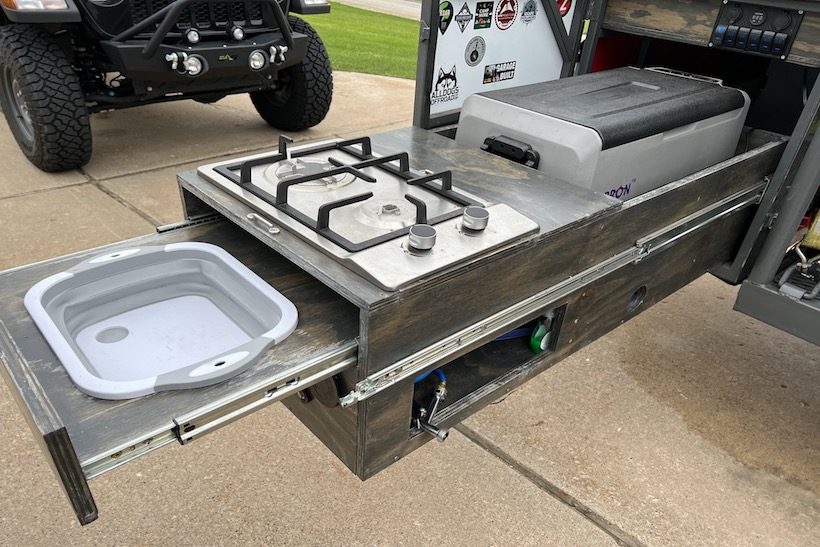
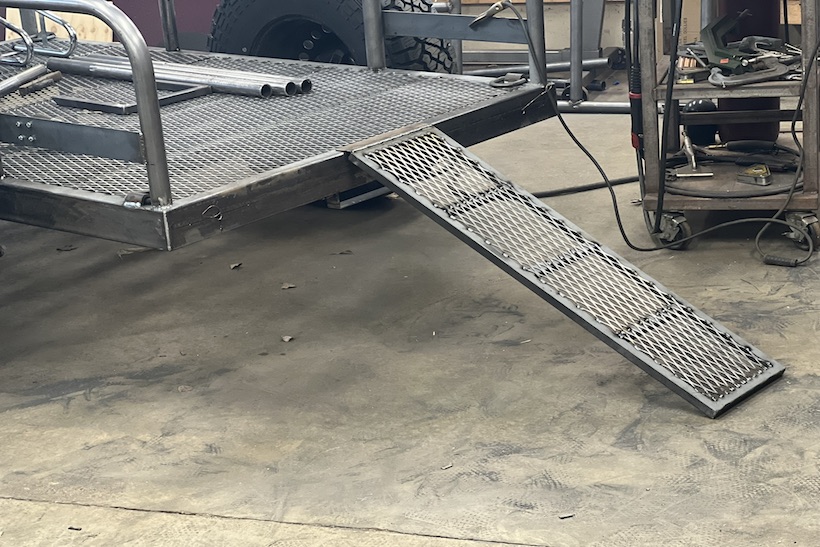
On a recent trip we loaded it with a large tent, chairs, cooking table, Yeti Cooler, Solo Stove, wood tote, paddleboard and extra water.  These were just the big items – all secure and weatherproof.  On the exterior, we tied down the motorcycle and affixed the aluminum motorcycle loading ramp to the back of the nose box.  With the relatively low rack profile, we can easily lift the kayaks onto their support saddles.  Spare fuel containers were added to the rear swing-out rack.

On the highway, the trailer tracked perfectly and was hardly noticeable behind the power of our diesel truck.  Off the road, and after airing down, we were able to glide over wash boards or heavily rutted roads.  Absent was the familiar trailer hop that can affect the handling of a tow vehicle.  This is where the trailer independent suspension and accompanying ground clearance really shined.  Potholes and rocks shrunk under the suspension keeping the motorcycle and kayaks intact.  Except for one very steep trough, that challenged the 3-axis articulation of the Max Coupler, the camping trailer went where the truck could go.

camping gear, turtleback trailer, overlanding, overland, off-roading, off-road, vehicle supported adventure, gear, overlanding gear,
Usage Notes

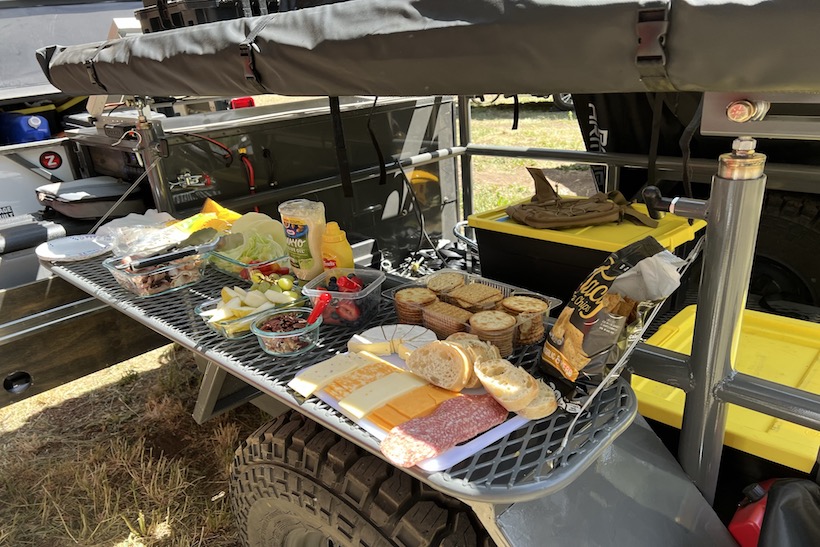
Aside from the incremental cargo capacity, there are a few other advantages of a camping trailer worth noting.  For example, we keep our trailer loaded and ready to roll year round (except for a few changes depending on destination).  Our auxiliary camping gear is all in one place.  Aside from checking water and on-board fuel levels we simply hitch up and go.  Once at a campsite, we often jack-knife the trailer to form a natural patio area outside our camper.  In inclement weather, the trailer can be oriented to serve as a welcomed wind break.  During meals, the trailer also becomes an integral part of meal preparation, serving or an impromptu party.  The large flat surfaces provide convenient access to portable grills, snacks and coolers.  Add an awning and you can quickly increase your shade or rain protection.  

Even the downsides of towing a camping trailer can be mitigated with a little creativity.  Case in point:  When we want to explore ‘trailer-free’ for a few days there are options.  We have found RV campgrounds that will let us park our trailer for several days for a nominal fee.  Combine this with laundry, water and WiFi and it quickly becomes a timely way-point.  Just be sure to add a hitch and/or wheel locks to deter theft.  If inside storage is desirable, ensure that the overall trailer height (including roof top tent or kayaks) will clear a standard garage door.  This will significantly increase your options.  

Ram, Four Wheel Campers, FWC, overlanding, overland, off-road, off-roading, camping trailers, vehicle supported adventure,
Areas for Improvement

Developing a custom camping trailer with CAD drawings, spec sheets and phone calls can be challenging but is a fairly common practice.  Even with experience in design and the best of efforts I soon found areas for improvement that I had not anticipated.  A few simple things that we would do differently include:

  • Move the axle forward by 10”, shifting the center of gravity, making the trailer easier to move by hand when loaded.
  • Increase the rack height by 2” to allow the motorcycle mirrors to more freely clear the bottom of the kayaks.
  • Section the nose box so that the battery, converter, controller etc. is isolated from other gear.          
Summary

Actively participating in the build-out of your own camping trailer can be very satisfying.  Besides meeting your specific needs, it will have your fingerprint on it.  The fine tuning is like an FM dial.  With just the right amount of knob twisting, the vision becomes clear.  You are then ready for the next adventure.

We are nearing spring in Central Oregon.  Snowfall is less frequent and warmer weather is tugging on us with magnetic forces.  Once again, our trailer is loaded to support a longer trip with fewer stops.  Maybe I will find inspiration to write another article while I enjoy a cold beer in a beach recliner.  My wife will not mind.  It will be my chair.  Like our RamHawk and camping trailer.  We get more than double the enjoyment.  One plus one can equal three.  I like this new math!     

__________________________________________________________________________________________________________________

g2bio

Contributor Gary Matos: After spending decades in the high tech industry, Gary and Gretchen stepped out of work and into the outdoors. They reside in Sisters Oregon and when not splitting or stacking wood they enjoy backpacking, kayaking and motorcycle riding.  Over the years, they have owned several pop-up campers and have made over 30 trips to Bajaexico.  Their favorite western states for overlanding are Montana, Idaho and Utah.  They currently have a Ram 3500 equipped with a Four Wheel Hawk Flatbed camper which they custom built.

Building an Overland Trailer from Scratch

overlanding, overland, off-roading, off-road, building, overland trailer, off-road trailer,

“Begin with the end in mind” and “Plan your work, work your plan”. Both often heard phrases in boardrooms around the globe. But not so commonly used in the overlanding space. Sure, no one wants corporate America peeing in our adventure Wheaties, but perhaps these cliche proverbs can be of use. When you are building an overland trailer, especially one designed to keep you alive many miles from civilization, you should indeed have an equally sophisticated plan.

Few years back I was living the overland life in an F250 on 37s, RTT perched on a self-built rack and usually a bike or two in the bed. All good, right up until I needed to exit camp and do some exploring. Nothing is less fun than a total camp teardown. Especially just to set it all back up again a few hours later. Making matters worse was dragging the expensive tent across low hanging branches (rig was pretty tall). The  Solution? Well, a trailer of course and this is where “beginning with the end in mind” comes into play. After setting up the aforementioned camp for the third time in as many days, I spent a long evening sketching out a new plan for overlanding nirvana. 

Fundamentally, I knew I’d want to run the same tires on the trailer as my rig (eliminating need for two spares). It would also need to haul small motorcycles. Groms are the ultimate overland tender and maybe a mountain bike or two. I was coveting a slide-out kitchen I had seen at a recent Overland Expo. I wanted to incorporate that into the trailer as well. The rig would need to live autonomously for days at a time. So a healthy battery and solar would also be mandatory.

Additionally, I had just adopted a Lab puppy. So the tent would need to live at a reasonable height in order to heft her rapidly growing floof into our intended sleeping quarters! Within 60 days I was well into the “planning my work” stage. Pencil sketches had evolved into detailed technical drawings with one significant takeaway. In an unanticipated departure in my original strategy, I would not be able to base the build on an existing trailer platform. 

Here’s the deal, military or utility are pretty much the two basic options when it comes to trailer platforms for this size and application. Surplus trailers are likely going to be durable enough. But the WW2 stuff (M100 generation) are tiny. And the newer units are extremely tall and shockingly heavy (a M1101 comes in just under 1500 lbs empty).

So maybe a cheap utility trailer? I took a hard look at this option, even wheeling one into the garage to start the project with. The chassis construction was a few clicks above angle iron, spindly axle was unlikely to survive off road and would certainly not tolerate a 35” tire and many of these things utilize slipper springs (eyelet on one end, slider on the other). I promptly returned this unit to the side yard. Where it would spend the remainder of its life transporting lawn mowers and yard debris. There was no chance it would live up to the end I had in mind. 

overlanding, overland, off-roading, off-road, building, overland trailer, off-road trailer,

It was soon obvious a scratch build was going to be the best option. I’m not a professional fabricator, so this was a daunting outcome. Around the same time, rising fuel costs prompted a switch from the F250 to a Gladiator. This made trailer weight an even more significant factor in the build plan. I like the stance and usability of 35” tires and decided both rig and trailer would sport the narrow Kenda Klever R/Ts. I also didn’t want a trailer with a high platform (you may recall the dog and Grom loading challenges). So this created a logistical problem. The answer turned out to be a 3500 lb, 4” drop axle with a 5×5 bolt pattern to match the Jeep.

After a bit of research, the axle procurement ended up being an easy and relatively inexpensive purchase through Ebay. Bolt up a set of wheels (allotting for substantial negative offset of factory Jeep rim). Whatever fits comfortably in the middle would now be the width of the platform. A couple of other things were factored in. I wanted a bunch of water. So a 25-gallon RV water tank would reside just in front of the axle but below the deck to keep the center of gravity low. The platform itself would need to be 7 feet long to accommodate small and medium-sized motorcycles as well as gear bins.

overlanding, overland, off-roading, off-road, building, overland trailer, off-road trailer,

Next challenge was the kitchen layout. All the cool kids seemed to be building a box of some sort and the dimensions of the fridge would define a lot of the dimensions of said box. Total width would naturally match the platform and the box would be roughly 24” deep. After a little research I framed it in 1” square steel tube and skinned the box with adhesive mounted aluminum (similar to an enclosed trailer).

End result is a durable and relatively light structure. Heavy duty hinges adorn the side door as well as top access point. The box would also house all the electronics, including fuse array, inverter, kill switch, solar controller and USB ports with a 100 watt solar panel perched on top of it. A 100 amp hour gel battery would power all of this (I love lithium, but the cost is painful). A simple two burner propane stove top and a pop out sink rounds out the kitchen with water pressure delivered via a 3.5 GPM 45 PSI pump living next to the water tank. 

overlanding, overland, off-roading, off-road, building, overland trailer, off-road trailer, camping food,

Kitchens require counter space. So a simple fold down table constructed out of the same expanded steel as the trailer floor, does the job. Next up would be hot water via a Camplux 1.32 GPM water heater housed in a Harbor Freight Apache 4800 weatherproof case. What about cold weather? Well, the Pelican case at the front of the upper rack not only stores the Trasharoo and other tools, but also houses a 5KW Vevor diesel heater. When needed, we plumb the duct and thermostat into the adjacent tent. 

overlanding, overland, off-roading, off-road, building, overland trailer, off-road trailer, camping kitchen,

We probably overthought (overplanned?) a couple of things, including the upper rack with 12” of height adjustment. We achieved this using giant rod ends and stainless sliders surrounded by brass bushings. I did say it was overthought, right?. Since the dog didn’t end up particularly big, we rarely utilize this feature. Twenty five gallons of water is also probably overkill (208 lbs!), but has proven to be quite a blessing on some of the more remote trips. The 1000 watt inverter seemed like a must have, but so far usage has been a one time hair curling demand from the Mrs.  

overlanding, overland, off-roading, off-road, building, overland trailer, off-road trailer, stainless sliders,

Other features have been amazing. A pair of repurposed motorcycle shocks keep the trailer running stable even under the harshest roads. This is a must have for any off-road trailer build. The solar panel, although a medium sized unit, has never let me down and kept the battery well above twelve volts during multiple days of off-grid usage running lights, pump and fridge. Built in ramp, once again utilizing the expanded steel is very handy and the Hebron 47 qt, dual zone fridge has performed flawlessly across the last two years. Bonus points for a slick app that lets me check temps without opening up the kitchen box. 

overlanding, overland, off-roading, off-road, building and overland trailer, overland trailer, overland ramp,

We color matched the entire cacophony of steel to the Jeep in Chrysler Sting Gray. With several of the forward-facing surfaces coated in Raptor liner tinted in the same shade. The trailer is now at the tail end of its second season and has traveled through 14 states and Canada. It’s performed exactly as planned with only minor tweaks along the way. I credit much of that to having a solid usage plan.

If you’re bold enough to build your own rig (and I know many of you are!), sketch that idea out. List the features you want and measure everything. You can even get technical and use SketchUp or a similar design app (oddly enough, I did this in CorelDraw). Most importantly, have a plan. Even basic pencil drawings will get you there. It took six months of weekends to build this trailer, but that was preceded by four months of design work. End in mind, indeed and my end in this scenario is the flexibility to leave basecamp behind, bug out at the drop of a hat (all the camping gear lives in bins in the trailer) and have a good time off-grid. Mission accomplished. 

_____________________________________________________________________

Screen Shot 2023 09 29 at 12.42.37 PM 1 2

Contributor David Zemla: Dave is a native of California, now living in the wilds of Wisconsin. He has been writing about his two and four wheeled antics for the last few decades. He travels with his yellow Lab, Ranger and on occasion his wife Apryl. As of late he can be found dreaming about building a Mitsubishi Fuso Overland rig. 

Industry News: FWC New Dealership In MO

four wheel pop up campers
four wheel campers

Four Wheel Campers, the leading manufacturer of pop-up truck campers, is excited to announce the addition of a new camper dealership in Grandview, MO!  Since 2015 Adventure Motors has been their region’s best source for vehicle outfitting and overland gear. Four Wheel Campers is excited that Michael Fuller and his team are part of the FWC dealership network. Adventure Motors will be managing new camper sales, installations, parts, and service work.

Four Wheel Campers customers explore challenging and remote back-country terrain, mountains, lakes, and rivers. In January or February 2024 Adventure Motors will have campers on display for people to see, and will help them begin planning their next adventure!

Adventure Motors  

Outfitting@adventure-motors.com
816-824-4892

13906 Norby Rd. 

Grandview, MO 64030 
 

Sign up for our newsletter and TAP into Adventure!